background image

DS1097-010


85


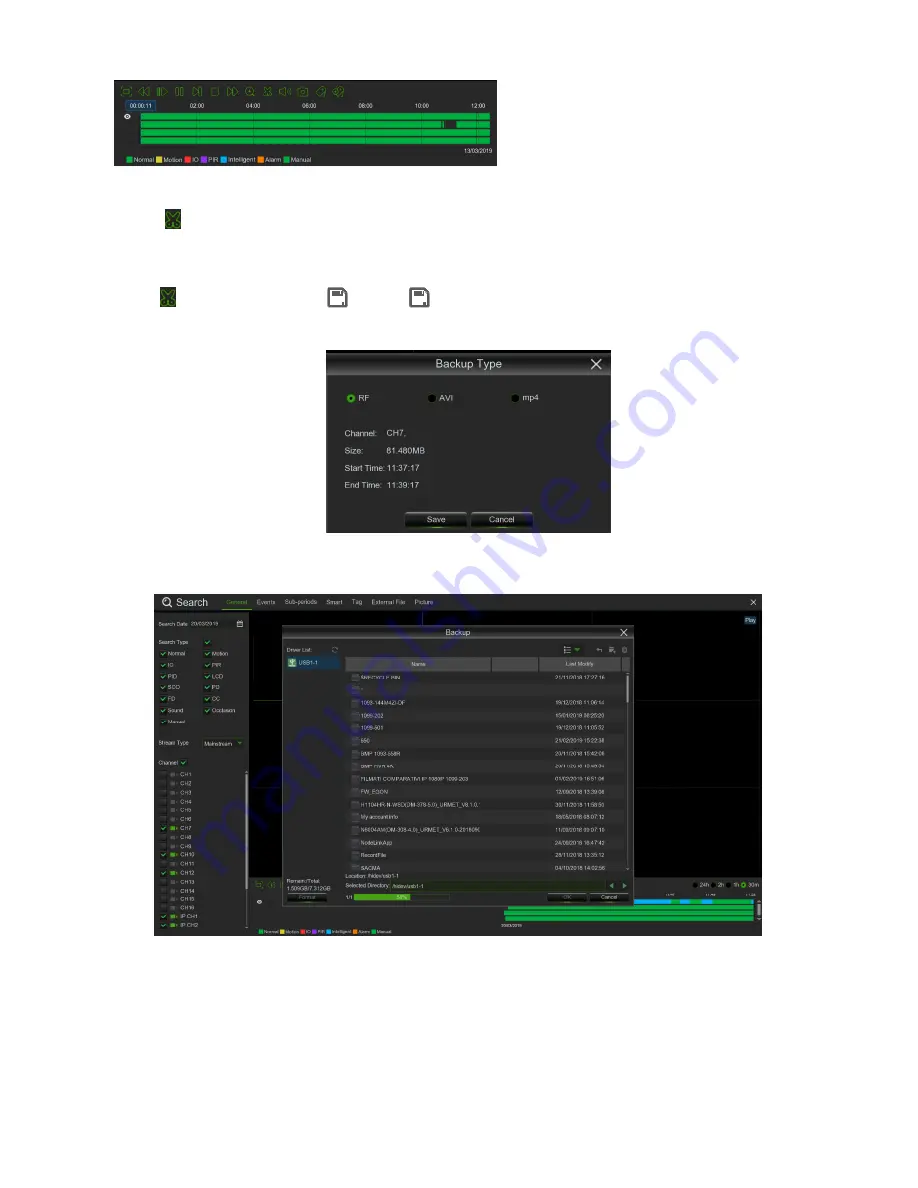
3.11.2.1  Video Clip Backup 


  Insert your USB flash or USB DVD Writer drive to the HVR. 

  Start a video recording playback. 

  Click 

 icon. 

  Check the channel(s) you want to make a video clip backup. 

  Move the mouse cursor to the timeline where you want to start the video clip. 

  Press and hold the left button of your mouse, and drag the drag the cursor to the timeline where you want to end the 

video clip. 

  The 

 icon has been changed to 

 icon, click 

 to save the video clip. 

  Select a file type for your backup files, click 

Save

 button to save the video clips. Please make sure your USB driver 

has enough space to save the video clips. 


  The backup drive menu appears. Navigate to the folder you want the backup files to save in. 

  Click 

OK

 to begin. The progress bar at the bottom of the window shows you the progress of the backup. 


Summary of Contents for 1097/564

Page 1: ...R WITH HDMI Hybrid HVR 5M LITE 4K Series 5M Lite HVR Series 4 Can Sch 1097 564 8 Can Sch 1097 568 16 Can Sch 1097 566 4K HVR Series 4 Can Sch 1097 604 8 Can Sch 1097 608 4K HVR Series 16 Can Sch 1097...

Page 2: ...nnection Diagram 15 3 HVR OSD Menu Settings 16 3 1 First HVR Login 16 3 2 Live Interface and Pop up Menu 17 3 2 1 Taskbar 18 3 2 2 Camera Quick Toolbar 18 3 2 3 Shutdown Reboot Lock Screen Menu 19 3 2...

Page 3: ...1 2 Disk Group 67 3 9 1 3 S M A R T Self Monitoring Analysis and Reporting Technology information 68 3 9 2 Cloud Storage 68 3 10 System 69 3 10 1 General 69 3 10 1 1 General Settings 69 3 10 1 2 Date...

Page 4: ...7 1 Display Configuration 103 5 7 2 Record 109 5 7 3 Alarm Set 110 5 7 4 Network Parameters 112 5 7 5 Device 117 5 7 6 System 118 5 8 Local Setting 121 5 9 Logout 121 6 Mobile Software 122 6 1 Smartph...

Page 5: ...and Android platforms DDNS function P2P function available for Urmet UVS Client and Mobile Urmet iUVS RTSP function FTP function with the possibility to save event images videos on FTP server Cloud f...

Page 6: ...time monitoring Double video output with monitor VGA virtual output port or HDMI Output Support URMET UVS Client Software and MP live surveillance and also support zoom in out auto sequence and PIP di...

Page 7: ...using faults Do not cover the device with a cloth while it is running to prevent deforming the external casing and overheating the internal parts risk of fire electrocution and mechanical failure Keep...

Page 8: ...d description 1 Power indicator PWR When the green LED is on it means that the NVR is powered correctly 2 IR receiver Receives the IR signal from the remote control 3 Hard disk indicator HDD When the...

Page 9: ...Output Audio output RCA interface 4 USB Port Connect USB mouse 5 HDMI Port Connect to HDMI monitor 6 VGA Port Connect to VGA monitor such as PC monitor 7 PIN RS485 Sensor Alarms RS485 Sensor Alarm in...

Page 10: ...Audio output RCA interface 4 USB Port Connect USB mouse 5 HDMI Port Connect to HDMI monitor 6 VGA Port Connect to VGA monitor such as PC monitor 7 PIN RS485 Sensor Alarms RS485 Sensor Alarm interface...

Page 11: ...io output RCA interface 4 USB Port Connect USB mouse 5 HDMI Port Connect to HDMI monitor 6 VGA Port Connect to VGA monitor such as PC monitor 7 PIN RS485 Sensor Alarms RS485 Sensor Alarm interface see...

Page 12: ...ut Audio output RCA interface 5 USB Port Connect USB mouse 6 HDMI Port Connect to HDMI monitor 7 VGA Port Connect to VGA monitor such as PC monitor 8 PIN RS485 Sensor Alarms RS485 Sensor Alarm interfa...

Page 13: ...me Button function 1 1 8 Channel 1 8 selection numeric button 2 9 0 Number buttons Pressing buttons 9 and 0 has no effect 3 ALL Multiple viewing mode 4 Menu Open close main menu 5 MUTE Mute mode on of...

Page 14: ...to adjust the respective values Click on the combo box to access the drop down menu Click to select the values in the specific combo boxes This activates the drop down menu for support to enter Chine...

Page 15: ...DS1097 010 15 2 7 CONNECTION DIAGRAM Note Above diagram is for reference only The practical connection may be different depending on the HVR you purchased Speaker...

Page 16: ...evice ID in the parentheses Default ID is 000000 New Admin Name To set your own administrator name Password Strength it shows how is safe the password edited New Admin Password To set your own passwor...

Page 17: ...detected motion PIR This icon appears when the camera has detected PIR event S This icon appears when the camera has detected intelligent video analysis The icon indicates that the external I O alarm...

Page 18: ...and network state 3 2 2 CAMERA QUICK TOOLBAR In live viewing click the left button of your mouse on a connected camera to display the Camera Quick Toolbar AHD Camera Quick Toolbar IP Camera Quick Too...

Page 19: ...viewing screen will be disappeared You will need to login in the system again for further operations After edit the Password in order to re login to system press Unlock button for login again If press...

Page 20: ...PTZ AHD IP Camera 2 Type Select the PTZ UTC Preset Control Camera 3 Pointer Panel A Click to Start Stop PTZ B Click up down left right to set cruise of PTZ camera 4 Speed Adjust the PTZ speed 5 ZOOM Z...

Page 21: ...pressing the central enter button using the arrows buttons you navigate the menu The last choice of the menu allows to save and exit from menu IMPORTANT NOTE The UTC function can be used according to...

Page 22: ...tton to view tools bar the Add Customized Tag icon is Click is show then click is OK Set the Tag once the Tag can record one minute this is default Tag name may the edit for example Notice User can to...

Page 23: ...art Menu Setup Search Tag into the Tag event search page then set Start Time End Time and Channel click the all Tag event list is show Playback Click to playback Tag record event Edit Click to edit th...

Page 24: ...e organised by type following the order shown in the following diagram Main Menu Channel Capture Capture Capture Schedule IP Channels Analog Channels Protocol Manage PTZ Channel LCD PID SOD FD PD Live...

Page 25: ...ork Configuration Cloud Disk Manage IP Filter LCD PID SOD FD PD Sound Detection CC Occlusion Detection Network Settings PTZ Linkage Intelligent Exception PPPOE General Settings 3G Wireless SNMP Port C...

Page 26: ...Date and Time Output Configuration Multi Users Settings Maintenance Settings Load Default Log Upgrade Auto Reboot Parameter Management IP Camera Maintain Upgrade Load Default Reboot IPC Information Ch...

Page 27: ...p which appears in the lower part of the screen As mentioned above the Main Menu can be used to manage the device setup parameters search for images recorded by the HVR access advance settings shut do...

Page 28: ...d to enable or exclude one or more analogue channels NOTE For each disabled analogue channel and for each added IP channel the bandwidth will be increased by additional 4Mbps for 5M Lite HVR Series an...

Page 29: ...added IP cameras Channel Delete Choose one or more added IP cameras and click this button to delete Manual Mode When set to Manual Mode the user can delete or add the network IPC Auto Mode When set t...

Page 30: ...the user typing a different numeric value Resource path Copy the resource path used for the VLC software VideoLAN Client the multimedia player used to view the camera video stream installed in the PC...

Page 31: ...Channel name Setup Click icon into the setup page Choose a channel to configure Give a name to the camera Date format to display for the camera for IP camera only Time format to display for the camer...

Page 32: ...DataBit are 8 7 6 5 the available parameters for the StopBit are 1 or 2 Parity For error check See the documentation of your PTZ capable camera to configure this setting Cruise Enable to use the Cruis...

Page 33: ...alert you to a potential threat at your home It does this by sending you an email alert with an attached image from the camera to use as a reference if this option is enabled and or sending push notif...

Page 34: ...e the methods and actions to be taken in case of motion alarm detection Click PIR button Then click setup to configure the motion detection PIR function Show is Analog Channel and IP Cannel Setup moni...

Page 35: ...s describing improvements to the intelligent video analysis algorithms 3 5 8 1 PID Perimeter Intrusion Detection Perimeter Intrusion Detection function detects people vehicle or other objects which en...

Page 36: ...on from side B to side A A B HVR will detect the action from either side B to side A or side A to side B Use your mouse to click 4 points in the camera picture to draw a virtual region The sharp of th...

Page 37: ...choose the scene to match with the place your camera installed IVA Lines Enable or disable the IVA Lines Post Recording You can set how long after an event occurs that the HVR will continue to record...

Page 38: ...ove All will delete all lines Notice o The lines shall not be too close to the edges of the camera picture to avoid any failure to trigger an alarm when the target cross through it o The lines shall n...

Page 39: ...SOD function To enable the detection in Rule Switch Choose a Rule Type Legacy HVR will only detect the left over objects Lost HVR will only detect the lost objects Legacy Lost HVR will detect both lef...

Page 40: ...or and Outdoor Please choose the scene to match with the place your camera installed Post Recording You can set how long after an event occurs that the HVR will continue to record Latch Time To config...

Page 41: ...faces of moving people appear in a pre defined region and a series of actions can be taken when the alarm is triggered Channel to select the channel you want to configure Enable to enable or disable t...

Page 42: ...ounting function counts the times for moving objects or people across the virtual lines Channel to select the channel you want to configure Switch to enable or disable the CC function Buzzer to disabl...

Page 43: ...anged to red color Long press the left button of your mouse to move the line or drag the terminals to modify the length or position of the line If you want to remove one of the lines from the camera p...

Page 44: ...able the Sound Detection function Rise To enable or disable the Rise function of Sound Detection Rise Sensitivity To setup the Rise Sensitivity within 0 100 default is 50 Sound intensity To setup the...

Page 45: ...uld be unavailable It depends from Camera Model if supports this function or not 3 5 8 9 Intelligent Schedule In order to active the intelligent function you need to config the schedule The schedule w...

Page 46: ...ub menu Encode Record Capture 3 6 1 ENCODE This menu allows you to configure the recording video or network transmission picture quality Generaly Main Stream defines the recording video quanlity which...

Page 47: ...only for IP Channels it s possible to set I Frame values for IP channels ETR only for AHD Channels Main Stream separate settings use for motion recordings Once ETR enabled the motion detection will be...

Page 48: ...ave your settings Channel Select the channel to set its recording parameters Normal When the time slot is marked green this indicates the channel performs normal recording for that time slot Motion Wh...

Page 49: ...channel 3 6 3 2 Capture Schedule Capture Schedule can be used to configure the times and days of the week during which the capture function must be operational Channel Select the channel to set its r...

Page 50: ...will last when motion is detected 10sec 20sec 40sec and 60sec Record Channel this is used to select the channels to be recorded following the alarm detected by the HVR from the list shown Post Record...

Page 51: ...ect the channels to be recorded following the PIR detected by the HVR from the list shown Post Recording you can set how long alarm record will last when PIR alarm ends 10sec 30sec 1min 2min 5min Show...

Page 52: ...st Recording you can set how long alarm record will last when alarm ends 10sec 30sec 1min 2min 5min Show Message You can set show the icon on the screen when sensor alarm is detected About icons type...

Page 53: ...10sec 20sec 40sec 60sec Alarm Out allow to match the correct external alarm sensor number Latch time you can set how long the external sensor alarm will last when Intelligent Event is detected 10sec 2...

Page 54: ...her channel or all channels Default allow to restore the Default notification settings 3 7 2 PTZ LINKAGE A connection may be established between a Speed Dome Camera if present and the Motion Detection...

Page 55: ...R support to connect external alarm device Show Message Check the box to display a message on the screen when No Space on Disk Disk Error or Video Loss event happens About icons type please refer to s...

Page 56: ...Settings This menu allows to set WLAN Network settings If you connect to a router allows to use DHCP please check the DHCP box The router will assign automatically all the network parameters for your...

Page 57: ...to the network more directly via DSL modem Check the Enable PPPOE box and then enter the User name Password of the PPPoE Click Apply to save system will reboot to active the PPPoE setting 3 8 1 3 3G F...

Page 58: ...twork manage protocol open source protocol SNMP can check the device basic parameter like IP Hardware information Software information 3 8 1 5 Wireless For future use Wireless HVR connects with wirele...

Page 59: ...ding on your router If your router does not support UPnP make sure the port forwarding is completed manually 3 8 2 DDNS SET DDNS or Dynamic DNS see the glossary for more information is a service that...

Page 60: ...no ip com or DDNS Account for payment at the web www dyndns org You can register on DDNS Service website and get a domain name user name and password The options to configure are Server select DDNS p...

Page 61: ...dress should be consistent with the server you use That is to say when you use email address aaa gmail com the according server should be smtp gmail com Receiver1 this indicates the email address of t...

Page 62: ...alysis detection PIR use this option to define the times at which to enable sending in case of automatic PIR detection Default Restore the Schedule default settings Copy this is used to copy the curre...

Page 63: ...EST FTP click on the FTP TEST button to check operation of the configuration 3 8 4 2 FTP Schedule This configuration page can be used as seen in the other cases to select on which times and days of th...

Page 64: ...you able to setup the Whitelist and Blacklist Enable Whitelists Whitelist default is enable first to check Enable after you may to setup Start Address and End Address of the White List You may set Si...

Page 65: ...is show below Edit Click to edit Start Address and End Address you may set one or several Address for Single Add Delete Click the Warning dialog box is show click OK the Address list is delete Enable...

Page 66: ...en HVR is connected to a HDD the system will automatically detect if HDD is normal or not If the cable connected to HDD is loosen or HDD is not working correctly HDD status will be shown as No Disk or...

Page 67: ...mat HDD button Record On ESATA If enabled this allows video files to be recorded on the external HDD connected to the ESATA External Serial Advanced Technology Attachment port on the rear panel of the...

Page 68: ...d respective results with respective reference values The information is mainly for use by expert personnel 3 9 2 CLOUD STORAGE The HVR can transfer the images and video shot by cameras in case of ala...

Page 69: ...to control only the HVR with ID 111111 you can input the Device ID 111111 in login page with remote controller for further operations Language Select a language you would like the system menus to be d...

Page 70: ...x 6fps 1097 608 AHD 1080p AHD 4M AHD 5M AHD 4K 5M DVR Max 25fps Max 17fps Max 14fps N D 5M XVR Max 25fps Max 17fps Max 13fps N D 4K DVR Max 25fps Max 15fps Max 10fps Max 8fps 4K XVR Max 25fps Max 15fp...

Page 71: ...light Saving has increased by in your time zone This refers to the difference in minutes between Coordinated Universal Time UTC and the local time Daylight Saving Time Week Select the month a particul...

Page 72: ...R supports 4K output resolution you can select either 2K 2560 x 1440 or 4K 3840 x 2160 to take advantage of the higher resolution that your 4K TV provides Scale and Offset The HVR supports to adjust t...

Page 73: ...t1 Layout4 Layout9 Layout10 Layout10 1 Layout12 Layout13 Layout13 1 Layout14 Layout16 Layout19 Layout20 Layout22 SEQ Dwell Time cyclic rotation function time interval The default setting is 5 seconds...

Page 74: ...ble the password to protect your privacy If you want to disable the password protection please ensure your HVR is placed in a secure place 4 Add New Users Select one of the user accounts that is curre...

Page 75: ...ions You can enable or disable access to certain menus and functions of each user account Click the edit icon under Permission tab Check the boxes next to any system menus or capabilities you would li...

Page 76: ...te End Time to choose the end date time for your search from the on screen calendar Select the type of events you would like to search for from the dropdown next to Log Type or select All to see the e...

Page 77: ...hoose all items Click Apply to load default settings of your chosen items 3 10 3 3 Upgrade This function allows to upgrade the HVR firmware Copy the firmware file sw file to your USB drive and insert...

Page 78: ...nother HVR Click Load Settings button to navigate to the system settings file you want to import from your USB flash driver You will be required to input the Admin password to authenticate Upload this...

Page 79: ...SB flash drive then click OK Click IPC Upgrade button to start upgrading You will be required to input the Admin password to authenticate Please do NOT power off the HVR and IP camera or remove the US...

Page 80: ...be rebooted 3 10 5 SYSTEM INFORMATION This menu allows you to view the system information channel information record information network status 3 10 5 1 Information View system information such as de...

Page 81: ...each connected camera such as alias mainstream and substream recording specifications motion detection status privacy zone 3 10 5 3 Record Information View recording information for each connected cam...

Page 82: ...DS1097 010 82 3 10 5 4 Network State View network information Total Band Width It shows the HVR s total input band width for IP cameras Used Band Width It shows the used band width of IP cameras...

Page 83: ...o narrow your search 4 Channel Selection to choose the channels you want to search play 5 Video Playback Controls to control the video playback Enlarge the video playback to full screen Rewind x2 x4 x...

Page 84: ...or Alarm Recording in Orange color Manual Recording in Green color 7 Playback Status display the video play status 3 11 2 SEARCH PLAY VIDEO IN GENERAL This menu gives an option to search play recordin...

Page 85: ...of your mouse and drag the drag the cursor to the timeline where you want to end the video clip The icon has been changed to icon click to save the video clip Select a file type for your backup files...

Page 86: ...ls you want to search or check Channel to choose all channels 4 Click icon to start search 5 Events fitting your search criteria are displayed in list form You can double click the left button of your...

Page 87: ...l size information will be displayed at the right bottom of the screen 11 After selecting file you can click icon to save the video to USB flash drive or USB DVD Writer Or click icon into event playba...

Page 88: ...ypes you want to search or check Search Type to choose all 4 Choose the channels you want to search Please note that this function only supports to search play one channel at a time 5 Click the play b...

Page 89: ...to choose all 4 Choose the channels you want to search Please note that this function only supports to search play one channel at a time 5 Click the play button to start playing Control the playback w...

Page 90: ...ive or USB DVD Writer To search play back up pictures 1 Choose the date time you want to search 2 Check the picture capture types you want to search or check Search Type to choose all 3 Choose the cha...

Page 91: ...view You can view the details of the events 8 When you click the left button of your mouse upon one of the pictures system will show the picture information on the left bottom corner of the screen 9...

Page 92: ...on to view the pictures in slideshow 3 Press button to exit preview control window and go back to picture search window Press button to pause press to resume slideshow Press button to display previous...

Page 93: ...Minimum System Requirements Intel Pentium 4 or above Microsoft Windows XP Vista 7 8 10 256MB RAM 16MB video memory 1 Install the Video Player software in the CD and run 2 Copy the backup files to your...

Page 94: ...4 and 1 8 1 16 speed Fast Forward x2 x4 x8 and x16 4 Volume control Multi screen play It allows to play multiple videos at a time When you choose multi screen you can drag the video in Play List to t...

Page 95: ...DS1097 010 95 Capture Settings Set the format and the path to save snapshots...

Page 96: ...on HVR in the URL box 2 For the first time you run the web client system will require to install the web client plugin Click download to download the plugin and install to your computer Item Minimum...

Page 97: ...e If you use Google Chrome please use Version V41 or below If you use V42 to V44 you need to enable NPAPI plugins Please enter chrome flags enable npapi on URL bar to find and enable NPAPI It doesn t...

Page 98: ...IP address of the HVR needs to be entered as follows http IP Address e g http 192 168 36 40 o Direct access via URMET DDNS web portal start Internet Explorer and enter the address of the URMET portal...

Page 99: ...w record video to local computer manually take snapshots of the screens PTZ control color adjustment etc 1 Channel List Open the channel list for quick camera function Click button to display the Chan...

Page 100: ...functions of the HVR setting menus Local Settings Set download locations for recordings and snapshots taken using Web Client and choose file type for video files 4 Information Hover over to see system...

Page 101: ...apshots of all current displayed channels to your computer Digital Zoom Click upon on a live image then click and drag over an area of the live image to enlarge Right click to return to the normal dis...

Page 102: ...Synchronous playback to play all channels at once 6 Click Search 7 Recordings that fit your search will be displayed in the timeline Click a section of video where you would like to begin playback and...

Page 103: ...upon on a playing video then click and drag over an area of the video to enlarge Right click to return to the normal display Original Proportions Shows the playing video at the original proportions S...

Page 104: ...cted to LAN using the Auto Assign Channels button 3 Manage Protocol The Protocol Manage function manages the RTSP Protocol Settings This function allows to connect and control Live Preview IP Camera c...

Page 105: ...DS1097 010 105 5 Image Control if supported by IP Camera Model it is possible to set the IP Camera Parameters where possible 6 PTZ it is possible to set the correct PTZ settings for PTZ control...

Page 106: ...configure Sensitivity and set the Area Details setting should be consistent with HVR local setting 8 PIR Detection allow to configure Sensitivity and set the Area about PIR Detection Detail Settings s...

Page 107: ...rner 10 Intelligent you can set the video Intelligent analysis functions and their Schedule and Log For further details on the use and settings of the intelligent video analysis functions you are reco...

Page 108: ...DS1097 010 108 Note o The Sound Detection function is unavailable This function depends from Camera Model and it must be supported by camera in order to set it...

Page 109: ...as shown in Pictures below The relevant parameters should be consistent with HVR local setting 2 Record Under Record parameters option allow you set channel record enable pack time and Pre record sta...

Page 110: ...stands for Motion detection Red stands for I O triggered record Violet for PIR Detection 5 7 3 ALARM SET You can set the notifications i e Buzzer Latch Time Post Recording Send Email Show Message Ful...

Page 111: ...DS1097 010 111 Note o The Sound Detection function is unavailable This function depends from Camera Model and it must be supported by camera in order to set it...

Page 112: ...configuration 1 The model support three network type including Static DHCP and PPPoE Static User could allocate IP and perform Port forwarding for HVR according to different router When set UPNP to O...

Page 113: ...ault DHCP as its network type Set network type to DHCP shown as below Relative parameters should be consistent with HVR local setting Set network type to PPPoE Its user name and password should be con...

Page 114: ...DS1097 010 114 2 3G Wireless SNMP setting for future use 3 Port Configuration it is possible to set the Port Configuration i e Data Port HTTP Port...

Page 115: ...ils setting should be consistent with HVR local setting 5 Email setting Click Email setting option to allow you set alarm email configuration parameters shown as below Under Email Schedule you can sch...

Page 116: ...t FTP service port default value is 21 Nome Utente User name for visiting FTP Password Password for visiting FTP Nome Dir Directory Name in order to transfer the pictures or record alarms Under FTP Sc...

Page 117: ...stent with HVR local setting 5 7 5 DEVICE Click Device to unfold its sub options HDD and PTZ 1 HDD allow you check out HDD status and overwritten time shown below the overwrite time and recording enab...

Page 118: ...stent with HVR local setting 5 7 6 SYSTEM Click System option to unfold its sub options General Users and information 1 General User could check HVR s language and video system and also set system tim...

Page 119: ...ame and password shown below Details setting should be consistent with HVR local setting 3 Maintenance HVR allow to set the Log Load Default Firmware Update and Auto Reboot function of HVR Details set...

Page 120: ...vailable for IP camera with ONVIF Protocol Details setting should be consistent with HVR local setting 5 Info Channel Info Allow you check out device name number type MAC address software version IE v...

Page 121: ...saved on your computer Download Path Click to browse for and select the folder where you would like to save the download video recordings to your computer Snapshot Path Click to browse for and select...

Page 122: ...hat is compatible with all URMET devices both IPCam Codec H265 and NVR HVR all codecs Main features Multichannel audio video live streaming Multichannel remote playback Double stream playback Fisheye...

Page 123: ...ernet via the 3G network or WIFI Start the application to access the Live menu To access the menu select the icon at the top left 2 Live Select Live In the menu for the Live interface which includes v...

Page 124: ...an record the stream while viewing a video in live mode Select and then the channel label to start recording It will continue recording on the live page once it has started only the channels that are...

Page 125: ...p the PTZ control buttons on the live page Select the arrows to control camera movement from side to side or up and down The other control buttons allow you to zoom force operate the aperture operate...

Page 126: ...Playback button to open the device list as shown below select a channel on a device in the list 9 Selecting the date When you have selected a channel all dates with recordings will be marked with a d...

Page 127: ...the stream while viewing a video in live mode as shown above 11 Images Images opens a gallery of screenshot pictures 12 Remote Settings Controls on the remote device can be enabled such as sending e m...

Page 128: ...e icon at the top right of the start screen to open the interface shown below and manually add a device To add a new device select then Manual Adding Import Device via QR Code Online Device Device pre...

Page 129: ...rder for the the Mobile Software to work properly If the user does not configure the mobile device port the iUVS Mobile Software will not work To delete a device from list select the name of the devic...

Page 130: ...he Apple Store or the iUVStab app from the Google Play Store Once the application has been downloaded from the store and installed the NVR can be added to the smartphone and viewed via a P2P connectio...

Page 131: ...rt opening and forwarding To view the IP camera in the local network LAN it can be added to the app using its IP address To know the local IP address of the IP camera see the menu page Network Menu of...

Page 132: ...for each analog channel disabled the bandwidth is increased about 4Mbps till to max 24Mbps 16Mbps 48Mbps default 16Mbps for each analog channel disabled the bandwidth is increased about 4Mbps till to...

Page 133: ...ed the bandwidth is increased about 8Mbps till to max 48Mbps 32Mbps 96Mbps default 32Mbps for each analog channel disabled the bandwidth is increased about 8Mbps till to max 96Mbps 64Mbps Max Output B...

Page 134: ...hannels or decrease the Main Stream frame rate of IP Camera Product specifications may be subject to change without prior notice In the event of HDD replacement addition the operation must be carried...

Page 135: ...52 53 2 19 80 81 3 37 4096 2560 4 5 65 66 2 74 105 05 4 38 3072 2048 1 3 87 54 3 65 131 32 5 47 16 recording channels with 4K resolution 3840 2160 Variables to be set H 264 Codec H 265 Codec H 264 Bi...

Page 136: ...1024 768 1 3 2101 07 87 54 2801 43 116 73 4 recording channels with 4M resolution 2560x1440 Variables to be set H 264 Codec H 265 Codec H 264 Bitrate in Kbps H 265 Bitrate in Kbps Frame rate in fps Ti...

Page 137: ...3 700 36 29 18 1050 54 43 77 8 recording channels with 3Mpx resolution 2048 1520 Variables to be set H 264 Codec H 265 Codec H 264 Bitrate in Kbps H 265 Bitrate in Kbps Frame rate in fps Time HD hours...

Page 138: ...73 384 512 4 5 5602 86 233 45 4202 14 175 09 256 256 1 3 8404 29 350 18 8404 29 350 18 4 recording channels with 720P resolution 1280x720 and WD1 resolution 960x576 Variables to be set H 264 Codec H...

Page 139: ...144 20 23 65 66 2 74 87 54 3 65 7168 5120 16 19 75 04 3 13 105 05 4 38 6144 4096 12 15 87 54 3 65 131 32 5 47 5120 3328 9 11 105 05 4 38 161 62 6 73 4096 2560 6 8 131 32 5 47 210 11 8 75 3072 2048 4 5...

Page 140: ...6 8 233 45 9 73 420 21 17 51 1536 768 4 5 350 18 14 59 700 36 29 18 768 512 1 3 700 36 29 18 1050 54 43 77 8 recording channels with resolution 3 5M 2304 1296 Variables to be set H 264 Codec H 265 Cod...

Page 141: ...5 525 27 21 89 1050 54 43 77 768 384 1 3 700 36 29 18 1400 71 58 36 8 recording channels with 1080P resolution 1920 1080 Variables to be set H 264 Codec H 265 Codec H 264 Bitrate in Kbps H 265 Bitrate...

Page 142: ...0 22 1200 61 50 03 1536 17 19 1400 71 58 36 1280 14 16 1680 86 70 04 1024 11 13 2101 07 87 54 896 10 2401 22 100 05 768 8 9 2801 43 116 73 640 6 7 3361 71 140 07 512 5 4202 14 175 09 384 4 5602 86 233...

Page 143: ...emote controller at the IR receiver on front panel If it still doesn t work please check if the batteries in the remote controller are dying If not check if the remote controller is broken 8 Q I want...

Page 144: ...VR please firstly shut down the system and then turn off the power Do not turn off the power directly or HDD data will be lost or damaged 2 Please keep HVR away from heat sources or places 3 Clean the...

Page 145: ...e procedure below Before performing the connection to the PC activate IE protection configuration following the procedure below Double click the icon to open Internet Explorer browser The following di...

Page 146: ...e and script Active X controls not marked as safe is selected as Enable or Prompt Download insigne Active X controls is selected as Enable or Prompt Make sure that the Protection Level is set as Low I...

Page 147: ...d Add Web Site to the Zone Add the device IP address in the field click on Add NOTE Do not select the item Require server https verification for all sites in this zone Close the window selecting Exit...

Page 148: ...tween hosts generally computer based on TCP H 264 H 264 MPEG 4 AVC Advanced Video Coding is a standard digital video compression standard H 265 High Efficiency Video Coding HEVC or H 265 is a video co...

Page 149: ...eo files distributed by the server in real time S M A R T Acronym of Self Monitoring Analysis and Reporting Technology This is a system for monitoring hard disks and SSD solid state devices to detect...

Page 150: ...DS1097 010 150...

Page 151: ...DS1097 010 151...

Page 152: ...S1097 010 URMET S p A 10154 TORINO ITALY VIA BOLOGNA 188 C Telef 39 011 24 00 000 RIC AUT Fax 39 011 24 00 300 323 Area tecnica servizio clienti 39 011 23 39 810 http www urmet com e mail info urmet c...

Reviews: