


-36-
Frequently Asked Questions
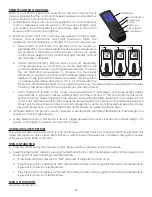
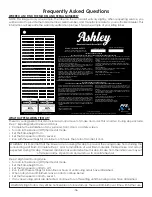
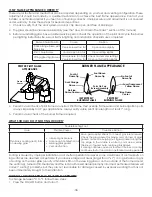
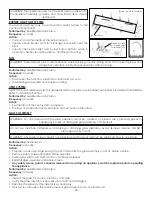
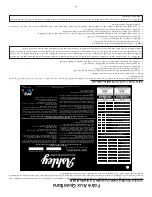
WHERE CAN I FIND THE MODEL AND SERIAL NUMBERS?
NOTE: This image is only an example. The label on the actual unit will vary slightly. When requesting service, you
will be asked to provide the model number, serial number, and manufacture date to your authorized dealer. This
information will expedite the warranty verification process. This is an example of your listing label:
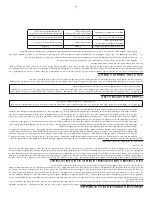
This vented gas fireplace heater is not for use with air filters.
This appliance
is only for use with the type(s) of gas indicated on the rating plate and may
be installed in an aftermarket, permanently located, manufactured home
(USA only) or mobile home, where not prohibited by local codes. See
owner's manual for details. This appliance is not convertible for use with
other gases, unless a certified kit is used.
This appliance must be installed in accordance with local codes, if any; if
none, follow the National Fuel Gas Code, ANSI Z223.1/NFPA 54, or
Natural Gas and Propane Installation Code, CSA B149.1.
WARNING: Improper installation, adjustment, alteration, service or
maintenance can cause injury or property damage. Refer to the owner's
information manual provided with this appliance. For assistance or
additional information consult a qualified installer, service agency or the
gas supplier. This vented gas fireplace is not for use with air filters. FOR
USE WITH GLASS DOORS CERTIFIED WITH APPLIANCE ONLY.
This appliance equipped only for altitudes:
U.S.A.:
0-2,000 ft (0-610 m)
Canada:
0-4,500 ft (0-1,372 m)
For Natural Gas when equipped with No. 40 drill size orifice, for Propane
Gas when equipped with No. 53 drill size orifice. Orifices and instructions
necessary for propane gas conversion are provided with the kit #
AG30LPC.
This appliance must be properly connected to a venting system in
accordance with the manufacturer's installation instructions. If the vent-air
intake system is disassembled for any reason, reinstall per instructions with
initial installation.
SAFETY BARRIERS:
For use only with barrier Part Number: 611012. Follow installation
instructions accompanying the appliance.
REPLACEMENT FAN KIT:
Part No. 80709 fan or blower assembly must be used.
Rating: 120Volts, 60Hz, 1.3 Amps.
VENTED GAS FIREPLACE HEATER
NOT FOR USE WITH SOLID FUEL - THIS APPLIANCE IS MANUFACTURED AS NATURAL GAS.
Natural Gas / Gaz
Naturel
LP Gas / Gaz Propane
Efficiency Per /Efficacité par
CSA P.4.1-15
65%
66%
Minimum Inlet Pressure /
Pression de gaz à l'entrée (Min.)
5.0" WC (1.25 kPa)
12" WC (2.74 kPa)
Maximum Inlet Pressure /
Pression de gaz à l'entrée (Max.)
10.5" WC (2.61 kPa)
14" WC (3.49 kPa)
Max. Input BTU/h (kW) /
Puissance de chauffage (Max.)
27,000 BTU/h (7.9 kW)
27,000 BTU/h (7.9 kW)
Min. Input BTU/h (kW) /
Puissance de chauffage (Min.)
14,000 BTU/h (4.1 kW)
13,000 BTU/h (3.8 kW)
Manifold Pressure /
Pression d'admission
3.8" WC (0.95 kPa)
11.0 WC (2.74 kPa)
Orifice Size (DMS) /
Dimension de l'prifice (DMS)
#40
#53
Total Electrical Requirements: 120Vac, 60 Hz, less than 6 amperes. / Alimentation
électrique totale requise: 120 Volts c.a., 60Hz, moins de 6 Ampères.
Minimum Appliance Clearances To Combustibles /
Dégagements Minimums De L'appareil Aux Matériaux Combustibles
From appliance top stand-offs /
Des étriers de dégagement supérieurs du foyer à l'encadrement
0"
0 mm
From appliance left and right side stand-offs /
Aux étriers dégagement latéraux et droits du foyer
0"
0 mm
From appliance back stand-offs /
Aux étriers dégagement arrières de l'appareil
0"
0 mm
From appliance corners / À chaque coin du foyer
1/4"
6 mm
From appliance front /
Du devant du foyer aux matériaux combustibles
36"
914 mm
From appliance top to ceiling / Dessus du foyer au plafond
51"
1295 mm
Mantel 9" (229 mm) deep from appliance top / Du dessus du
foyer à un manteau de 9 po (229 mm) de profond (projection)
10"
254 mm
Horizontal pipe sides and bottom surfaces /
Côtés horizontaux et surfaces inférieures
1"
25 mm
Vertical pipe left and right surfaces /
Surface du tuyau vertical de tous les côtés
1"
25 mm
Horizontal pipe top surface / Surface
supérieure du tuyau horizontal
3"
76 mm
853802B
Ce foyer à gaz à évacuation ne doit pas être utilisé avec les filtres à air. Cet appareil ne doit
fonctionner qu'avec le type de gaz spécifié sur la plaque signalétique et peut être installé
dans une maison préfabriquée (États-Unis seulement) ou une maison mobile installée en
permanence, là où les codes locaux le permettent. Voir le manuel d'installation du foyer
pour les détails. Cet appareil ne doit pas fonctionner avec un autre type de gaz, à moins
d'installer un kit de conversion de gaz certifié.
Cet appareil doit être installé selon les codes locaux s'il y en a; suivez le National Fuel Gas
Code, ANSI z223.1/NFPA 54, ou le Code d'installation du gaz naturel et du propane, CSA B
149.1.
AVERTISSEMENT: Une altération ou non-conformité d'installation, d'installation, d'entrtien
ou de réglage de cet appareil peut causer des blessures et'ou dommages matériels. Voir le
manuel d'installation et d'utilisation fourni avec cet appareil. Pour de l'aode ou
del'information additionnelle, consulter un installatuer qualifié, une agence d'entretien ou le
fournisseur de gaz. N'utiliser aucun filte à air avec ce foyer au gaz à évacuation. POUR
UTILISATION UNIQUEMENT AVEC LES PORTES EN VERRE CERTIFIÉES AVEC
L'APPAREIL.
Cet appariel est équipé pour fonctionner aux altitudes suivantes:
États-Unis: 0 à 2000pieds (0 à 610m)
Canada: 0 à 4500pieds (0 à 1372m)
Convient au gaz naturel quand l'appareil est muni d'un injecteur de diamètre no. 40.
Convient au propane quand l'appareil est muni d'un injecteur de diamètre no. 53. Pour le
convertir au gaz proplane (GPL), suivez les instructions fournies avec les kit de conversion
# AG30LPC.
Cet appareil doit être corectement raccordé à un système d'évacuation, conformément aux
instruction du fabricant. Veuillez consulter le manuel d'installation du foyer, pour les
exigences complètes du conduit d'évacuation.
ÉCRANS PARE - ÉTINCELLES:
À utiliser uniquement avec des barrières Numéros de pièces: 611012. Suivez les
instructions d'installation accompagnant l'appareil.
KIT DE REMPLACEMENT DU VENTILATEUR:
L'ensemble de ventilateur (pièce n° 80709) doit être utilizé.
Caracteristiques Electrlques: 120 volts, 60 Hz, 1.3 amperes.
FOYER ENCASTRABLE À GAZ À ÉVACUATION
N'UTILISER AUCUN COMBUSTIBLE SOLIDE. CET APPAREIL EST ÉQUIPÉ POUR FONCTIONNER AU GAZ NATUREL.
Report #
F18-149
Natural Gas / Gaz Naturel
LP Gas / Gaz Propane
United States Stove Company
227 Industrial Park Road• South Pi�sburg, TN 37380• Phone: (800) 750-2723• Web: www.usstove.com
Model / Modéle: AG30FP
Cer�fied to / Cer�fié: ANSI Z21.88-2017/ CSA
2.33-2017; CSA 2.17-2017; CAN/CSA-P.4.1-2015
Serial No. / N
o
de série
Mfg Date. / Date de Fabrication
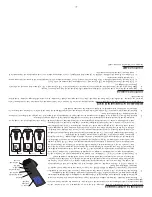
WHAT HAPPENS WHEN FIRST LIT?
There is a curing period. This can include a small amount of smoke and odor. This is normal. Curing steps include:
Step 1: Expelling Initial Smoke and Odors
• Complete the installation of any surround, front, doors, or safety screen.
• Turn on in the Manual (Off) thermostat mode.
•
Set the flame height to Hi.
• Set the fan speed control to Level 2.
• Run with these settings for a minimum of 3 hours. Then turn off and let it cool.
WARNING: It is important that the blowers are on during this step to prevent the curing smoke from staining the
surrounding wall finish. Complete Step 1 prior to installation of wall finish materials. Visible smoke and odor is
expected during this step. If desired, disable smoke alarms before this step. Smoke from the initial cure may set
off smoke alarms. Open doors and windows to circulate fresh air.
WARNING: Slight odors may still be noticeable on future startups. These will diminish over time with further use.
Step 2: High Heat Curing Cycle
• Turn on in the Manual (Off) thermostat mode.
•
Set the flame height to Hi.
• Set the fan speed control to Off.
• Run it with these settings for 8 continuous hours or until curing odors have diminished.
• When odors have diminished, leave on and continue below.
• Set the fan speed control to Level 1.
• If any new curing odors are detected, continue to run this setting until the curing odors have diminished.


