29
VIII. SySTEm START-UP
A.
ALWAyS INSPECT INSTALLATION BEFORE
STARTING BURNER.
1. Verify that the venting, water piping, oil piping, and
electrical system are installed properly. Refer to
Installation Instructions contained in this manual.
2. Confirm all electrical, water and oil supplies are
turned off at the source and that the vent is clear
from obstructions.
WARNING
Completely read, understand and follow all
instructions in this manual before attempting
start up.
B.
FILL HEATING SySTEM WITH WATER.
NOTICE
It is important to properly remove the oil and dirt
from the system. Failure to clean the system can
result in clogged air vents, circulator damage and
seized zone valves.
CLEAN HEATING SySTEM if boiler water is
dirty.
Refer to Maintenance and Service Instructions Section
of this manual for proper cleaning instructions for water
boilers.
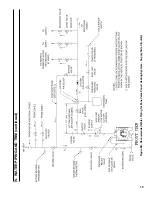
1. HOT WATER BOILERS. Fill entire heating
system with water and vent air from system. Use
the following procedure on a series loop or multi-
zoned system installed as per Figures 8A and 8B, to
remove air from system when filling:
a. Close full port ball valve in boiler system piping.
b. Isolate all zones by closing zone valves or
shut-off valves in supply and return of each
zone(s).
c. Attach a hose to vertical purge valve in boiler
system supply piping up stream from the full
port ball valve.
(
Note
- Terminate hose in five gallon bucket at a
suitable floor drain or outdoor area).
d. Starting with one zone at a time, open zone valve
or shut-off valve in boiler supply and return
piping.
e. Open purge valve.
f. Open shut-off valve in cold water supply piping
located between the air scoop and expansion
tank.
g. Allow water to overflow from bucket until
discharge from hose is bubble free for 30
seconds.
h. When zone valve is completely purged of air,
close zone valve or shut-off valve. Open zone
valve to the next zone to be purged. Repeat this
step until all zones have been purged. At
completion, open all zone valves.
i. Close purge valve, continue filling the system
until the pressure gauge reads 12 psi. Close
shut-off valve in cold water supply piping.
WARNING
The maximum operating pressure of this boiler is
posted on the ASmE Data Label located on the top
of the boiler. Never exceed this pressure. Do not
plug relief valve.
NOTICE
If make-up water line is equipped with pressure
reducing valve, system will automatically fill to 12
psi. Follow fill valve manufacturer's instructions.
j. Open full port ball valve in boiler system piping.
k. Remove hose from purge valve.
l. Confirm that the boiler and system have no water
leaks.
m. It may be necessary to clean the air vent assem-
bly after a few days of operation.
C.
CHECK CONTROLS, WIRING AND BURNER
to be sure that all connections are tight and burner is
rigid, that all electrical connections have been
completed and fuses installed, and that oil tank is filled
and oil lines have been tested.
D.
ADJUST CONTROL SETTINGS with burner service
switch turned “ON”.
1. SET ROOM THERMOSTAT about 10°F below
room temperature.
WARNING
All boilers equipped with burner swing door have a potential hazard which can cause severe property damage,
personal injury or loss of life if ignored. Before opening swing door, turn off service switch to boiler to
prevent accidental firing of burner outside the combustion chamber. Be sure to tighten swing door fastener
completely when service is completed. In addition, the burner power cord will have to be disconnected from
the receptacle in the front jacket.
Summary of Contents for LE DV Series
Page 5: ...5 I General Information Figure 1A LEDV Packaged Water Boiler with Beckett AFII Burner ...
Page 6: ...6 I General Information continued Figure 1B LEDV Packaged Water Boiler with Riello BF Burner ...
Page 19: ...19 v venting continued Figure 11 Vent Installation Figure 12 Vent Connector Un Assembled ...
Page 20: ...20 v venting continued Figure 13 Vent Connector Assembled Figure 14 Air Intake Installation ...
Page 48: ...48 xiii Repair Parts continued Figure 29 LEDV Bare Boiler Assembly ...
Page 50: ...50 xiii Repair Parts continued Figure 30 LEDV Boiler Jacket Insulation ...
Page 55: ...55 xiii Repair Parts continued Figure 33 Vent Kit Repair Parts ...
Page 60: ...60 U S Boiler Company Inc P O Box 3020 Lancaster PA 17604 1 888 432 8887 www usboiler net ...

