MAINTENANCE MANUAL
194
STE 85357
8)
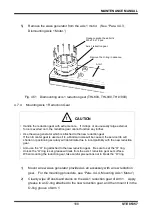
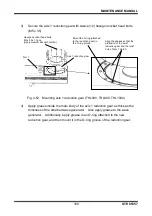
Mount the axis 2 motor assembly, the harness guide and the support plate. Put
back the cables to the original locations.
9)
Move Arm 2 by hand and check that there is no abnormal sound before turning
on the power.
10) Mount the arm 2 cover.
11) Set up the home positions of axes 2 to complete axis 2 reduction gear
replacement.
4.7.7
Replacing Axis 4 Reduction Gear
!
CAUTION
• Handle the reduction gear with extreme care. If it drops or an unusually large external
force is exerted on it, the reduction gear cannot function any further.
• Be sure to tighten the coupling connecting the reduction gear and motor shaft.
1)
Remove t
he arm 2 cover. (See “Para. 4.3.1, Arm 2 Cover.”)
2)
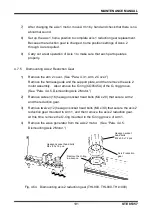
Remove only the axes 3 and 4 motor assemblies from the arm 2 according to
steps (1) and (2) of "4.5.4 Replacement of axis 4 timing belt".
3)
Remove the cap attached to the lateral side of the axis 4 reduction gear, then
loosen the coupling bolt (M4) securing the axis 4 motor shaft and the input shaft
of the axis 4 reduction gear.
4)
Remove four (4) hexagon socket head bolts (M4 x 12) and washers securing
the motor, and draw out the axis 4 motor upward.
5)
While holding the axis 4 motor pulley with pliers or the likes, remove six (6)
hexagon socket head bolts (M4 x 12) to remove the pulley. In doing so, use a
waste cloth (or the like) as a cushion to protect the pulley from scratches.
6)
Remove four (4) hexagon socket head bolts (M5 x 16) and washers securing
the axis 4 motor plate and reduction gear to the motor base, then dismount the
reduction gear.


