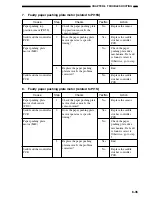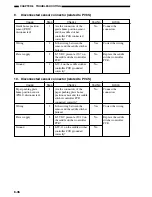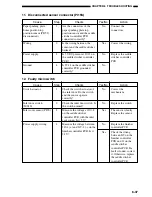
6-23
CHAPTER 6 TROUBLESHOOTING
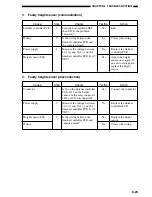
3.
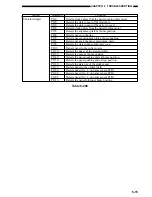
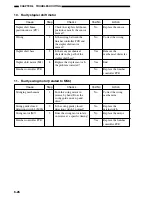
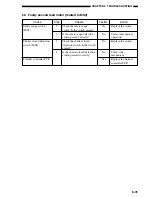
Faulty height sensor (communication)
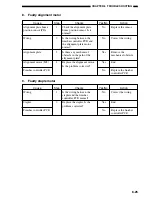
4.
Faulty height sensor (disconnection)
Checks
Is J6 on the finisher controller
PCB, J114 on the height
sensor, or the relay connector
J212 or J213 disconnected?
Measure the voltage between
J6-2 (+) and J6-4 (
−
) on the
finisher controller PCB. Is it 5
VDC?
Is the wiring between the
finisher controller PCB and
sensors normal?
Cause
Connector
Power supply
Height sensor (PS1)
Wiring
Step
1
2
3
Yes/No
Yes
No
Yes
No
Action
Connect the connector.
Replace the finisher
controller PCB.
Replace the height
sensor.
Correct the wiring.
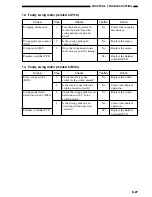
Checks
Turn the host machine OFF
then ON. Is the problem
corrected?
Is the wiring between the
finisher controller PCB and
the sensors normal?
Measure the voltage between
J6-2 (+) and J6-4 (
−
) on the
finisher controller PCB. Is it 5
VDC?
Cause
Finisher controller PCB
Wiring
Power supply
Height sensor (PS1)
Step
1
2
3
Yes/No
Yes
No
No
Yes
Action
End.
Correct the wiring.
Replace the finisher
controller PCB.
Adjust the height
sensor once again. If
an error occurs again,
replace the height
sensor.
Summary of Contents for MJ-1027
Page 1: ...SERVICE MANUAL FINISHER MJ 1027 1028 File No SME040041A0 R04102169300 TTEC Ver01_2007 09 ...
Page 5: ...ii ...
Page 9: ...vi ...
Page 70: ...2 41 CHAPTER 2 FINISHER UNIT BASIC OPERATION Height sensor PS1 Paper Figure 2 240 ...
Page 101: ...3 15 CHAPTER 3 SADDLE STITCHER UNIT BASIC OPERATION Figure 3 301 ...
Page 104: ...3 18 CHAPTER 3 SADDLE STITCHER UNIT BASIC OPERATION 2 A3 LD Paper Path 3 sheets Figure 3 303 ...
Page 116: ...3 30 CHAPTER 3 SADDLE STITCHER UNIT BASIC OPERATION Cam Mount Figure 3 404 ...
Page 173: ...6 CHAPTER 6 TROUBLESHOOTING II ARRANGEMENT OF ELECTRICAL PARTS A Finisher Unit ...
Page 235: ...2 17 2 HIGASHIGOTANDA SHINAGAWA KU TOKYO 141 8664 JAPAN ...

