
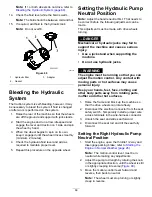


WARNING
The electrical system does not perform
proper safety shut off with the jumper
wire installed.
•
Remove the jumper wire from the
wire harness connector and plug the
connector into the seat switch when
you complete the adjustment.
•
Never operate the machine with the
jumper installed and the seat switch
bypassed.
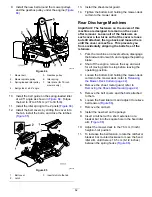
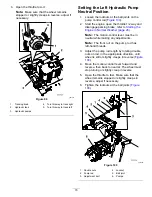
7.
After both pump neutrals are set, shut off the
machine.
8.
Remove the jumper wire from the wire harness
connector and plug the connector into the seat
switch.
9.
Install the seat rod and lower the seat into
position.
10.
Remove the jack stands.
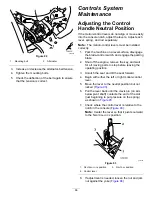
Mower Deck
Maintenance
Blade Safety
A worn or damaged blade can break, and a piece of
the blade could be thrown toward you or bystanders,
resulting in serious personal injury or death. Trying to
repair a damaged blade may result in discontinued
safety certification of the product.
•
Inspect the blades periodically for wear or damage.
•
Use care when checking the blades. Wrap the
blades or wear gloves, and use caution when
servicing the blades. Only replace or sharpen the
blades; never straighten or weld them.
•
On multi-bladed machines, take care as rotating 1
blade can cause other blades to rotate.
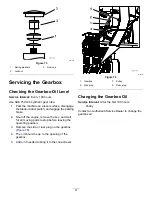
Servicing the Cutting
Blades
To ensure a superior quality of cut, keep the blades
sharp. For convenient sharpening and replacement,
you may want to keep extra blades on hand.
Before Inspecting or Servicing the
Blades
1.
Park the machine on a level surface, disengage
the blade-control switch, and engage the parking
brake.
2.
Shut off the engine, remove the key, and wait
for all moving parts to stop before leaving the
operating position.
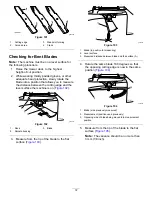
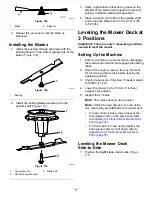
Inspecting the Blades
Service Interval:
Before each use or daily
1.
Inspect the cutting edges (
2.
If the edges are not sharp or have nicks, remove
and sharpen the blade; refer to
.
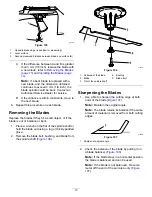
3.
Inspect the blades, especially in the curved area.
4.
If you notice any cracks, wear, or a slot forming
in this area, immediately install a new blade
(
).
71
Summary of Contents for Z Master Professional 7000 Series
Page 2: ......
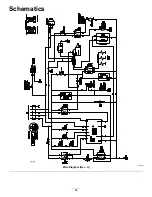
Page 84: ...Schematics g012068 Wire Diagram Rev A 82...
Page 86: ......
Page 177: ...Schaltbilder g012068 Schaltbild Rev A 91...
Page 270: ...Sch mas g012068 Sch ma de c blage Rev A 92...
Page 271: ...Remarques...
Page 272: ...Remarques...
Page 274: ......
Page 362: ...Schema s g012068 Elektrisch schema Rev A 88...
Page 364: ......


