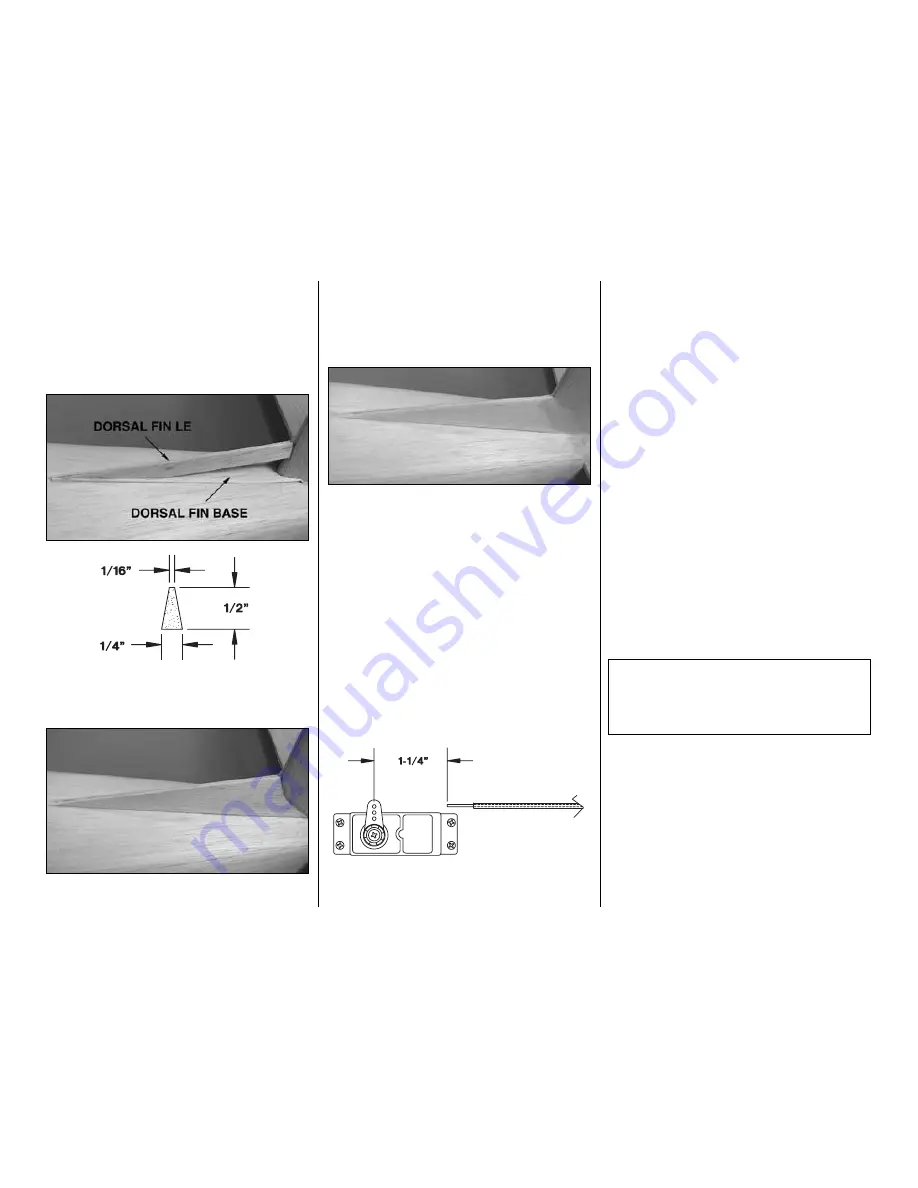
BUILD THE DORSAL FIN
❏
1. Use the pattern on the plan to make the
dorsal
fin base
from leftover 1/16” [1.6mm] balsa. Glue the
dorsal fin base to the top of the turtle deck. Make
sure the front of the base is
centered
on the fuse
centerline.
❏
2. Cut the 15” [381mm] tapered balsa
dorsal fin
LE
to the shape shown on the plan. Glue the dorsal
fin LE to the fin LE and the dorsal fin base.
❏
3. Make two
dorsal fin sheets
from leftover 1/16”
[1.6mm] balsa sheeting using the pattern on the
plan. Test fit and glue one of the sheets to the turtle
deck and dorsal fin base. Wet the sheet and glue it to
the dorsal fin LE. Make sure you do not pull the
dorsal fin LE off to one side when you glue the sheet
to it. Glue the other dorsal fin sheet in position.
❏
4. Apply Hobbylite
™
filler to the dorsal fin and fin
filler sheet to blend them to the fin. Apply filler to the
front of the dorsal fin to complete the taper and blend
it to the turtle deck. Do not apply all the filler in one
application but build up thin layers, allowing each
layer to fully dry before you apply the next. Sand the
filler, blending the dorsal fin, fin filler and fin into one
smooth contour.
HOOK UP THE RUDDER AND ELEVATOR
❏
1. Install the pushrods in the guide tubes.
Temporarily connect the clevis, with a silicone
retainer, to the elevator control horn and fit the
rudder and elevator in place.
❏
2. Place a servo arm on your rudder and elevator
servos. With the servos centered and the rudder and
elevators neutral, use a felt-tip pen to mark the
pushrods exactly 1-1/4” [31.8mm] from the holes in
the servo arms. Remove the pushrods from the
fuselage (see the note below). Cut them at the marks
you made.
Note: It is very difficult to remove the rudder pushrod
now that the stab is glued in place. It is not difficult to
solder the pushrod with it installed in the fuselage in
the following step. You might also consider cutting an
access hatch in the fuselage side so that you can
remove the pushrod. This hatch can also be used for
future maintenance.
❏
3. Silver solder a
threaded coupler
onto each wire
pushrod. Reinsert the pushrods into the fuselage and
thread a nylon clevis onto the couplers. Temporarily
connect the pushrods to the servos and rudder and
elevator. Adjust the length of the pushrods if necessary
by turning the clevises in or out.
Hint:
It will be easier to thread the clevis onto the
threaded coupler if you install it on the servo arm
first, using the arm for better leverage. Be careful not
to damage the pin on the clevis.
T-34B Fact:
Beech built a total of 423 T-34B
aircraft, starting in 1954. The Navy used the
aircraft for over twenty years, flying over 100,000
hours per year. Training was conducted at NAS
Saufley Field and NAS Whiting Field.
-43-
Summary of Contents for T-34B MENTOR
Page 7: ...7 DIE CUT PATTERNS...


