background image

LLEXETER.CO.UK

LLEXETER LTD - UNITS 15-18 GREENDALE BUSINESS PARK - WOODBURY SALTERTON - DEVON - EX5 1EW - UNITED KINGDOM

COMPANY NO: 4940600 / VAT REGISTRATION NO: GB825156925 TEL: 01395 233128

5   Electronic Power-train

The Talaria Sting L1e utilises a proprietary motor 

controller developed in house by Talaria and 

uses a 3 phase control system to power the motor 

combined with a Hall effect sensor system to 

monitor both rotation direction and rotation speed 

in the motor itself.

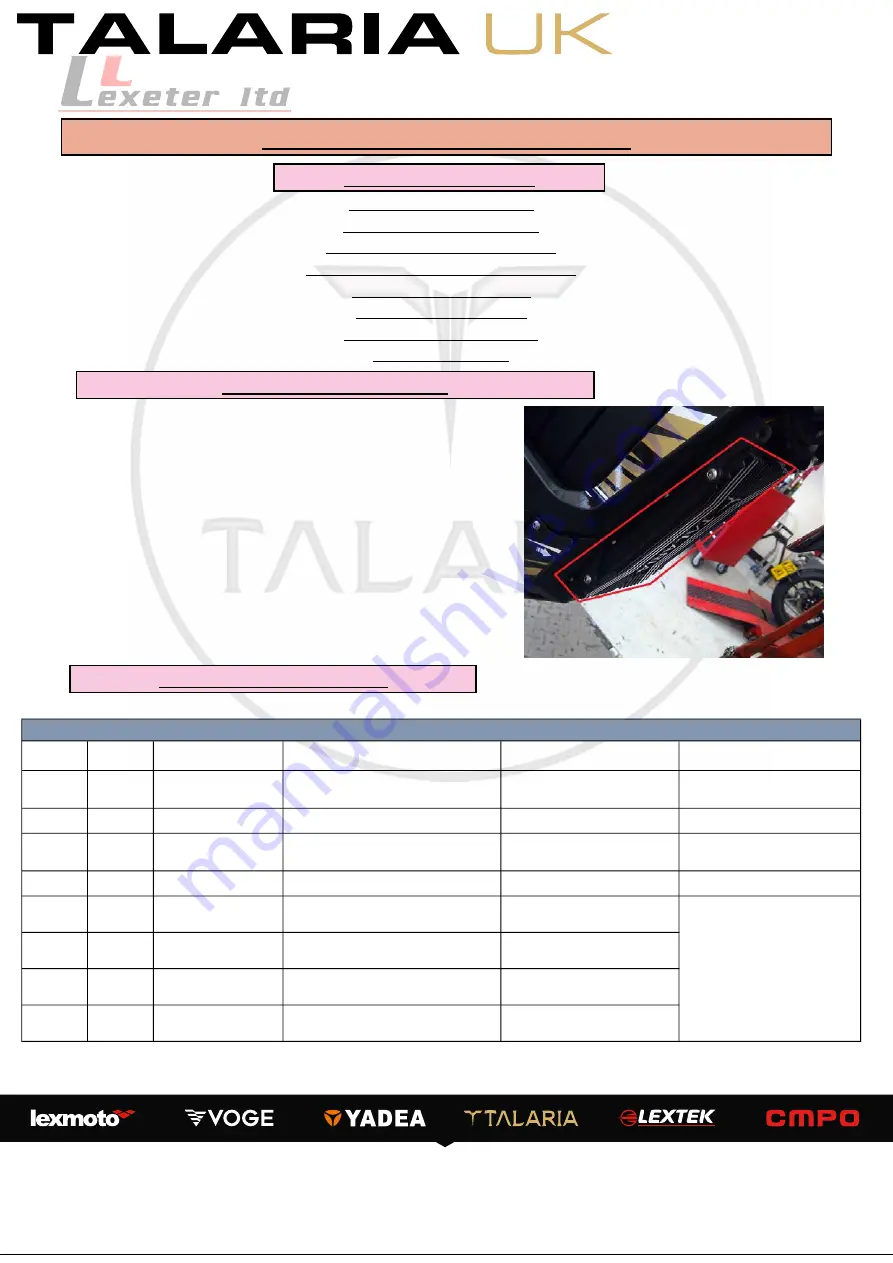
The Controller is located at the lower front of the 

motorcycle chassis.

Chapter Contents

5.1 : Motor Controller

5.2 : Diagnostic Codes

5.3 : Motor Control Testing

5.4 Battery and Circuit Breaker

5.5 : Throttle Control

5.6 : Ignition Switch

5.7 : DC-DC Converter

5.8 : Tilt Sensor

5.1 Motor Controller

Error Code

TL3000

Error Code

TL45

Description

Possible fault

Solution

Remarks

E01

00001

Protection IC error

The inner communication of the chip is disconnected

Re-start the bike

Check all the CANbus wiring connections and 

wiring to the battery, dashboard and motor 

controller. Repair as necessary.

E02

00002

Battery cell connection wire 

disconnected.

Internal battery cell connection failure

Re-start the bike

If fault persists, replace the battery

E03

00003

Voltage of battery cells are not 

balanced.

The difference of battery cells is more than 500mV, this 

error code will display on the dash.

Fully charge the battery

Re-start the bike

It may be necessary to cycle discharging and 

recharging the battery 2-3 times. If fault 

persists, replace the battery

E04

00004

Battery capacity measurement 

error

Not applicable

/

E05

00005

Storage error

Internal storage error

Re-start the bike

E06

00006

Time display error

Internal clock failure

Re-start the bike

E07

00007

Discharge MOS error

Discharge circuit failure

Re-start the bike

E08

00008

Charge MOS error

Charging circuit failure

Re-start the bike

Troubleshooting

If fault persists, replace the controller

5.2 Diagnostic Codes

Summary of Contents for STING TL3000

Page 1: ...TD UNITS 15 18 GREENDALE BUSINESS PARK WOODBURY SALTERTON DEVON EX5 1EW UNITED KINGDOM COMPANY NO 4940600 VAT REGISTRATION NO GB825156925 TEL 01395 233128 Motorcycle Service Manual Models Covered TL30...

Page 2: ...s at any time without prior notice and without incurring an obligation to make such changes to products manufactured previously See your Motorcycle dealer for the latest information on product improve...

Page 3: ...tics Drive System Chain and Sprockets Front Suspension DNM USD Telescopic Rear suspension Fastace Mono shock Wheel Base 1250mm Overall Length 1890mm Overall Width 815mm Front brake Hydraulic Overall H...

Page 4: ...ar Subframe Assembly 20 M8 x 20mm Front Fork Lower Yoke Pinch Bolts 10 M5 x 16mm Rear Wheel Spindle 50 5 Front Fork Top Yoke Pinch Bolts 7 M5 x 16mm Saddle Fittings 5 M6 nuts Front Indicator Mount Bol...

Page 5: ...th the wheel off the ground Do not us the side stand as a lifting support as this may lead to injury or damage to the machine 1 Remove the 2 bolts M6 x 18mm securing the brake caliper to the fork brac...

Page 6: ...From one side of the spindle remove the spindle securing bolt M16 x 12mm followed by loosening the fork pinch bolts M5 x 15mm fork pinch bolts M5 x 15mm from both fork legs When refitting tighten the...

Page 7: ...er 1 Loosen the upper yoke fork pinch bolt M5 x 16mm When refitting tighten to 7Nm 2 Loosen the lower yoke pinch bolts M5 x 16mm and lower the fork leg through the yokes When refitting tighten to 10Nm...

Page 8: ...ing procedure For the RIGHT side fork leg 8 Remove the 3 bolts M5 x 8 securing the fork guard to the lower leg When refitting tighten to 5Nm 9 On the lower of the leg remove the air valve dust cap fol...

Page 9: ...le container Refill the damper chamber with 130ml of 15w fork oil Refitting is the reverse of the removal procedure When rebuilding the right hand leg remember to install compressed air to between 100...

Page 10: ...sher 12 Lower Yoke Steering Assy 13 Upper Bearing Snap Ring 14 Upper Bearing Washer 15 Stem Spacers 16 Steering Crown Bolt Both the DNM Suspension and RST Suspension fitted are sold as a complete unit...

Page 11: ...steering stem along with the spacer below the mount When refitting tighten to 8Nm 5 Loosen the top yoke fork pinch bolts for both fork legs M5 x 16mm When refitting tighten these bolts to 7Nm 6 Loosen...

Page 12: ...unt and remove the handlebars When refitting tighten to 6Nm 3 Remove the rubber bolt cap form the crown bolt and loosen the handlebar mounting pinch bolts handlebar mounting pinch bolts M8 x 22mm When...

Page 13: ...hose rear brake hose must be mounted behind it 6 Remove the 3 bolts M6 x 14mm securing the front mudguard to the lower yoke When refitting tighten these bolts to 5Nm 7 Loosen the top yoke fork pinch...

Page 14: ...arings have been serviced or replaced refitting is performed as described below 1 Assemble the following steering components together first a Lower Yoke b Upper Yoke c Handlebar Clamp Spacers RST 1 x...

Page 15: ...the service repair 4 Ensure the forks are correctly aligned correctly aligned with the top of the upper yoke and tighten the pinch bolts pinch bolts to 7Nm RST and DNM 2 3b Refitting 3 Rear wheel and...

Page 16: ...e the spindle to remove the wheel from the machine When refitting tighten to 50Nm 5Nm Note When refitting the wheel assembly ensure the rear brake caliper mount is correctly located on the locating pi...

Page 17: ...and remove the bolts When refitting tighten to 30Nm and apply a suitable thread locking agent Caution take care to direct the heat away from the wheel bearing and dust seal Refitting is the reverse o...

Page 18: ...e machine When refitting tighten to 52Nm 7Nm 5 To service the bearings remove the centre spacer taking care to retain the rubberised bushes and lubricate or replace the bearings If the bearings are ex...

Page 19: ...e ensuring the bearings and internal spacer are correctly fitted 3 2 Rear Suspension Bearing Spacer Rubberised Bushes Needle Bearings Pivot Spacer Refitting is the reverse of the removal process When...

Page 20: ...tly when installing the brake pads Refitting is the reverse of the removal procedure 4 If it necessary to remove or replace the brake caliper mounting bracket remove the 2 bolts M6 x 24mm to remove th...

Page 21: ...is oriented correctly when refitting To remove adjust or replace the brake light switch see Chapter 7 3 Lighting If the brake requires bleeding remove the 2 securing bolts from the fluid reservoir and...

Page 22: ...n refitting tighten to 10Nm and apply a suitable thread locking agent 5 To remove the rear brake disc remove the 6 bolts M6 x 12mm securing it to the wheel hub When refitting tighten to 12Nm and apply...

Page 23: ...has been removed from the system test the feel of the brake If spongy repeat the bleeding process until firm Ensuring the brake fluid reservoir is topped up Mineral oil only follow the bleeding routin...

Page 24: ...r The inner communication of the chip is disconnected Re start the bike Check all the CANbus wiring connections and wiring to the battery dashboard and motor controller Repair as necessary E02 00002 B...

Page 25: ...ne to a warm area and wait for the internal temperature to rise before continuing to use the machine Stop riding and return the machine to a warm area and wait for the internal temperature to rise bef...

Page 26: ...Send the bike to the nearest dealer to repair Check all wiring connections battery connections and wiring for faults and repair if necessary If fault persists replace the controller E42 00C00 Motor o...

Page 27: ...onents remove the components listed previously to enable access to the MCU harness connectors and motor outputs With the battery and MCU correctly connected and the circuit breaker set to the On posit...

Page 28: ...NTC type The Purple and Purple Black wires are CANbus cables and connect to the Battery Management Unit and the Speedometer display To test the MCU outputs to the motor it is necessary to support the...

Page 29: ...he terminal Locate the loom terminal in the same location that connects directly to the battery Do not disconnect this terminal at this point Test between the Black wire on the battery connector Becom...

Page 30: ...Control 5 6 Ignition Switch Disconnect the ignition switch from the main wiring harness and remove the switch For testing check continuity between the switch terminals Continuity should be present whe...

Page 31: ...constant live Blue Red Green 66v full battery ignition switch set to On 0v ignition switch set to Off Blue Black 12v ignition switch set to On Connect the DC DC converter to the main harness Re route...

Page 32: ...Bolt M6 x 10 8 Front Sprocket 9 Sprocket Retaining Cir clip 10 Drive Chain 12 Engine Bolt M10 x 80mm 13 Engine Bolt Nut M10 14 Engine Mount Bolt M8 x 25mm 15 Engine Mount Bolt M8 x 75mm 16 Engine Moun...

Page 33: ...21 8 18 2 18 2 5 ve 28 0 0 5 24 8 X 29 3 29 6 29 6 6 ve 55 4 17 8 50 9 18 4 X 57 8 57 8 7 ve 54 5 20 7 29 5 21 4 56 4 X 57 0 8 ve 54 5 21 0 29 6 21 7 56 5 56 9 X 5 Disconnect the motor phase wiring f...

Page 34: ...25mm securing the motor and gearbox to the chassis When refitting tighten to 35Nm 9 Remove the rear motor mounting nut and bolt M10 x 80mm The motor is now detached from the chassis When refitting ti...

Page 35: ...moved from the output shaft and withdraw the output shaft from the casing 4 If required replace the output shaft oil seal This should be fitted flush with the bevel of the outer casing To service or r...

Page 36: ...Nm 8 Remove the gearbox casing from the motor Note there is no gasket or sealant between the casing and the motor 9 Remove the input shaft from the casing and replace the bearing if required The shaft...

Page 37: ...es 7 4 Speedometer 7 5 Horn 7 6 Side stand Switch 7 1 Battery Cover Remove the cir clips securing the pivot pins to the cover hinges and remove the pivot pins Take care to retain the washers between t...

Page 38: ...ocated above the battery compartment to the left of the machine 2 Remove the 2 bolts M6 x 10mm from the fairing panel followed by the 4 bolts M8 x 20mm securing the assembly to the chassis When refitt...

Page 39: ...y and sliding forwards away from the subframe Note this is a tight fit care should be taken not to damage the panel 7 2 Rear Fairings and Saddle TL45 On Road It is recommended to remove the number pla...

Page 40: ...ting tighten the M6 bolts to 5Nm and the M8 bolts to 20Nm Caution the rear assembly will fall from the machine when the bolts are removed Take care to support the assembly when removing the bolts 7 2...

Page 41: ...lts completely 10 Separate the subframe halves by removing the 2 nuts and bolts M6 x 16mm self locking nuts and separate the components When refitting tighten to 5Nm 7 2 Rear Fairings and Saddle TL45...

Page 42: ...ed behind the main circuit breaker 7 3a Headlamp TL45 7 3a Headlamp TL3000 To remove the Front indicators it is necessary to remove the ignition switch Chapter 7 1 and recommended to remove the Headla...

Page 43: ...ting tighten these bolts to 7Nm 7 3d Indicator Relay 7 3e Brake Light and Switches TL3000 Off Road Brake Light 7 3e Brake Light and Switches TL45 On Road Brake Light In order to correctly replace the...

Page 44: ...correctly aligned Loosen the grub screw underneath the switch securing the brake light switch and adjuster to the master cylinder When refitting tighten to 3Nm 7 3e Brake Light and Switches Unscrew th...

Page 45: ...from the speedometer mounting and remove the assembly from the handlebars When refitting tighten to 5Nm To remove the speedometer form the machine it is not necessary to remove any other components 1...

Page 46: ...side bolts side bolts M5 x 14mm M5 x 14mm securing the surround to the machine and remove When refitting tighten to 5Nm 7 6 Side stand Switch The Talaria Sting utilises a magnetic switch to activate t...

Page 47: ...GB825156925 TEL 01395 233128 9 1 Component Locations 9 Component Locations and Wiring Diagram Chapter Contents 9 1 Component Locations 9 2 Wiring Diagram 1 Battery 2 Battery connector 3 Ignition Swit...

Page 48: ...en Yellow Yellow red Orange Light Blue Black Green Red Green Red 12v Gnd Signal Red Red Red Red Green Red Black Red Red Black Black Red Red Green Red Green Green Yellow Green Yellow Green Yellow Green...

Page 49: ...Green Blue White Red Black Black Blue Purple Black Purple Black Yellow Blue Red Brown Red Green Red 12v Gnd Signal Red Red Red Red Green Red Black Red Red Black Black Red Red Green Red Green Green Ye...

Page 50: ...permission of LLexeter Ltd UK No liability can be accepted for any inaccuracies or omissions in this publication although every possible care has been taken to make it as complete and accurate as poss...

Reviews: