- 54 -
7.3 INSTRUCTIONS FOR SERVICE
LOWER UNIT XN OIL INJECTED AND PRE-MIX
STOMPER MODEL XN650
1.
Detach the shoe from the stomper by removing (6) shoe bolts and washers.
2.
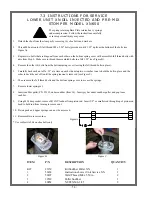
Thread M8 nuts onto (2) full thread M8 x 5.50” bolts (provided in kit) 1.25” up from the bottom of the bolts (see
Figure A).
3.
Replace two bolts that are diagonal from each other on the bottom spring cover with assembled full thread bolts with
nuts from Step 2. Make sure to thread the assembled bolts in a full 1.25” (see Figure B).
4.
Remove the other (4) bolts from the bottom spring cover (leaving the full thread bolts in place).
5.
Carefully back each nut off a .25” at a time on each side using two wrenches (one to hold the bolt in place and the
other to back the nut off) until the spring tension is removed (see Figure C).
6.
Then remove the full thread bolts and the bottom spring cover to access the springs.
7.
Remove lower spring set.
8.
Insert snubber puller, P/N 39539, under snubber (Item 14). Insert pry bar under snubber puller and pop loose
snubber.
9.
Using M24 deep socket, remove M16NY locknut from piston rod. Insert 5/8" or smaller rod through top of piston rod
head to hold rod from turning to remove nut.
10. Piston puck and upper springs can now be accessed.
11. Reassemble in reverse order.
* Use red loctite 264 on shoe bolts only.
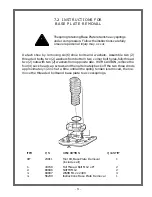
ITEM
P/N
DESCRIPTION
QUANTITY
KIT
23159
Kit Snubber Puller XN
1
1
56338
Instructions Lower Unit Service XN
1
2
50107
Weld Thread M8 x 5.50 in.
2
3
39539
Puller Snubber
1
4
80854
NUTFX M8-1/25
2
Figure B
Figure C
Figure A
The spring retaining Base Plate retains heavy springs
under compression. Follow the instructions carefully
or severe personal injury may occur.
Summary of Contents for XD836Y
Page 2: ......
Page 8: ......
Page 9: ... 9 1 TECHNICAL DATA ...
Page 11: ... 11 2 HEALTH SAFETY ...
Page 15: ... 15 3 OPERATIONS 2 CYCLE OIL INJECTED ...
Page 22: ......
Page 23: ... 23 4 OPERATIONS DIESEL ...
Page 34: ......
Page 35: ... 35 5 OPERATIONS 2 CYCLE PRE MIX ...
Page 42: ......
Page 43: ... 43 6 OPERATIONS 4 CYCLE GASOLINE ...
Page 50: ......
Page 51: ... 51 7 MAINTENANCE ...
Page 55: ... 55 8 EXPLODED VIEWS WITH PARTS ...
Page 56: ......
Page 60: ... 60 8 3 Gearcase for XN Oil Injected and Pre Mix ...
Page 62: ... 62 8 4 Gearcase for XT Oil Injected and Pre Mix ...
Page 64: ... 64 8 5 Gearcase XM Oil Injected and Pre Mix ...
Page 66: ... 66 8 6 Gearcase XD Diesel ...
Page 68: ... 68 8 7 Gearcase XJ 4 Cycle ...
Page 70: ... 70 8 8 Lower Unit XN Oil Injected and Pre Mix ...
Page 72: ... 72 8 9 Lower Unit XT Oil Injected and Pre Mix ...
Page 74: ... 74 8 10 Lower Unit for XM Oil Injected and Pre Mix ...
Page 76: ... 76 8 11 Lower Unit XD Diesel XJ 4 Cycle ...
Page 78: ... 78 8 12 Engine XN XT XM Oil Injected and Pre Mix ...
Page 80: ... 80 8 13 Engine XD Diesel ...
Page 82: ... 82 8 14 Engine XJ 4 Cycle ...
Page 84: ... 84 8 15 Handle and Fuel Tank XN Oil Injected and Pre Mix ...
Page 86: ... 86 8 16 Handle and Fuel Tank XT XM Oil Injected and Pre Mix ...
Page 88: ... 88 8 17 Handle and Fuel Tank XD Diesel ...
Page 90: ... 90 8 18 Handle and Fuel Tank XJ 4 Cycle ...
Page 92: ... 92 8 19 Shoes for XT XN Oil Injected and Pre Mix ...
Page 94: ... 94 8 20 Decal Identification 55379 Robin 55322 55378 Diesel ...
Page 95: ... 95 8 20 Decal Identification PN 55325 Diesel PN55324 Diesel PN 55053 55156 55377 ...
Page 96: ......

