- 45 -
OPERATING INSTRUCTIONS
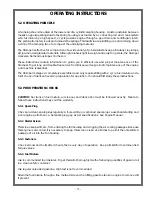
6.2 OPERATING PRINCIPLE
A tamping shoe is mounted at the lower end of a cylindrical spring housing. A piston, installed between
massive opposing springs inside the spring housing, is actuated by a connecting rod and crank system
which is driven by a high speed, 4 cycle gasoline engine through a gear train and centrifugal clutch.
The piston alternately loads and unloads the springs. This results in a rapid lifting up and ramming down
action of the tamping shoe to compact the underlying material.
The Stomper is effective for compaction of a wide variety of job soil substances, particularly clay lumps,
silt, loam and all granular materials. Although relatively light in weight and easy to operate, the Stomper
delivers a tremendous impact to the soil.
These instructions contain information to guide you in efficient use and proper maintenance of the
Stomper. To get long and trouble-free service from this power tool, periodic maintenance of the engine
and machine is essential.
The Stomper is shipped completely assembled and only requires filling 4 cycle engine with oil, fuel and
a brief check of lubricant levels in preparation for operation. You should first study these instructions.
6.3 PRE-OPERATION CHECKS
CAUTION:
Sections on fuel mixture, air cleaner, and lubrication must be followed exactly. Failure to
follow these instructions may void the warranty.
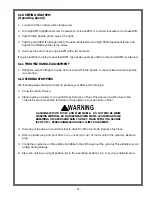
6.3.1 Spark Plug
Check and clean spark plugs regularly. A fouled, dirty, or carboned spark plug causes hard starting and
poor engine performance. Set spark plug gap as per specifications. See Engine Manual.
6.3.2 Starter Screen
This screen keeps dirt, etc. from entering the fan housing and clogging the air cooling passages. Because
this engine is air-cooled, it is necessary to keep this screen clean at all times to permit the unrestricted
passage of air into the fan housing.
6.3.3 Fasteners
Check all nuts and bolts after 4 hours, then every day of operation. See parts lists for recommended
torque values.
6.3.4 Fuel Mixture
Use regular unleaded gasoline. High test is not recommended.
Strain the fuel through a fine meshed screen when filling gasoline tank on engine to remove dirt if
present.
6.3.5 Lubrication
The oil level should be checked now, and before first use of the Stomper. Thereafter, it should be checked
every day as follows.
Summary of Contents for XD836Y
Page 2: ......
Page 8: ......
Page 9: ... 9 1 TECHNICAL DATA ...
Page 11: ... 11 2 HEALTH SAFETY ...
Page 15: ... 15 3 OPERATIONS 2 CYCLE OIL INJECTED ...
Page 22: ......
Page 23: ... 23 4 OPERATIONS DIESEL ...
Page 34: ......
Page 35: ... 35 5 OPERATIONS 2 CYCLE PRE MIX ...
Page 42: ......
Page 43: ... 43 6 OPERATIONS 4 CYCLE GASOLINE ...
Page 50: ......
Page 51: ... 51 7 MAINTENANCE ...
Page 55: ... 55 8 EXPLODED VIEWS WITH PARTS ...
Page 56: ......
Page 60: ... 60 8 3 Gearcase for XN Oil Injected and Pre Mix ...
Page 62: ... 62 8 4 Gearcase for XT Oil Injected and Pre Mix ...
Page 64: ... 64 8 5 Gearcase XM Oil Injected and Pre Mix ...
Page 66: ... 66 8 6 Gearcase XD Diesel ...
Page 68: ... 68 8 7 Gearcase XJ 4 Cycle ...
Page 70: ... 70 8 8 Lower Unit XN Oil Injected and Pre Mix ...
Page 72: ... 72 8 9 Lower Unit XT Oil Injected and Pre Mix ...
Page 74: ... 74 8 10 Lower Unit for XM Oil Injected and Pre Mix ...
Page 76: ... 76 8 11 Lower Unit XD Diesel XJ 4 Cycle ...
Page 78: ... 78 8 12 Engine XN XT XM Oil Injected and Pre Mix ...
Page 80: ... 80 8 13 Engine XD Diesel ...
Page 82: ... 82 8 14 Engine XJ 4 Cycle ...
Page 84: ... 84 8 15 Handle and Fuel Tank XN Oil Injected and Pre Mix ...
Page 86: ... 86 8 16 Handle and Fuel Tank XT XM Oil Injected and Pre Mix ...
Page 88: ... 88 8 17 Handle and Fuel Tank XD Diesel ...
Page 90: ... 90 8 18 Handle and Fuel Tank XJ 4 Cycle ...
Page 92: ... 92 8 19 Shoes for XT XN Oil Injected and Pre Mix ...
Page 94: ... 94 8 20 Decal Identification 55379 Robin 55322 55378 Diesel ...
Page 95: ... 95 8 20 Decal Identification PN 55325 Diesel PN55324 Diesel PN 55053 55156 55377 ...
Page 96: ......

