


- 46 -
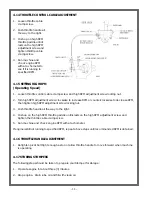
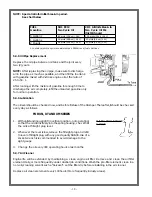
FOR XJ MODEL
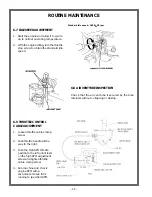
1.
With unit standing upright (in vertical
position--not operating) so that the oil
drains freely into the spring housing, check
that the oil is at fill sight plug level.
2.
Whenever the level is low, remove the fill
sight plug and refill to level of fill sight plug
with any good quality SAE-30. Use of a
socket wrench is recommended to avoid
damage to the sight gauge.
3.
Change the oil every 300 operating hours
or six months.
6.3.6 Air Cleaner
Engine life will be extended by maintaining a clean engine air filter. Remove and clean the air filter
element every 50 hours, or more frequently under dustier job conditions.
1.
Foam element: Wash the element in a solution of household detergent and warm water, then rinse
thoroughly, or wash in nonflammable or high flash point solvent. Allow the element to dry thoroughly.
Soak the element in clean engine oil and squeeze out the excess oil. The engine will smoke during
initial start-up if too much oil is left in the foam.
2.
Paper element: Tap the element lightly several times on a hard surface to remove excess dirt, or blow
compressed air (not exceeding 30psi [207 kPa]) through the filter from the inside out. Never try to
brush the dirt off; brushing will force dirt into the fibers. Replace the paper element if it is excessively
dirty.
3.
Wipe dirt from the air cleaner case and cover. Be careful to prevent dirt from entering the air duct
that leads to the carburetor.
Replace air cleaner element every 100 hours. (More frequently in dusty areas).
6.4 TO START MACHINE
1.
Check fuel tank, air cleaner, and Stomper lubrication as previously instructed.
2.
Open the fuel valve under the tank and the air vent thumbscrew in the tank fill cap.
3.
Turn the ON/OFF switch to ON.
4.
Raise throttle lever halfway and apply the choke.
NOTE:
A warm engine may not require choking.
5.
When engine starts, set choke in the open or run position. Let the engine run at idle to warm up, then
open up to full throttle for operation.
6.5 TO STOP MACHINE
1.
Throttle engine down.
2.
Turn the ON/OFF switch to OFF.
OIL FILL PLUG & SIGHT GAUGE
Summary of Contents for XD836Y
Page 2: ......
Page 8: ......
Page 9: ... 9 1 TECHNICAL DATA ...
Page 11: ... 11 2 HEALTH SAFETY ...
Page 15: ... 15 3 OPERATIONS 2 CYCLE OIL INJECTED ...
Page 22: ......
Page 23: ... 23 4 OPERATIONS DIESEL ...
Page 34: ......
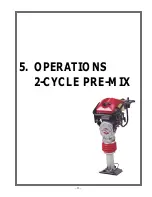
Page 35: ... 35 5 OPERATIONS 2 CYCLE PRE MIX ...
Page 42: ......
Page 43: ... 43 6 OPERATIONS 4 CYCLE GASOLINE ...
Page 50: ......
Page 51: ... 51 7 MAINTENANCE ...
Page 55: ... 55 8 EXPLODED VIEWS WITH PARTS ...
Page 56: ......
Page 60: ... 60 8 3 Gearcase for XN Oil Injected and Pre Mix ...
Page 62: ... 62 8 4 Gearcase for XT Oil Injected and Pre Mix ...
Page 64: ... 64 8 5 Gearcase XM Oil Injected and Pre Mix ...
Page 66: ... 66 8 6 Gearcase XD Diesel ...
Page 68: ... 68 8 7 Gearcase XJ 4 Cycle ...
Page 70: ... 70 8 8 Lower Unit XN Oil Injected and Pre Mix ...
Page 72: ... 72 8 9 Lower Unit XT Oil Injected and Pre Mix ...
Page 74: ... 74 8 10 Lower Unit for XM Oil Injected and Pre Mix ...
Page 76: ... 76 8 11 Lower Unit XD Diesel XJ 4 Cycle ...
Page 78: ... 78 8 12 Engine XN XT XM Oil Injected and Pre Mix ...
Page 80: ... 80 8 13 Engine XD Diesel ...
Page 82: ... 82 8 14 Engine XJ 4 Cycle ...
Page 84: ... 84 8 15 Handle and Fuel Tank XN Oil Injected and Pre Mix ...
Page 86: ... 86 8 16 Handle and Fuel Tank XT XM Oil Injected and Pre Mix ...
Page 88: ... 88 8 17 Handle and Fuel Tank XD Diesel ...
Page 90: ... 90 8 18 Handle and Fuel Tank XJ 4 Cycle ...
Page 92: ... 92 8 19 Shoes for XT XN Oil Injected and Pre Mix ...
Page 94: ... 94 8 20 Decal Identification 55379 Robin 55322 55378 Diesel ...
Page 95: ... 95 8 20 Decal Identification PN 55325 Diesel PN55324 Diesel PN 55053 55156 55377 ...
Page 96: ......