


Getting Started
Procedure 7: Connect Power
34
|
Getting Started with Spirent TestCenter
Procedure 7: Connect Power
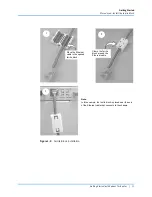
After making all cable connections and installing the ferrite block to the Ethernet cable,
you can connect power to the chassis or appliance.
The Spirent chassis and appliance has an on/off button on the front of the unit that controls
only the DC power. The (DC) POWER button controls the DC power from the power
supply to the components of the chassis.
The AC power is controlled by removing or attaching the AC power cord/s from the back
of the chassis.
Important:
On the SPT-N4U, SPT-N11U, SPT-N12U, and SPT-C50, each power supply
must be connected to a 15A circuit that is not shared with other equipment.
Notes: •
For complete setup information about the Spirent PX3/DX3-QSFP-DD-8
appliances, refer to the installation documentation that is included in your
shipment. You can also find installation and quick reference documents in the
Knowledge Base. Search on DOC11449 and DOC11450.
•
For complete setup information about the Spirent C1 appliance, refer to the
installation documentation that is included in your shipment. You can also
find installation and quick reference documents in the Knowledge Base.
Search on DOC10338 and DOC10339.
AC Power Operation
The SPT-N4U, SPT-N11U, SPT-N12U, and SPT-C50 do not have an AC master power
switch. Remove or attach the power cord to control AC power.
Warning:
To power down the unit, use the (DC) POWER button on the front of the
chassis. Under normal circumstances, do not remove the AC power cords for this purpose.
Doing so may lead to equipment failure.
The (DC) POWER button on the front of the chassis performs an orderly (firmware-
controlled) shutdown of the chassis systems. The removal the AC power cords should
only be used if all power needs to be removed from the chassis (e.g., during maintenance).
In such situations, the AC power cords should only be removed
after
DC power has been
disabled by using the (DC) POWER button. The DC power is disabled when the main
cooling fans are off, and the Power LED on the front of the chassis is off. This shut down
requires approximately 45 seconds.
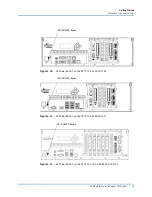
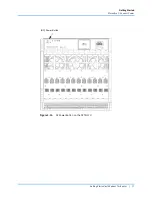
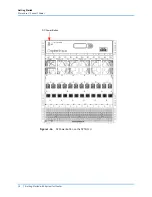
DC Power Operation
The DC power button (labeled POWER) is located on the front panel of the chassis or
appliance (refer to the appropriate figures in this section). The POWER button controls the
DC power from the units’ internal AC/DC power supply. Information about how the
button operates begins on


