


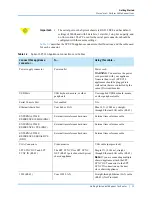


Getting Started
Procedure 6: Install the Ferrite Block
32
|
Getting Started with Spirent TestCenter
Procedure 6: Install the Ferrite Block
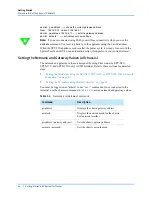
This procedure describes how to attach the ferrite block to the Ethernet cable before
connecting the cable to your Spirent chassis.
The ferrite block is designed to absorb excess electronic magnetic interference (EMI) that
is emitted from the Ethernet cable. This prevents potential damage to your system and
helps ensure that test data is not corrupted.
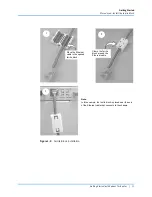
The ferrite block (
) is packaged as part of the Cable Kit that is sent with your
chassis.
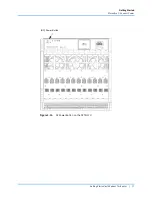
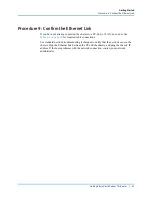
Figure 1-8.
Ferrite Block
Warning:
Before you begin using your chassis, make sure that you have attached the
ferrite block to the Ethernet cable using the procedure below.
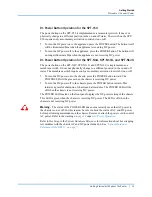
Installing the Ferrite Block
To install the ferrite block:
1
Remove the ferrite block and the Ethernet cable from the Cable Kit package.
2
Release the built-in clip on the side of the ferrite block and open it so that the center of
the ferrite block faces up. Place the Ethernet cable in the open ferrite block
(see
,
#1).
3
Clamp the ferrite block around the Ethernet cable within a few inches of the end of the
connector, making sure that the built-in clip snaps together (see
, #2).
4
Connect the Ethernet cable to the chassis (see
, #3).


