1-24
99
Se
ttings an
d Adjustme
nts
2
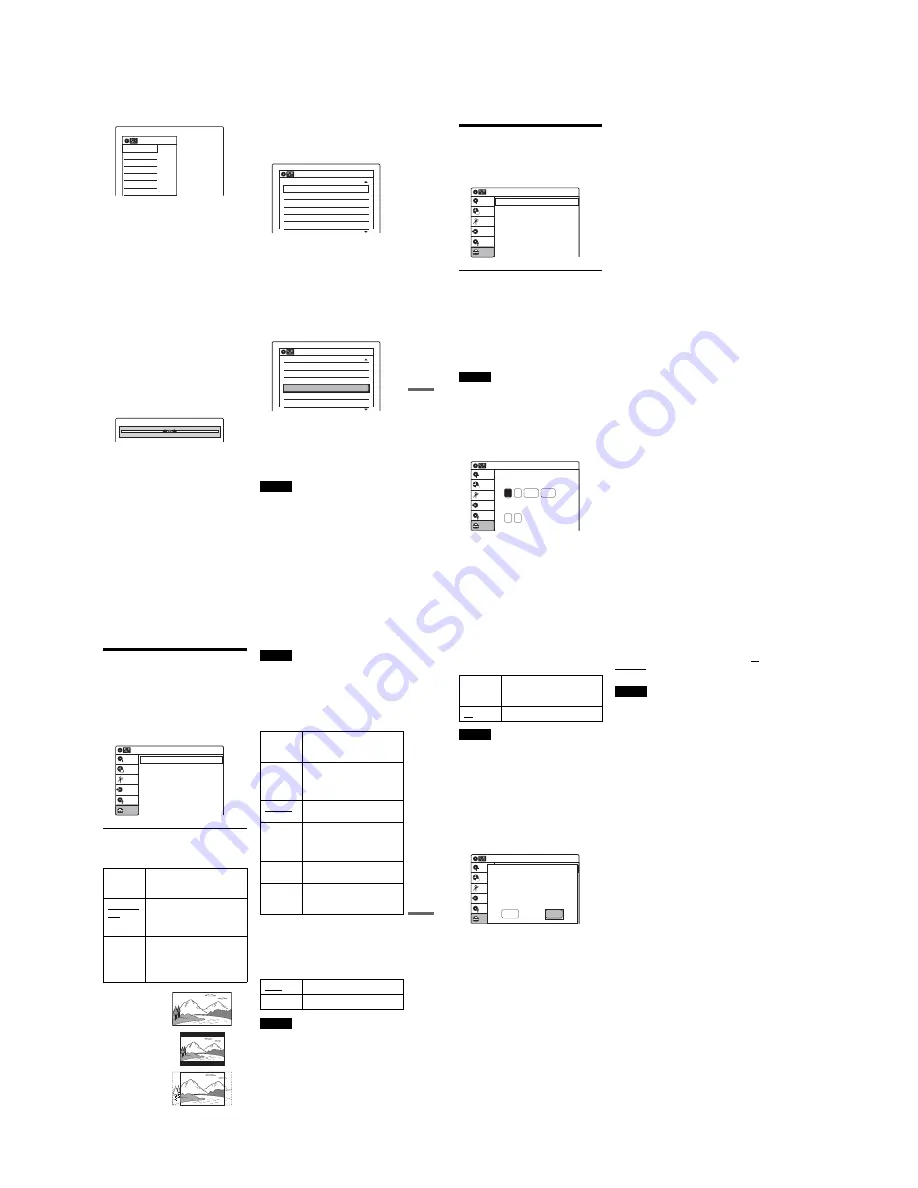
Select an option and press ENTER.
“Program”: Press
M
/
m
repeatedly to select the
programme position (1 to 80) for the channel
and press ENTER.
“Channel”: Press
M
/
m
to select the channel
number (002 to 255) and press ENTER.
“AFT”: Fine tunes the channel to obtain a
clearer picture. If the picture is not clear,
select “Off” and press ENTER. See “To adjust
pictures manually” (page 99).
“Tuner Audio”: Sets the channels for the
NICAM broadcast. Normally, select
“NICAM.” If the sound from the NICAM
broadcast is not clear, select “Standard” and
press ENTER.
“Station Name”: Changes a station name. See
“To rename the station” (page 99).
◆
To adjust pictures manually
Select “Off” for “AFT” in the display for manual
setting. When the fine tuning bar appears, press
<
/
,
to obtain a clearer picture, then press
ENTER.
◆
To rename the station
You can set up to four characters for the station
name. Select “Station Name” in the display for
manual setting.
Press
M
/
m
to select a character.
Each time you press
M
, the character changes as
follows: A
t
B...
t
Z
t
0
t
1...
t
9
t
-
t
A
Press
,
to set the next character. To correct a
character, press
<
and reset it. After setting all
characters, press ENTER.
Channel List
You can change or disable the programme
positions after setting the channels. The disabled
programme positions will be skipped when you
press PROG +/–.
1
Select “Channel List” and press ENTER.
The list of all the preset channels appears.
2
Press
M
/
m
to select the row containing the
programme position you want to change or
disable.
To change, press ENTER and go to step 3.
To disable, press CLEAR and go to step 5.
If there are more than six programme
positions, press
M
/
m
repeatedly to display the
next page.
3
Press
M
/
m
until the selected channel row
moves to the desired programme position.
4
Press ENTER.
The selected channel is inserted at the new
programme position.
5
To change or disable the programme position
of another station, repeat from step 2.
Note
Be sure to correctly select the programme position you
want to disable. If you disable the wrong programme
position by mistake, you need to reset that channel
manually.
Program
Channel
AFT
Tuner Audio
Station Name
01
002
On
NICAM
AAC
Manual Set
Fine Tuning
Prog.
CH
Name
011
DDE
3
012
FGH
4
061
PQR
5
128
QQR
6
2
005
AAB
1
002
AAC
Channel List
10:10
CH
011
DDE
005
AAB
3
061
PQR
5
128
QQR
6
2
102
AAC
1
002
AAC
4
Channel List
10:10
Prog.
Name
100
Clock Setting (Clock Set)
The “Clock Set” setup allows you to make clock
settings for the recorder.
Select “Clock Set” in the “Setup” display.
Auto Adjust
Turns on the Auto Clock Set function when a channel
in your local area broadcasts a time signal.
The Auto Clock Set function is activated whenever
the recorder is turned off.
If the recorder does not receive a time signal from
any station, “Auto Adjust” returns to “Off”
automatically and the display for setting the clock
manually appears. See “Present Time” below.
Note
The Auto Clock Set function does not work while
recording.
Present Time
If the Auto Clock Set function does not set the
clock correctly for your local area, set the clock
manually.
1
Select “Present Time,” and press ENTER.
2
Press
M
/
m
to set the day, and press
,
.
Set the month, year, hour, and minutes, in
sequence. Press
<
/
,
to select the item to be
set, then press
M
/
m
to set the item. The day of
the week is set automatically.
3
Press ENTER to start the clock.
Clock Set
Auto Adjust
Present Time
Setup
Disc Setting
Edit
Title List
Timer
Dubbing
: On
: Sat 21. 5. 2005 10:10
10:10
2005
Sat
21
05
10 : 10
Clock Set
Set the time and date.
Hour Min
Month
Day
Year
Setup
Disc Setting
Edit
Title List
Timer
Dubbing
10:10
101
Se
ttings an
d Adjustme
nts
Video Settings (Video)
The “Video” setup allows you to adjust items
related to the image, such as size and colour.
Choose the settings according to the type of TV or
tuner connected to the recorder.
Select “Video” in the “Setup” display.
The default settings are underlined.
TV Type
Selects the aspect ratio of the connected TV (4:3
standard or wide).
Note
Depending on the disc, “4:3 Letter Box” may be selected
automatically instead of “4:3 Pan Scan” or vice versa.
Picture Control
You can adjust the video signal from the recorder
to obtain the picture quality you want. Select the
setting that best suits the programme you are
watching.
z
Hint
When you watch a movie, “Cinema 1” or “Cinema 2” is
recommended.
Line 1 Output
Selects a method of outputting video signals for
the
i
LINE 1-TV jack.
Note
You cannot select “RGB” when “Component Out” below
is set to “On.”
16:9
Select this when connecting to a
wide-screen TV or TV with a
wide mode function.
4:3 Letter
Box
Select this when connecting to a
4:3 screen TV. Displays a wide
picture with bands on the upper
and lower portions of the screen.
4:3 Pan
Scan
Select this when connecting to a
4:3 screen TV. Automatically
displays a wide picture on the
entire screen and cuts off the
portions that do not fit.
Video
: 4:3 Letter Box
: Standard
: Video
: Off
: Off
Setup
Disc Setting
Edit
Title List
Timer
Dubbing
TV Type
Picture Control
Line 1 Output
Component Out
Progressive
10:10
16:9
4:3 Letter Box
4:3 Pan Scan
Dynamic 1
Produces a bold dynamic picture
by increasing the picture contrast
and the colour intensity.
Dynamic 2
Produces a more dynamic picture
than Dynamic 1 by further
increasing the picture contrast
and the colour intensity.
Standard
Displays a standard picture
(function turned off).
Cinema 1
White colours become brighter
and black colours become richer,
and the colour contrast is
increased.
Cinema 2
Enhances details in dark areas by
increasing the black level.
Personal
Adjusts “Contrast,” “Brightness,”
“Colour,” and “Hue” using
M
/
m
/
<
/
,
.
Video
Outputs video signals
RGB
Outputs RGB signals.
,
continued
102
Component Out
Selects whether or not to output video signals
from the COMPONENT VIDEO OUT jacks.
Notes
• When you set “Line 1 Output” to “RGB,” you cannot
set “Component Out” to “On.”
• When you connect the recorder to a monitor or
projector via only the COMPONENT VIDEO OUT
jacks, do not select “Off,” as the picture will not appear.
Progressive
If your TV accepts progressive (525p/625p)
format signals, you will enjoy accurate colour
reproduction and high quality image.
1
Select “Progressive,” and press ENTER.
2
Select “On,” and press ENTER.
3
Follow the instructions appearing on the TV
screen.
1)
Ensure your TV is progressive scan
capable.
2)
Connect with component video output
jacks (red/green/blue connections).
See “If your TV has component video input
jacks” on page 16.
3)
Select [OK] to test your video signal.
4)
If video signal appears OK, video
connection is complete.
4
Select “OK” and press ENTER.
The PROGRESSIVE indicator on the
recorder lights up.
If picture is distorted, press
O
RETURN.
Check the connection (page 16).
z
Hint
To cancel the “Progressive” setting, press
X
PAUSE on
the recorder continuously for five seconds or more, or
select “Off” in step 2 above.
Note
If you select progressive signals when you connect the
recorder to a TV that cannot accept the signal in
progressive format, the image quality will deteriorate. In
this case, set “Progressive” to “Off.”
On
Outputs the component video
signals. Select this when you want
to view progressive signals.
Off
Outputs no signals.
Video
TV Type
Black Level
Picture Control
Progressive
: Standard
: Off
: 4:3 Pan Scan
: On
Setup
Disc Setting
Edit
Title List
Timer
Dubbing
10:10
OK
Cancel
Progressive Scan Output
1) Ensure your TV is progressive scan capable.
2) Connect with component video output jacks.
(red/green/blue connections)
3) Select [OK] to test your video signal.
4) If video signal appears OK,
video connection is complete.
Summary of Contents for RDR-VX410
Page 62: ...2 22 2 22E MEMO ...
Page 64: ...3 4E MEMO ...
Page 66: ...4 1 VCR Main PCB 4 4 4 3 COMPONENT SIDE ...
Page 67: ...4 6 4 5 CONDUCTOR SIDE ...
Page 68: ...4 8 4 7 4 2 DVD Main PCB COMPONENT SIDE ...
Page 69: ...4 10 4 9 CONDUCTOR SIDE ...
Page 70: ...4 12 4 11 4 3 Jack PCB COMPONENT SIDE ...
Page 71: ...4 14 4 13 CONDUCTOR SIDE ...
Page 72: ...4 16 4 15 4 4 DV Jack PCB COMPONENT SIDE CONDUCTOR SIDE ...
Page 73: ...4 5 Function Timer PCB COMPONENT SIDE CONDUCTOR SIDE 4 18 4 17 ...
Page 74: ...4 20E MEMO ...
Page 76: ... Block Identification of Main PCB 5 4 5 3 VCR MAIN PCB Component Side Conductor Side ...
Page 77: ...5 6 5 5 5 1 S M P S VCR Main PCB ...
Page 78: ...5 8 5 7 5 2 Power VCR Main PCB ...
Page 79: ...5 10 5 9 5 3 Logic VCR Main PCB ...
Page 80: ...5 12 5 11 5 4 A V VCR Main PCB ...
Page 81: ...5 14 5 13 5 5 Hi Fi VCR Main PCB ...
Page 82: ...5 16 5 15 5 6 OSD VCR Main PCB ...
Page 83: ...5 18 5 17 5 7 SECAM VCR Main PCB ...
Page 84: ...5 20 5 19 5 8 Function Timer Function Timer PCB ...
Page 90: ...5 32 5 31 5 14 MUX NICAM TM PDC SCART Front Jack JACK PCB ...
Page 91: ...5 34 5 33 5 15 ADC DAC VIC1 LA73054 BLOCK JACK PCB ...
Page 92: ...5 36 5 35 5 16 MTS Tuner JACK PCB ...
Page 93: ...5 38 5 37 5 17 Component Super Out JACK PCB ...
Page 94: ...5 40E MEMO ...


