1-14
DVD Editing
59
Notes
• You cannot protect Playlist titles.
• If a message appears and indicates that the disc’s
control information is full, erase unnecessary titles.
Editing a Title
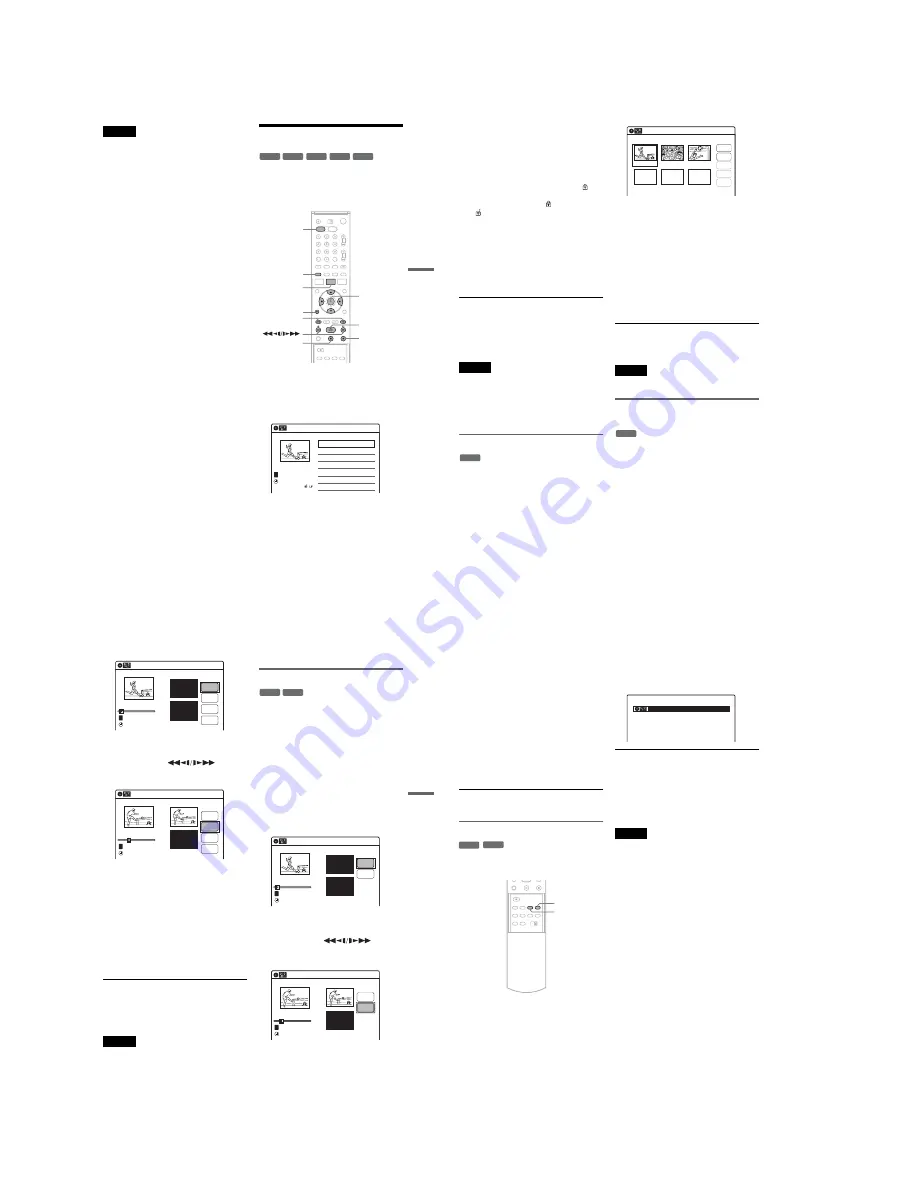
This section explains the basic edit functions. Note
that editing is irreversible. To edit a DVD-RW
(VR mode) without changing the original
recordings, create a Playlist title (page 64).
1
Press DVD to operate the DVD recorder.
2
Press TITLE LIST.
When editing a DVD-RW (VR mode), press
ORIGINAL/PLAYLIST to switch to the
“Title List (Original),” if necessary.
3
Select a title, and press ENTER.
The sub-menu appears.
-RW
VR
-RW
Video
+
RW
+
R
-
R
M
/
m
/
<
/
,
,
ENTER
TITLE LIST
H
x
X
DVD
ORIGINAL/
PLAYLIST
.
/
>
O
RETURN
Title List (Original)
>
>
08:00
T
No. Title
Length
Edit
01
01:29:03
02
00:31:23
03
>
01:59:00
04
>
00:58:56
10:10
Prog. 1
Prog. 2
Prog. 4
Prog. 3
Prog. 1
02.May.2005
1/4
,
continued
60
4
Select an option, and press ENTER.
You can select from the following:
“Title Erase”: Erases the selected title. Select
“OK” when asked for confirmation.
“Chapter Erase”
*1
: Allows you to select a
chapter in the title and erase it (see below).
“Protect”
*2
: Protects the title. Select “On”
when the Protection display appears. “
”
appears for the protected title. To cancel the
protection, select “Off.” “
” changes to
“
.”
“Title Name”: Allows you to rename the title
(page 63).
“A-B Erase”
*1
: Erases a section of the title
(page 60).
“Divide Title”
*2
: Divides a title into two
(page 61).
*1
DVD-RWs (VR mode) only
*2
DVD+RWs and DVD-RWs (VR mode) only
z
Hints
• You can also rename a disc (page 69).
• For a DVD+R or DVD-R, erasing titles does not free up
disc space. For a DVD+RW or DVD-RW (Video
mode), you can free up space only by erasing the last
title.
Notes
• When editing a DVD-RW (Video mode), DVD+R, or
DVD-R, finish all editing before finalizing the disc.
You cannot edit a finalized disc.
• You cannot erase protected titles or erase chapters from
a protected title.
• If you erase an original title used in a Playlist, that
Playlist is also erased.
Erasing a chapter (Chapter Erase)
You can select a chapter within a title and erase it.
Note that erasing chapters from original titles
cannot be undone.
1
Press TITLE LIST.
Press ORIGINAL/PLAYLIST to switch to the
“Title List (Original),” if necessary.
2
Select a title, and press ENTER.
The sub-menu appears.
3
Select “Chapter Erase,” and press ENTER.
The display for erasing chapters appears.
4
Select the chapter you want to erase, and
press ENTER.
“Check” is selected. To preview the chapter,
press ENTER. When playback finishes or
when you press
O
RETURN, the display
returns to “Chapter Erase (Original).”
5
Select “Erase,” and press ENTER.
The display asks for confirmation.
6
Select “OK,” and press ENTER.
The selected chapter is erased from the title.
To erase other chapters, repeat from step 4.
z
Hint
You can also erase chapters from a Playlist title
(page 65).
Note
If you erase an original title used in a Playlist, that Playlist
is also erased.
Erasing a section of a title
(A-B Erase)
You can select a section (scene) within a title and
erase it. Note that erasing scenes from original
titles cannot be undone.
1
Press TITLE LIST.
Press ORIGINAL/PLAYLIST to switch to the
“Title List (Original),” if necessary.
2
Select a title, and press ENTER.
The sub-menu appears.
3
Select “A-B Erase,” and press ENTER.
The display for setting point A and B appears.
-RW
VR
Chapter Erase (Original)
Chapter 1 / 3
Title No.01
Check
Erase
03 00:04:20
02 00:00:10
01
00:00:34
Modify
Move
Add
10:10
-RW
VR
DVD Editing
61
“Start” is selected.
4
Press ENTER at the start point of the
section to be erased (point A).
You can use
H
, ,
.
/
>
,
x
, and
X
to find the point.
“End” is selected.
5
Press ENTER at the end point of the section
(point B).
“Erase” is selected.
To reset the start or end point, select “Start” or
“End” and repeat from step 4 or 5.
6
Press ENTER.
The display asks for confirmation.
7
Select “OK,” and press ENTER.
The scene is erased.
To continue, repeat from step 4. To finish,
select “Finish,” and press ENTER.
z
Hints
• A chapter mark is inserted after the scene was erased.
The chapter mark divides the title into separate chapters
on either side of the mark.
• You can also erase a section of a Playlist title (page 65).
Notes
• Images or sound may be momentarily interrupted at the
point where you erase a section of a title.
• Sections shorter than five seconds may not be erased.
• The start and end points of a title may be different from
what you have set.
• The total playing time of the title does not change even
if a scene was erased.
• If you erase an original title used in a Playlist, that
Playlist is also erased.
Dividing a title into two (Divide Title)
You can divide a title into two. Note that dividing
original titles cannot be undone.
1
Press TITLE LIST.
When editing a DVD-RW(VR mode), press
ORIGINAL/PLAYLIST to switch to the
“Title List (Original),” if necessary.
2
Select a title, and press ENTER.
The sub-menu appears.
3
Select “Divide Title,” and press ENTER.
The display for setting the dividing point
appears.
“Point” is selected.
4
Press ENTER at the point where you want to
divide the title.
You can use
H
, ,
.
/
>
,
x
, and
X
to find the point.
“Divide” is selected.
5
Press ENTER.
The display asks for confirmation.
To reset the dividing point, select “No” and
press ENTER, then repeat from step 4.
A-B Erase
Title No.01
End 00:00:00
Start 00:00:00
Start
End
Erase
Finish
00:00:07
T
Title No.1
08:00
02.May.2005
10:10
A-B Erase
Title No.01
End 00:00:00
Start 00:00:10
Start
End
Erase
Finish
00:00:10
T
Title No.1
02.May.2005 08:00
10:10
-RW
VR
+
RW
Divide Title (Original)
Title No.01
T
Point
Divide
00:00:07
Title No. 1
Start 00:00:00
End 00:00:00
02.May.2005 08:00
10:10
Title No.01
T
00:00:10
Divide Title (Original)
Title No. 1
End 00:00:10
Start 00:00:00
Point
Divide
02.May.2005 08:00
10:10
,
continued
62
6
Select “Yes,” and press ENTER.
The display asks whether to use the same title
name as before.
To use the same name, select “Yes” and press
ENTER to finish.
7
Select “No,” and press ENTER.
The display asks whether to rename the title.
8
Select “Yes,” and press ENTER.
The “Title Name” display appears.
9
Follow steps 5 to 7 of “Changing the Name
of a Title” (page 63) to complete
renaming.
The divided title appears in the Title List with
the new name.
z
Hint
You can also divide a Playlist title (page 65).
Creating chapters manually
You can manually insert a chapter mark at any
point you like during playback.
Press CHAPTER MARK at the point where you
want to divide the title into chapters.
Each time you press the button, “Marking...”
appears on the screen and the scenes before and
after the mark become separate chapters.
To erase chapter marks
You can combine two chapters by erasing the
chapter mark during playback.
During playback, press CHAPTER MARK
ERASE.
The current chapter combines with the previous
chapter.
Notes
• If a message appears and indicates that no more chapter
marks can be added, you may not be able to record or
edit.
• You cannot add or erase chapter marks on protected
titles or discs.
-RW
VR
+
RW
CHAPTER
MARK
CHAPTER
MARK ERASE
Marking...
VR
Summary of Contents for RDR-VX410
Page 62: ...2 22 2 22E MEMO ...
Page 64: ...3 4E MEMO ...
Page 66: ...4 1 VCR Main PCB 4 4 4 3 COMPONENT SIDE ...
Page 67: ...4 6 4 5 CONDUCTOR SIDE ...
Page 68: ...4 8 4 7 4 2 DVD Main PCB COMPONENT SIDE ...
Page 69: ...4 10 4 9 CONDUCTOR SIDE ...
Page 70: ...4 12 4 11 4 3 Jack PCB COMPONENT SIDE ...
Page 71: ...4 14 4 13 CONDUCTOR SIDE ...
Page 72: ...4 16 4 15 4 4 DV Jack PCB COMPONENT SIDE CONDUCTOR SIDE ...
Page 73: ...4 5 Function Timer PCB COMPONENT SIDE CONDUCTOR SIDE 4 18 4 17 ...
Page 74: ...4 20E MEMO ...
Page 76: ... Block Identification of Main PCB 5 4 5 3 VCR MAIN PCB Component Side Conductor Side ...
Page 77: ...5 6 5 5 5 1 S M P S VCR Main PCB ...
Page 78: ...5 8 5 7 5 2 Power VCR Main PCB ...
Page 79: ...5 10 5 9 5 3 Logic VCR Main PCB ...
Page 80: ...5 12 5 11 5 4 A V VCR Main PCB ...
Page 81: ...5 14 5 13 5 5 Hi Fi VCR Main PCB ...
Page 82: ...5 16 5 15 5 6 OSD VCR Main PCB ...
Page 83: ...5 18 5 17 5 7 SECAM VCR Main PCB ...
Page 84: ...5 20 5 19 5 8 Function Timer Function Timer PCB ...
Page 90: ...5 32 5 31 5 14 MUX NICAM TM PDC SCART Front Jack JACK PCB ...
Page 91: ...5 34 5 33 5 15 ADC DAC VIC1 LA73054 BLOCK JACK PCB ...
Page 92: ...5 36 5 35 5 16 MTS Tuner JACK PCB ...
Page 93: ...5 38 5 37 5 17 Component Super Out JACK PCB ...
Page 94: ...5 40E MEMO ...


