1-21
87
Du
bb
in
g (T
APE
y
DV
D)
Dubbing (TAPE
y
DVD)
Dubbing From a VHS Tape to
a DVD
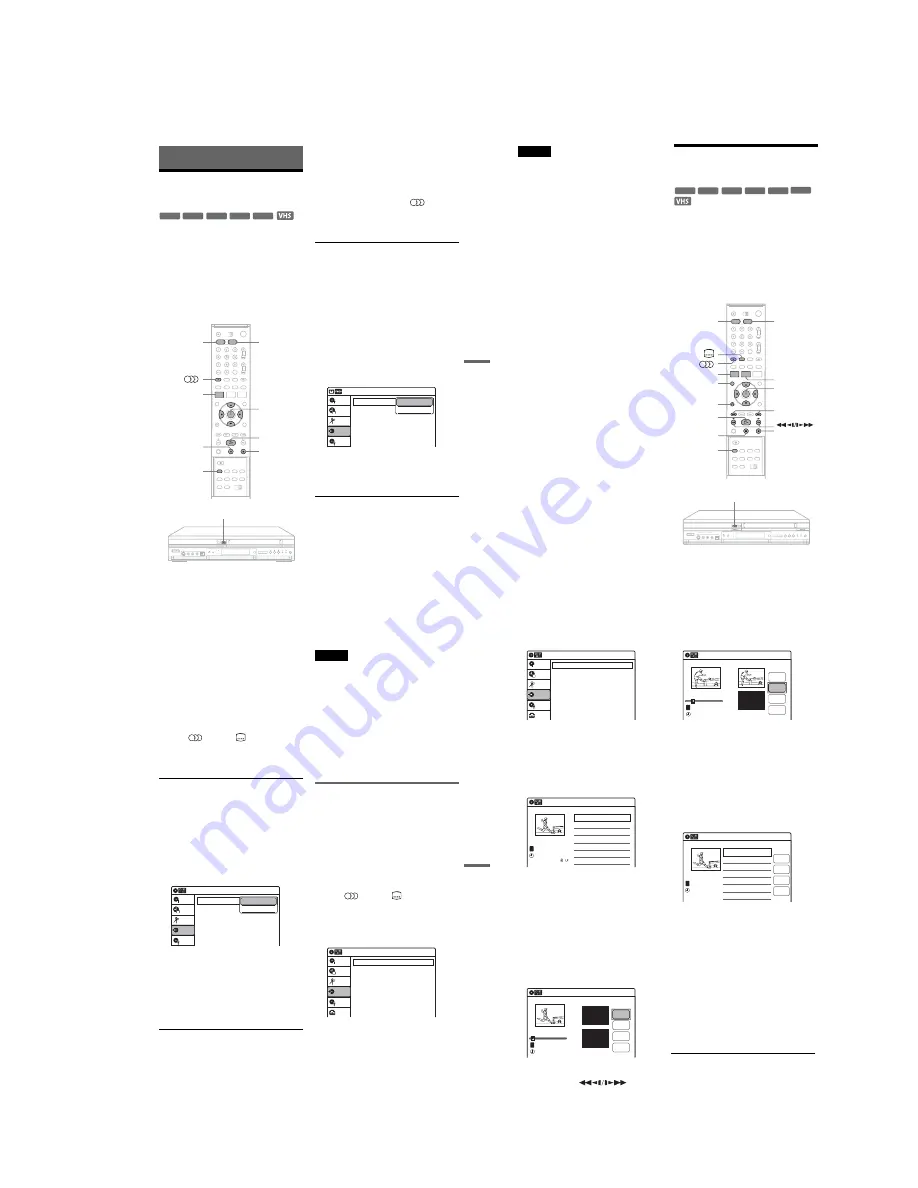
You can easily record (dub) a VHS tape to a disc.
Before dubbing, make the necessary audio settings
on the VCR.
◆
How titles and chapters are created
The recorder takes each recording on the VHS tape
and automatically divides them into titles as they
are dubbed to a disc. These titles are then further
divided into chapters at either 5 or 15-minute
intervals, according to the “DVD Auto Chapter”
setting in the “Features” setup (page 105).
1
Press DVD and insert a recordable disc.
To select the recording mode, press REC
MODE repeatedly (see page 47).
2
Insert a source VHS tape.
3
Press VIDEO to operate the VCR.
4
Start playing the VHS tape, and then press
x
(stop) or
X
(pause) at the point where
you want to start dubbing.
To select VCR sound, press
(audio)
during playback (see page 75).
5
Press
T
VIDEO on the recorder.
Dubbing starts.
To stop dubbing
Press
x
.
Note that it may take a few seconds for the
recorder to stop dubbing.
To play discs recorded with this recorder on
other DVD equipment
Finalize the disc (see page 91).
To dub using the on-screen menu
1
After step 4 above, press SYSTEM MENU.
2
Select “Dubbing” from the System Menu, and
press ENTER.
3
Select “Simple Dubbing,” and press ENTER.
4
Select “VIDEO
t
DVD,” and press ENTER.
The display asks for confirmation.
5
Select “Yes,” and press ENTER.
Dubbing starts.
z
Hints
• A black (no signal) screen at the end of the dubbed disc
is not a malfunction. This screen is recorded if a time
discrepancy exists between the disc and tape when the
recording is stopped.
• When dubbing a VHS tape to a DVD, the VHS tape
counter value may differ slightly from the DVD
recording time.
• VCR playback sound is output during dubbing.
-RW
VR
-RW
Video
+
RW
+
R
-
R
M
/
m
/
<
/
,
,
ENTER
REC MODE
x
SYSTEM
MENU
DVD
VIDEO
X
H
T
VIDEO
Dubbing
Simple Dubbing
Program Dubbing
DV Dubbing
Disc Setting
Edit
Title List
Timer
Dubbing
10:10
VIDEO --> DVD
DVD --> VIDEO
,
continued
88
Notes
• Dubbing cannot be made when:
– using a non-recordable DVD.
– using VHS software with copy guard functions.
• Dubbing stops when:
– the VHS tape reaches the end and stops.
– the VHS video deck or the DVD deck is stopped.
– the disc remaining time runs out.
• The System Menu, TOOLS menu, and information
display are not displayed during dubbing.
• Copyrights
– Recordings made from VHS tapes and other
copyrighted material are solely for individual
enjoyment, and other unauthorized use is prohibited
under copyright law.
– Unauthorized editing of copyrighted material is
prohibited under copyright law.
Dubbing From a DVD to a
VHS Tape
You can record (dub) a DVD title to a VHS tape.
Note that when you record copy-protected
software to a tape, picture may appear disrupted
when you play back the tape.
You can also select titles or scenes and dub them
all at once. See “Dubbing selected titles and scenes
(Programme Dubbing)” on page 89.
Before dubbing, make the necessary audio settings
on the DVD recorder.
1
Press VIDEO and insert a VHS tape with its
safety tab in place.
To select the recording mode, SP or LP, press
REC MODE repeatedly.
-RW
VR
-RW
Video
+
RW
+
R
DVD
-
R
M
/
m
/
<
/
,
,
ENTER
x
REC MODE
SYSTEM
MENU
VIDEO
TOP MENU
DVD
TITLE LIST
H
X
.
/
>
O
RETURN
DVD
t
89
Du
bb
in
g (T
APE
y
DV
D)
2
Insert a source disc.
3
Press DVD to operate the DVD recorder.
4
Press TOP MENU or TITLE LIST to select a
title.
5
Start playing the DVD, and then press
x
(stop) or
X
(pause) at the point where you
want to start dubbing.
To select DVD sound, language, or subtitle,
press
(audio) or
(subtitle) during
playback (see page 35).
6
Press DVD
t
on the recorder.
Dubbing starts.
To stop dubbing
Press
x
.
Note that it may take a few seconds for the
recorder to stop dubbing.
To dub using the on-screen menu
1
After step 5 above, press SYSTEM MENU.
2
Select “Dubbing” from the System Menu, and
press ENTER.
3
Select “Simple Dubbing,” and press ENTER.
4
Select “DVD
t
VIDEO,” and press ENTER.
The display asks for confirmation.
5
Select “Yes,” and press ENTER.
Dubbing starts.
If the disc’s menu appears when DVD
playback finishes, press
x
to stop dubbing.
Otherwise the disc’s menu is recorded until
the tape reaches its end.
z
Hints
• The brightness of the playback picture may differ from
normal DVD playback picture.
• The DVD playback time may differ slightly from the
VHS tape counter value.
• The sound being played back (main, sub, etc.) is the
dubbed sound.
Notes
• Dubbing cannot be made when “Progressive” is set to
“On” in the “Video” setup (page 102).
• Dubbing stops when:
– the DVD is played back to the end and stops.
– the DVD deck or the VHS video deck is stopped.
– the tape remaining time runs out.
• The System Menu, TOOLS menu, and information
display are not displayed during dubbing.
• Copyrights
– Recordings made from discs and other copyrighted
material are solely for individual enjoyment, and
other unauthorized use is prohibited under copyright
law.
– Unauthorized editing of copyrighted material is
prohibited under copyright law.
Dubbing selected titles and scenes
(Programme Dubbing)
You can select titles or scenes from a DVD, and
dub the contents to a VHS tape all at once.
1
Press VIDEO and insert a VHS tape with its
safety tab in place.
To select the recording mode, SP or LP, press
REC MODE repeatedly.
2
Press DVD and insert a source disc.
To select DVD sound, language, or subtitle,
press
(audio) or
(subtitle) during
playback (see page 35).
3
Press SYSTEM MENU.
The System Menu appears.
4
Select “Dubbing,” and press ENTER.
5
Select “Program Dubbing,” and press
ENTER.
Dubbing
Simple Dubbing
Program Dubbing
DV Dubbing
Disc Setting
Edit
Title List
Timer
Dubbing
10:10
VIDEO --> DVD
DVD --> VIDEO
Dubbing
Simple Dubbing
Program Dubbing
DV Dubbing
Setup
Disc Setting
Edit
Title List
Timer
Dubbing
10:10
,
continued
90
6
Select “Create Dubbing List,” and press
ENTER.
If you have performed Programme Dubbing
before, the display asks for confirmation. To
continue, select “Yes” and press ENTER.
The display for selecting titles appears.
7
Select the title you want to dub, and press
ENTER.
The sub-menu appears.
To dub the entire title, select “Title Dubbing”
and press ENTER. The Program Dubbing List
appears with the selected title. Go to step 13.
To select a scene to dub, go to step 8.
8
Select “Scene Dubbing,” and press
ENTER.
The display for setting a scene appears.
“Start” is selected.
9
Press ENTER at the start point.
You can use
H
, ,
.
/
>
,
x
, and
X
to find the point.
“End” is selected.
10
Press ENTER at the end point.
“Make” is selected.
To reset the start or end point, select “Start” or
“End” and repeat from step 9 or 10.
11
Press ENTER.
To continue, repeat from step 9.
12
Select “Finish,” and press ENTER.
The Program Dubbing List appears with the
selected scene.
13
Select an option and press ENTER, if
necessary.
“Addition”: Adds other titles or scenes.
Repeat from step 7.
“Erase”: Cancels the selected title or scene.
When asked for confirmation, select “OK”
and press ENTER.
“Check”: Plays back the selected title or
scene. When playback finishes or when you
press
O
RETURN, the display returns to
“Program Dubbing List.”
To cancel dubbing, press
O
RETURN.
14
Select “Dubbing,” and press ENTER.
Dubbing starts.
To stop dubbing
Press
x
.
Note that it may take a few seconds for the
recorder to stop dubbing.
Dubbing
Create Dubbing List
Program Dubbing List
Setup
Disc Setting
Edit
Title List
Timer
Dubbing
10:10
Create Dubbing List
>
>
T
No. Title
Length
Edit
01
00:05:04
02
00:00:51
Prog. 1
Prog. 2
Prog. 1
10:10
1/2
08:00
02.May.2005
Scene Dubbing
Scene No.01
T
--.---.---- --:--
Dubbing List No. 1
Make
Finish
Start
End
Start 00:00:00
End 00:00:00
00:00:07
10:10
Scene No.01
T
00:00:10
Dubbing List No. 1
Make
Finish
Start
End
Scene Dubbing
Start 00:00:10
End 00:00:00
10:10
--.---.---- --:--
Program Dubbing List
>
T
No. Title
Length
Edit
01 Prog. 1
00:05:04
Addition
Check
Dubbing
Erase
10:10
Prog. 1
03:25
02.May.2005
Summary of Contents for RDR-VX410
Page 62: ...2 22 2 22E MEMO ...
Page 64: ...3 4E MEMO ...
Page 66: ...4 1 VCR Main PCB 4 4 4 3 COMPONENT SIDE ...
Page 67: ...4 6 4 5 CONDUCTOR SIDE ...
Page 68: ...4 8 4 7 4 2 DVD Main PCB COMPONENT SIDE ...
Page 69: ...4 10 4 9 CONDUCTOR SIDE ...
Page 70: ...4 12 4 11 4 3 Jack PCB COMPONENT SIDE ...
Page 71: ...4 14 4 13 CONDUCTOR SIDE ...
Page 72: ...4 16 4 15 4 4 DV Jack PCB COMPONENT SIDE CONDUCTOR SIDE ...
Page 73: ...4 5 Function Timer PCB COMPONENT SIDE CONDUCTOR SIDE 4 18 4 17 ...
Page 74: ...4 20E MEMO ...
Page 76: ... Block Identification of Main PCB 5 4 5 3 VCR MAIN PCB Component Side Conductor Side ...
Page 77: ...5 6 5 5 5 1 S M P S VCR Main PCB ...
Page 78: ...5 8 5 7 5 2 Power VCR Main PCB ...
Page 79: ...5 10 5 9 5 3 Logic VCR Main PCB ...
Page 80: ...5 12 5 11 5 4 A V VCR Main PCB ...
Page 81: ...5 14 5 13 5 5 Hi Fi VCR Main PCB ...
Page 82: ...5 16 5 15 5 6 OSD VCR Main PCB ...
Page 83: ...5 18 5 17 5 7 SECAM VCR Main PCB ...
Page 84: ...5 20 5 19 5 8 Function Timer Function Timer PCB ...
Page 90: ...5 32 5 31 5 14 MUX NICAM TM PDC SCART Front Jack JACK PCB ...
Page 91: ...5 34 5 33 5 15 ADC DAC VIC1 LA73054 BLOCK JACK PCB ...
Page 92: ...5 36 5 35 5 16 MTS Tuner JACK PCB ...
Page 93: ...5 38 5 37 5 17 Component Super Out JACK PCB ...
Page 94: ...5 40E MEMO ...


