background image

2-14  

Using the SunEye

Capture a Skyline

structions. 

• Calculates the monthly, seasonal, and annual solar access percentages.

• Calculates the annual solar resource percentages.

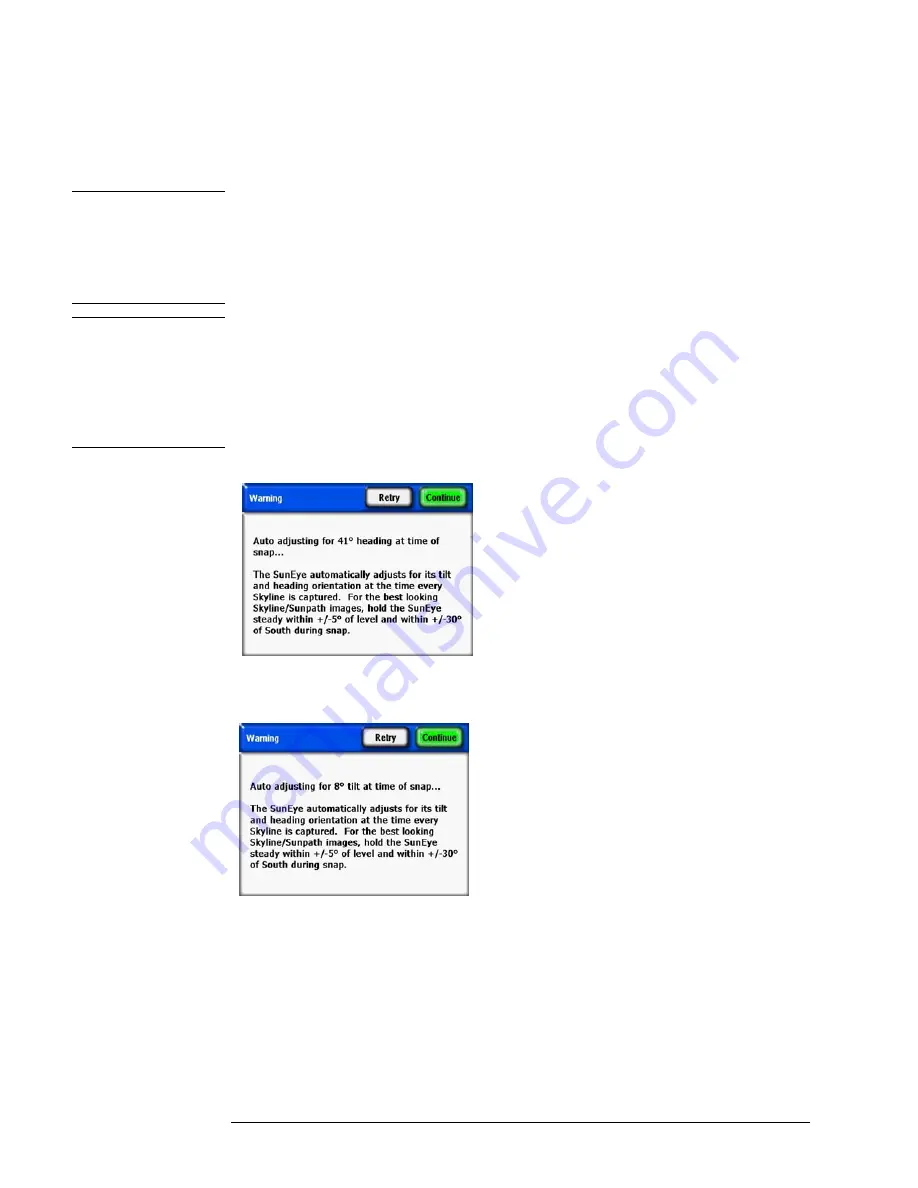
N O T E

The accuracy of the measurement is directly related to how close to true south (or north in the 
southern hemisphere) the compass needle points and to how level the unit is held at the time the 
skyline is captured. Care should be used during this critical step. If the orientation is not within 
+/-30° of true south (or north in the southern hemisphere) during the picture snap and /-
5° of level, a warning message will be displayed indicating the issue. It is strongly recommended 
that you delete this skyline and start again if this occurs. To do this, press 

Retry

N O T E

The SunEye will automatically correct the skyline for offsets in the azimuth up to +/-30° and tilt 
up to +/-5° . For best results, hold true South (or North in the Southern Hemisphere) and level as 
accurately as possible. The SunEye will alert the user when the azimuth or tilt cannot be corrected 
and force another measurement. The SunEye will alert the user if the azimuth or tilt correction is 
significant and can be corrected is the user wants to. Press Continue to proceed with that 
measurement and the auto correction or press Retry to return to Preview mode to make another 
measurement.

Figure


2-22.


SunEye Level Orientation Warning

Figure


2-23.


SunEye South Orientation Warning

5

Verify that the software has correctly identified the open sky and obstructions. You can verify 
that the yellow and green shading is correct by looking at the image through the shaded colors. 
Make sure obstructions are green and open sky is yellow. Incorrect identification will affect the 
accuracy of the calculations. Correct the shading if needed with the Edit tool as described below.

Skylines are automatically saved every time they are captured. To delete the skyline data that 
you just captured, press the navigation button to the left. Alternatively, to immediately capture 
another skyline, press the 

Star

 button.

Summary of Contents for SunEye 210

Page 1: ...Solmetric SunEye 210 User s Guide Solar Test and Measurement Equipment...

Page 2: ...2 YOUR SK D dZ DISTRIBUTOR SOLIGENT 800 967 6917 www soligent net...

Page 3: ...software The design and construction of any system or building by the Buyer is the sole responsibility of the Buyer Solmetric does not warrant the Buyer s system products or malfunction of the Buyer s...

Page 4: ...4...

Page 5: ...a Session 2 2 Site Survey Mode 2 8 Sky Type 2 9 Capture a Skyline 2 11 Quick Skyline Capture Mode 2 15 Align with Compass Align with Target 2 17 View the Skyline Measurement Data 2 19 Annual Sunpaths...

Page 6: ...YST hor 3 13 SkyXXWindowedObstructionElevations csv 3 13 AverageSolarAccess csv 3 15 AverageWindowedSolarAccess csv 3 16 AverageShading csv 3 17 ObstructionElevations csv 3 17 WindowedObstructionEleva...

Page 7: ...beyond the published operating and stor age temperature specifications found in Maintenance and Troubleshooting of the User Guide and in the Quick Start Guide Moisture Exposure to rain or condensation...

Page 8: ...re about the performance and payback of their systems hire installers that use the SunEye It is equally useful for photovoltaic PV passive hot water roof mount or ground mount systems The Sun Eye can...

Page 9: ...e SunEye Desktop Companion software Although you will not have any data to analyze on the desktop yet this will allow you to view the user s guide 2 The SunEye will most likely not need to be updated...

Page 10: ...elcome screen is not showing click on the Solmetric installer icon in the task bar at the bottom of your screen If the welcome screen is accidentally closed click on setup exe from the DVD as describe...

Page 11: ...without the external power connection for approximately 6 hours of continuous opera tion Power Status LED Indicator Green SunEye is turned on under battery power Red flashing SunEye is plugged into po...

Page 12: ...Easy to use finger driven touch screen interface SunEye 210 1 Digital camera with fisheye lens 6 Built in stylus 2 Touchscreen VGA display 7 Reset button DC Power USB Port 3 Standard camera tri pod mo...

Page 13: ...personal computer screen Tapping your finger on the screen is similar to clicking a mouse NOTE You will find that your fingernail works better than the fingertip on the touch screen Five Way Navigati...

Page 14: ...e solar array as well as the tilt of the array or pitch of the roof Wrist Strap You may choose to use the included wrist strap for an added measure of security with the free dom of easy one handed ope...

Page 15: ...ds Does not lose date time or any user data Hard Reset Green side button Hardware reset Reboots device and resets clock This takes about 50 sec onds Reinstall Reset Green side button center navigation...

Page 16: ...1 10 Getting Started System Controls and Settings...

Page 17: ...een fully charged as described previously connect the power cable to the DC power port located on the right side under the rubber I O door 2 Press the Power button Set correct Date and Time 1 Select m...

Page 18: ...includes a fisheye image a sunpath diagram and solar access calculations Every time a new skyline is captured the data is stored under the current session One session can hold many skylines You can ad...

Page 19: ...the New session dialog box Figure 2 2 New Session 3 You can accept the default session name for example Session 1 or you can select the keyboard icon next to the Session Name text box on the display a...

Page 20: ...word click on the word where it appears above the text area as shown in the example below This feature reduces the amount of typing required to enter text Figure 2 4 Session Name Auto Complete 5 Clic...

Page 21: ...te 6 Select Next to advance to the Location dialog box to enter the site location information Figure 2 7 Location 7 Select the location of the site using one of the following methods List of cities fo...

Page 22: ...then Next Figure 2 9 Get New GPS Location b Click on Acquire Session Location and the latitude longitude and calculated magnetic dec lination will be acquired If you would like the GPS to acquire the...

Page 23: ...information about the selected NREL weather station is displayed By default the SunEye selects the weather station that is closest in geographical distance to the session location that you entered Th...

Page 24: ...urveying a site to understand exactly where on a roof or potential array site the best module locations exist In this mode a live preview is visible through the fisheye lens and in real time the calcu...

Page 25: ...pturing many skylines however this editing operation may become time consum ing You can increase the accuracy of the detection by using a new feature that adjusts the SunEye 210 s color balance before...

Page 26: ...entified as obstruction Figure 2 15 Clouds and Blue Sky Setting At other times shading obstructions may be incorrectly identified as open sky See for instance the tree branches in the image detail bel...

Page 27: ...NOTE The SunEye 210 has a built in electronic compass It is important to understand that all magnetic compasses are susceptible to magnetic fields from external magnets or objects containing iron such...

Page 28: ...rameters html array_type Fixed For a fixed panel enter the orientation by tapping on the Azim numeric box to set azimuth True or Magnetic and the Tilt numeric box to set tilt 1 Axis For 1 Axis trackin...

Page 29: ...azimuth and tilt such as for racked systems on flat roofs This can be set in the SunEye Setup in the Tools menu 2 Set the default skyline panel azimuth and panel tilt then select OK You will now see a...

Page 30: ...nd level as accurately as possible The SunEye will alert the user when the azimuth or tilt cannot be corrected and force another measurement The SunEye will alert the user if the azimuth or tilt corre...

Page 31: ...Skylines may be shortened to speed the data capture process Processing for Skyline analysis open sky and obstruction detection and solar access computations is delayed until a more convenient time Pro...

Page 32: ...default skyline panel orienta tion in the Panel Orientation dialog box refer to Capture a Skyline on page 2 11 for details Figure 2 27 Skyline Note You can enter or change the note for the skyline by...

Page 33: ...tiles on a roof surface The azimuth of the target is not necessarily South or North in the Southern Hemisphere To use Align with Target use the following procedure 1 In the preview mode tap the arrow...

Page 34: ...ake the skyline by aligning the SunEye device with the Target and holding it level The screen will have a reference line as an aid to point the device at the Target s azimuth The center top of the scr...

Page 35: ...a You can choose from four main views of your skyline data Annual sunpaths view Monthly solar access view Obstruction elevation view Full fisheye view You can also choose to view average data for mult...

Page 36: ...ormation Windowed Access Calculates solar access only within a window of time in months and time of day The user specifies the months and time window and solar access is calculated only for that windo...

Page 37: ...d hours to be included in the window for calculations Figure 2 36 Windowed Access Settings Dialog The windowed solar access numbers are displayed as shown in the figure In addition window is displayed...

Page 38: ...le the user perspective is looking down at the display By reversing the image the sunpaths will go from left morning to right evening when overlaid on the fisheye image NOTE The sunpath hour lines do...

Page 39: ...ew Obstruction Elevation You will see the graph showing elevation angle of the highest obstruction at each azimuth The Obstruction Elevation view can be configured for a range of azimuth values to dis...

Page 40: ...ange tab select the Azimuth center in degrees for example 180 for south This value is the center of the x axis in the graph Next select the Number of windows that will be displayed and the Azimuth win...

Page 41: ...Data for multiple skylines in a session can be processed together and displayed as average solar access or as average or maximum obstruction elevation angles Select Session Session Data Summaries Cho...

Page 42: ...ndowed with the same windowed settings This shows average solar access for all selected skylines but only within the month and time windows selected An example is shown below Figure 2 47 Windowed Sess...

Page 43: ...splay the average obstruc tion elevation for all skylines within each defined Azimuth Window This is therefore the aver age value in the window for all skylines Tools This section describes the Edit T...

Page 44: ...n moving the brush around the image You can hold the paint brush anywhere in the large box that surrounds the small yellow square Only the yellow square actually paints Figure 2 49 Removing Obstructio...

Page 45: ...ire image as opposed to just in the sunpath region as shown below Figure 2 52 Edit Mode Showing Shading Outside Sunpaths 6 Select the X icon and then select New Scenario SkyXX N to save your edited ve...

Page 46: ...selecting View Zoom In Edit mode the zoom and pan tools are part of the tool bar on the right side of the display Use the zoom in and zoom out tools to magnify or demagnify the displayed image Select...

Page 47: ...yline note NOTE You can also use the SunEye Desktop Companion software to transfer the sessions and skyline data through USB to your PC to store further analyze the data or add or modify notes See Cha...

Page 48: ...is degraded or in question relative to other references More information on when and how to perform the compass calibra tion can be found in Compass Calibration on page 5 2 By laying the SunEye on the...

Page 49: ...e NOTE This is a key set up parameter Location time zone orientation and even skyline editing can be changed later However the date and time must be entered correctly initially About Solmetric SunEye...

Page 50: ...a location that is difficult to access Analyze the shading of a roof that is too sloped to walk on Analyze the shading of a roof that is made out of a material that cannot be walked on Analyze a locat...

Page 51: ...unting plate is bolted to the top of the extension pole and both protects the SunEye 210 and safely fas tens it to the Extension Kit The dimensions of the mounting plate are designed so that the Sun E...

Page 52: ...safety very seriously and we encourage the operator to be careful when using the SunEye Extension Kit CAUTION Do not use the Extension Kit near cables electric power lines or telephone lines Maintain...

Page 53: ...t in fin ger tight and ensure that the SunEye is securely attached 2 Set up the SunEye Adjust the SunEye setting for operation with the SunEye Extension Kit First establish a session and enter preview...

Page 54: ...hat the SunEye is approxi mately level and wait a few seconds The SunEye will automatically snap a skyline and announce that a measurement has been taken Skyline Captured NOTE If the device is tilted...

Page 55: ...tically corrected for the azimuth and tilt of the device when the image was snapped The top of the annual sunpath view is always in the direction that the device was point ing when the image was snapp...

Page 56: ...ion cord as long as the desired extension height Note that the USB can support up to a 5 meter cable without an active repeater In this mode the operators have access to all SunEye features and can ca...

Page 57: ...ptions If you have not yet installed the SunEyeDesktop Companion software please refer to the instructions in Installing the SunEye and Desktop Companion Software on page 1 3 Launch the SunEye Desktop...

Page 58: ...ailable in the Sessions folder normally My Documents Solmetric SunEye Sessions the folder can be transferred via e mail or through shared disc access It is important not to alter the folder contents o...

Page 59: ...erating Reports 1 Within the Desktop Companion application click File Export Session Report and Data to export the session data to a report and to generate exported data files The export tool combines...

Page 60: ...be used in session averages and session related output calculations and files Then select windowing parameters if needed Figure 3 4 Select Report Parameters If you selected Obstruction Elevation then...

Page 61: ...tion about these values refer to Obstruction Elevation View on page 2 23 Figure 3 6 Configure Windowed Access Parameters If you selected Solar Access then click Next and define the start and stop date...

Page 62: ...ort was saved By default reports are saved in My Documents Solmetric SunEye Exported Reports Print the Report The report contains a hyper link under the title Importable and printable version of the r...

Page 63: ...soft pro vides a free Add in that supplies this functionality which can be downloaded from Microsoft The name of the Add in is Microsoft Save as PDF or XPS Once this Add in is installed fol low these...

Page 64: ...Dec 1 35 16 36 72 38 16 55 61 64 65 85 11 95 29 77 34 54 97 47 97 40 07 29 13 2 35 16 36 72 38 16 55 61 64 65 85 11 95 29 77 34 54 97 47 97 40 07 29 13 3 35 16 36 72 38 16 55 61 64 65 85 11 95 29 77...

Page 65: ...46 56 45 26 100 100 100 100 100 100 100 100 100 100 5 46 54 50 59 100 100 100 100 100 100 100 100 100 100 6 46 54 50 59 100 100 100 100 100 100 100 100 100 100 7 46 54 50 59 100 100 100 100 100 100 1...

Page 66: ...on Name Ses sion 1 Skyline Sky 01 Creation Date 11 3 200 9 10 4 3 00 AM Latitude 37 Longitude 122 Mag Dec 14 Panel Tilt 37 Panel Azimuth 180 Time Zone GM T 8 00 A value of 1 implies that the time inte...

Page 67: ...ng that is they assume no shading An example of the header and part of the data is shown below Insolation 1 1 Session Name Session 1 Skyline Sky01 Creation Date 11 3 2009 10 43 00 AM Latitude 37 Longi...

Page 68: ...on The region outside of the sunpaths may be important for ambient light analysis The obstruction ele vation data in this file is also useful for importing into other design analysis software An exam...

Page 69: ...s importable by PVSYST GROUPE ENERGIE CUEPE University of Geneva SkyXXWindowedObstructionElevations csv This file contains elevation values either average or maximum within user specified azimuth wind...

Page 70: ...ng Reports The elevation given for each azimuth window center is the maximum of all of the elevations in that window begin data Azimuth Window Center North 0 East 90 Maximum Elevation 0 90 67 5 22 90...

Page 71: ...session An example of the header and data is shown below Average Solar Access 1 0 Session Name Session 1 Creation Date 2 16 2009 17 02 Latitude 39 Longitude 123 Mag Dec 15 Time Zone GMT 8 00 Number of...

Page 72: ...ple of the header and data is shown below Windowed Average Solar Access 1 0 Main Street Creation Date Latitude 38 4 Longitude 122 8 Mag Dec 14 6 Time Zone GMT 08 00 Number of skylines 4 Window Month R...

Page 73: ...file contains a session summary of Windowed Obstruction Elevations for all selected skylines in the session with the Azimuth window defini tions defined by the user If the maximum elevation is select...

Page 74: ...um of multiple skylines selected by the user PVSYST horizon angles averages hor PVSYST horizon angles maximums hor This is an obstruction elevation file that is importable by PVSYST GROUPE ENERGIE CUE...

Page 75: ...trike a specific sur face over time four variables need to be considered Solar irradiance Shading Air quality and clouds Surface orientation Solar Irradiance The sun is a tremendous source of energy f...

Page 76: ...skyline image NOTE The annual sunpaths are drawn in standard time and the exported csv data files are also in standard time Daylight savings adjustments must be applied manually where appropriate Sha...

Page 77: ...uses TMY3 hourly insolation data when the NREL TMY3 weather model is selected When using this model the NREL weather station must be selected normally the one closest to where the SunEye session is b...

Page 78: ...of the site location For example if the latitude of the site that is being evaluated is 37 then by default the solar access calculations performed in the SunEye are assuming a surface tilt of 37 from...

Page 79: ...longitude For either weather model the solar access numbers reported by the SunEye are percentages that are calculated by first calculating insolation Wh m2 for every 15 minute time interval every fou...

Page 80: ...4 6 Solar Access and Interpretation of Data Numerical Calculations...

Page 81: ...etric com support Periodically clean the lens with a lint free lens cleaning cloth Maintain the battery charge level and avoid allowing the battery to go completely dead even when not in use Charging...

Page 82: ...gnetic disturbances and the compass reading is still incorrect then a field calibration should be performed The compass is calibrated by orienting in six different directions as directed by the calibr...

Page 83: ...or must be centered and locked yellow for the calibration point to be accepted Two measurements are made at positive and negative tilts for the Northern orientation Tilt the SunEye so that the level i...

Page 84: ...the SunEye The figures below are examples of the errors you may get if you need to do a second calibration With the first error if you are certain that there is no magnetic interference and this mess...

Page 85: ...el 2 Double click on Add or Remove Programs 3 Locate and select SunEye 4 Click Remove 5 Close the Add or Remove Programs window 6 Install the older version as you would any version by double clicking...

Page 86: ...unEye we would greatly appreciate your feedback For 24 hour self help technical support visit our online Knowledge Base at http www solmet ric com knowledgebase html If you experience a software issue...

Page 87: ...or Transportation 4 F 20 C to 140 F 65 C Weight 1 0 lb Display Resolution 640 X 480 VGA Battery Life 6 Hours typical with backlight on 120 days typical in power off state Backlight To preserve power t...

Page 88: ...nterference to radio communications However there is no guarantee that interference will not occur in a particular installation If this equipment does cause harmful interference to radio or television...

Page 89: ...Radiation The installer of this radio equipment must ensure that the antenna is located or pointed such that it does not emit RF field in excess of Health Canada limits for the general population con...

Page 90: ...5 10 Maintenance and Troubleshooting Regulatory Compliance...

Reviews: