- 22 -
Installation of the Transducer
7
th
)
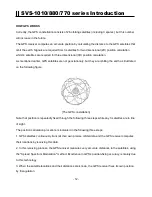
Go to the inside of the hull and slide the hex nut over the end of the cable. Fit the hex nut over
the end of the transducer and tighten it. (On a vessel with a wooden hull, do not tighten the nut
completely right away. Allow some time for the wood to swell after the vessel is put in the water. Be
sure that the correct end of the transducer is pointing forward see Picture 1-1
8
th
)
Remove any excess sealant from the outside of the unit to assure smooth water flow over the
face of the transducer.
9
th
)
As soon as the boat is placed in the water, check for leaks. Check again within 3 to 5 hours.
(You may not be able to see a small leak right away.) If there are any leaks, you must repeat the
installation procedure.
Summary of Contents for SVS-1010
Page 1: ...1 SVS 880 1010 OPERATION MANUAL...
Page 11: ...11 SVS 1010 series Flush Mounting SVS 770 880 series Flush Mounting...
Page 29: ...29 2 Specification of the connectors...
Page 32: ...32 3 3 Navigation Data page 3 3 1 Navigation Data Type1 3 3 2 Navigation Data Type2...
Page 43: ...43 Fig 1 6 3...
Page 55: ...55 2 9 Sorting MENU User data WPT List MENU Sorting the order of WPT s on the list...
Page 67: ...67 The maximum range of Correction Offset is 5nm...
Page 80: ...80 2 2 Detail Choose the AIS target and press ENTER 2 3 Goto Choose the AIS target and press...
Page 85: ...85...
Page 95: ...95...
Page 103: ...103...
Page 117: ...117...


