28
Watching TV
Manual setting for each channel (Analogue)
(continued)
Sound system (Broadcasting system)
Press
a
/
b
/
c
/
d
to select the channel you
want to edit, and then press
?
.
• The selected channel information displays.
Press
a
/
b
to select “Sound sys.”, and then
press
?
.
• Receivable sound systems (Broadcasting systems)
are listed.
1
2
Press
a
/
b
to select the optimum sound
system, and then press
?
.
3
Labelling channels
You can change individual channel names.
Setting the child lock
You can block the viewing of any channel.
Press
a
/
b
/
c
/
d
to select the channel you
want to edit, and then press
?
.
• The selected channel information will be displayed.
1
Press
a
/
b
to set “Lock” to “On”, and then
press
?
.
3
Press
a
/
b
to select “Lock”, and then press
?
.
• Child lock menu will be displayed.
2
NOTE
• See page 33 for setting a password.
• If “Lock” is set to “On” for a channel, “Child lock has been
activated” is displayed when you select the channel, and
the image and sound of the channel is blocked.
• When pressing
RETURN
while “Child lock has been
activated” is displayed, password input menu will be
displayed. Inputting the correct password lifts the child lock
temporarily until the power is turned off.
Skipping channels
Channels with “Skip” set to “On” are passed over
when using
CH
r
/
s
even if selected while watching
the image from the TV.
Press
a
/
b
to set “Skip” to “On”, and then
press
?
.
3
Press
a
/
b
/
c
/
d
to select the channel you
want to edit, and then press
?
.
• The selected channel information will be displayed.
1
Press
a
/
b
to select “Skip”, and then press
?
.
• Skip menu displays.
2
NOTE
• Check the sound system if the sound output were not
correct.
NOTE
• The name can be 5 characters or less. Select “Done” to set
the channel name.
w
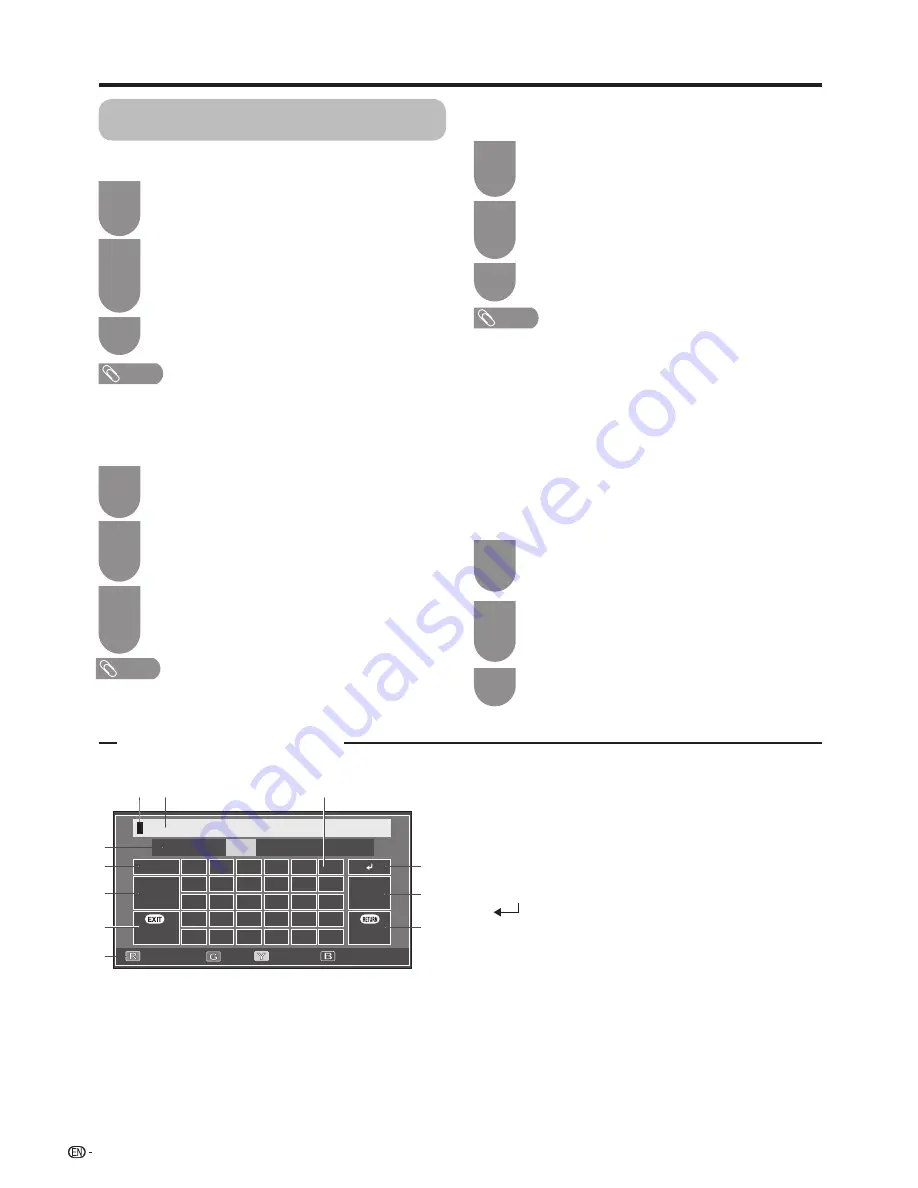
Using Software keyboard
The software keyboard appears when you
need to input text.
Char.Set
Cursor Left
Cursor Right
Caps
Char.Set
123 ./@
abc
Caps
a
b
c
d
e
f
g
h
i
j
k
l
m
n
o
p
q
r
s
t
u
v
w
x
y
z
:
/
.
SP
Done
Clear
Delete
Cancel
1
8
7
6
2
3
4
9
10
11
5
1 Char. Set
Changes character set into the alphabet, numbers,
symbols, etc.
2 Caps
Changes characters to capital/lower case.
3 Done
Confirm the entry.
4 Cancel
Abort input and close the software keyboard.
5 R/G/Y/B (Colour) buttons
Selects the coloured items on the screen.
6 Input cursor
Press
c
/
d
to move the cursor when highlighted.
7 Input field
The text you enter is displayed as you type it in.
8 Character
Input characters by using these buttons.
9
Put a line break.
10 Clear
Erases the character string.
• When the cursor is somewhere in a line: the
character string to the right of the cursor will be
erased.
• When the cursor is at the right end of a line: the
entire line will be erased.
11 Delete
If the cursor is at the right end of a line, this erases
text one character at a time.
• You can also delete text by pressing
RETURN
on
the remote control unit.
Use the software keyboard to input the new
name.
• Refer to
“Using Software keyboard”
at the
bottom of this page.
3
Press
a
/
b
/
c
/
d
to select the channel you
want to edit, and then press
?
.
• The selected channel information displays.
1
Press
a
/
b
to select “Label”, press
?
, and
then press
?
again.
• The software keyboard will be displayed.
2


