background image

Confidential & Proprietary|© ROKIT Healthcare Inc. 2019. All Rights Reserved

Dr. INVIVO 4D User Guide

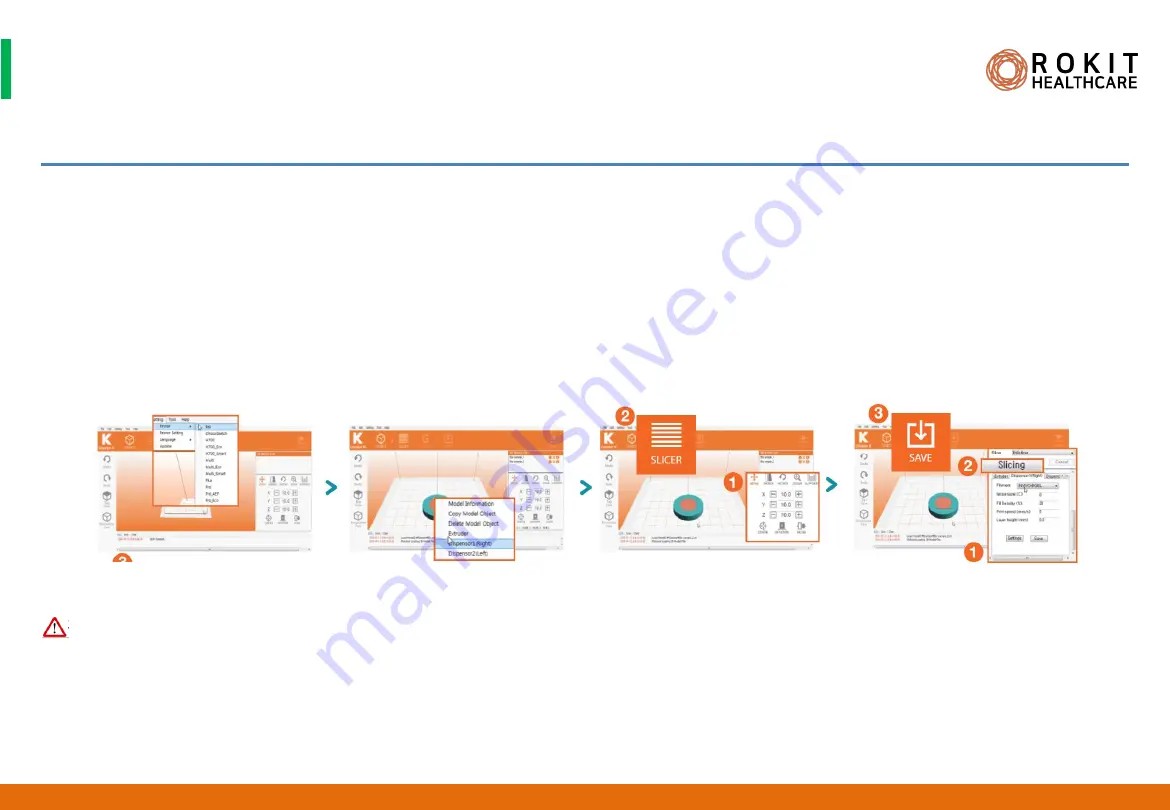
Creating a G-Code for Dual Printing

1. Run [New Creator K] installed on your PC.
2. Select [Settings]> [Printer]> [Bio] on the top menu of NewCreatorK.
3. Press [File]> [Open] to load two 3D model files.
4. Right-click on each object and select the desired dispenser type.
5. In [OBJECT], you can individually move and rotate, set the dimensions of each file. Press the [Ctrl] key to do it with the both file 

simultaneously.

6. In [SLICER], enter the printing setting parameters (output speed, output nozzle temperature, fill%, etc.).
7. Click the [Slicing] button at the top to create a G-Code file, and then click the [SAVE] button to save the file.

1. The right Dispenser is Dispenser1 and the left Dispenser is Dispenser2.

37

INV-CHS-20191210

CAUTION

Summary of Contents for Dr. INVIVO 4D

Page 1: ...Changing the world by serving patients through personalized regenerative therapeutics Version 2020 01 15 ...

Page 2: ...Confidential Proprietary ROKIT Healthcare Inc 2019 All Rights Reserved Table of Contents 2 1 2 3 4 5 6 7 INV CHS 20191210 ...

Page 3: ...alteration of your products software or data iv statements or conduct of any third party v any other matter relating to the product software or services The text and drawings herein are for illustration and reference only The specifications on which they are based are subject to change ROKIT Healthcare may at any time and without notice make changes to this document ROKIT Healthcare for itself and...

Page 4: ...e electric shock or fire Use an outlet that matches the electrical capacity of the equipment provided including any accessory equipment If multiple devices are provided connect to a separate outlet for each device Do not install near any hot air or heat prone items places exposed to moisture oil dust direct sunlight water rain etc or gas leaks or flammable volatiles The above may result in electri...

Page 5: ...as flammable sprays burning materials dry ice medicines or academic materials near the equipment Also do not store volatile or flammable objects or materials benzene thinner propane gas etc or electrical appliances Do not allow water other liquids or foreign objects to enter the equipment If water other liquids or foreign objects get inside it may cause equipment failure electric shock or fire If ...

Page 6: ...re due to short circuit After cleaning check that the power cord is not damaged that there is no heat generation on the power plug and that the plug is plugged in properly Avoid using it under the direct sunlight high heat or cold temperature Avoid using in places with high vibration Do not push or tilt the equipment with excessive force It may cause personal injury or damage the floor The coolant...

Page 7: ... the UV lamp when not using the equipment The recommended replacement cycle of the UV lamp is 14 months based on 24 hours of use Cautions when using the HEPA filter Turn on off the HEPA filter with the green switch on the upper right side of the equipment Turn off the UV lamp and start the HEPA filter before starting to use the equipment The recommended replacement cycle of the HEPA filter is 8 mo...

Page 8: ...f the future is in your hands INVIVO is the world s first clean bench hybrid 4D biofabricator capable of printing biologically active structures with materials ranging from cells and hydrogels to thermoplastic filaments pellets and slurries INVIVO offers Wide range of material types including cells hydrogels polymeric filaments pellets and slurry Versatile three printhead technologies with the wid...

Page 9: ...Confidential Proprietary ROKIT Healthcare Inc 2019 All Rights Reserved Dr INVIVO 4D Overview Technical Specifications 9 INV CHS 20191210 ...

Page 10: ...hanical precision motor syringe 10 ml default 3 ml optional Curing UV Lamp UV LED 365 nm UV LED 365 nm Syringe Bio Dispenser Temperature Control Temperature control function 4 60 Temperature control function 4 60 Printing Bed Temperature Control Temperature control function 4 60 Temperature control function 4 60 Nozzles Extruder Ø 0 2 0 4mm Syringe Bio Dispenser Ø 0 1 0 4mm Extruder Ø 0 2 0 4mm Sy...

Page 11: ...0191210 1 Bio Dispenser 1 ea 2 Filament Extruder 2 ea 3 Filament Guide Tube 1 ea 4 Filament Holder 1 ea 5 Pin 1 8mm 1 ea 6 Niddle 0 18mm 1 pack 7 Hex Wrench 1 5 2 0 2 5 3 1 set 8 Allen Bolt 4x45 6 ea 9 Countersunk Bolt 4x12 5 ea 10 Thickness Gauge 1 ea 11 Syringe 10ml 5 ea 12 Syringe Tip 6 ea 13 Taper Tip 6 ea 14 Petri Dish 1 pack 15 Dongle Wireless LAN 1 ea 16 Leveling Jig 1 ea 17 Screwdriver 1 e...

Page 12: ...r Tube cto5 1 ea premium 2 Air Tube cto6 1 ea premium 3 Connecting Cable 1 ea premium 4 Rubber O ring 1 ea premium 5 Power Cable Air Dispensor Controller 1 ea premium 6 Air Tube 1 ea premium 7 Coupler 1 ea premium 1 Power Cable Temperature Controller 1 ea premium 2 Invivo Liquid Coolant 6 ea premium 3 Rubber Hose 2 ea premium 4 Clamp 4 ea premium 5 Silicone Cover 1 ea premium 6 Valve Fitting 4 ea ...

Page 13: ...y to withstand the weight of the equipment Install the equipment with some space for ventilation Be sure to keep the back side at least 5 cm from the walls for good ventilation Avoid places with direct sunlight high heat or excessive cold Install at an ambient temperature typically between 5 and 35 If the temperature at the installation place is too high or too low the heating or cooling function ...

Page 14: ...t 4 Turn on the power 5 When the system boots an Android logo appears If operational the NewCreatorK app would turn up on the LCD screen 6 Turn off the power Remember to keep the system turned off during installation and connection of accessory equipments to the body Dr INVIVO 4D Installation Before removing package After removing package Power on NewCreatorK on Power off Installation of INVIVO Bo...

Page 15: ...e are no bubbles in the hose 10 After the coolant circulates check the inside of the tank and add coolant if the level has dropped 11 Turn off the power of the Temperature Controller 12 Align the groove of temperature control cable with the one in the socket and connect it gently Do not use excessive force 13 Turn on the body and the Temperature Controller together Operate the Temperature Controll...

Page 16: ...s Reserved Dr INVIVO 4D Installation 16 Circulate the coolants 3 4 min Power off When installing connecting and disconnecting any parts or equipment power off the system first 1 1 2 2 3 2 3 4 5 6 7 8 9 11 10 10 13 12 WARNING INV CHS 20191210 520x480x365 16 5 kg ...

Page 17: ... turn the pressure regulator clockwise until you see the gauge needle move 7 Turn the regulator to adjust to the required pressure 8 Turn off the power and finish the installation 1 Before installing or using the Air Compressor be sure to read the operating instructions provided with Dr INVIVO 2 When not in use for a long time remove the air using the vacuum control knob on the Air Dispenser Contr...

Page 18: ...O 4D Installation 18 Installation of Air Compressor Premium Packaging specification 820 x 550 x 560 49 kg 1 1 4 2 3 When installing connecting and disconnecting any parts or equipment power off the system first CAUTION INV CHS 20191210 Packaging specification 820 x 550 x 560 49 kg ...

Page 19: ...rming that the power of Dr INVIVO is turned off connect the hot melt control connector 7 Insert the power cord plug into the power socket 8 Turn on the power of the Air Dispenser Controller 9 Check that the Air Dispenser LCD screen is on 10 Check the change of pressure on the Air Compressor 11 Check that the air pressure of the Air Compressor can be adjusted by the Air Dispenser Controller 12 Make...

Page 20: ...erved Dr INVIVO 4D Installation 20 Installation of Air Dispenser Controller Premium Packaging specification 480 x 440 x 205 7 kg 1 1 2 4 4 6 7 8 2 When installing connecting and disconnecting any parts or equipment power off the system first CAUTION INV CHS 20191210 ...

Page 21: ...r language settings and checking serial number and IP address Easy Mode Step by step guide for using INVIVO NewCreatorK App Start Display 1 When the installation of the Dr INVIVO Body and accessories have been completed turn on the power of all equipments 2 The start up screen of New Creator K appears as the LED screen below 3 Dr INVIVO is ready to use 1 After the installation of the Temperature C...

Page 22: ...ess network connection may be affected by the surrounding wireless environment 4 If your Internet service provider has permanently registered the MAC address unique identification number of your PC or modem you may not be able to connect the dongle to the Internet Ask your Internet service provider how to connect a device dongle other than your PC to the Internet 5 Firewall issues may prevent you ...

Page 23: ...ted 6 Fill each barrel or syringe with the material to be printed 7 Connect the appropriate nozzle or needle to the barrel or syringe for output 8 Correctly install a genuine barrel or genuine syringe containing the material to be printed in the Dr INVIVO Body 9 If you want to run the output from a PC install NewCreatorK on your PC and connect it with the Dr INVIVO You can connect with a USB cable...

Page 24: ...correctly 3 The replacement term of Dr INVIVO COOLANT is 1 year Using genuine coolant is recommended If there is coolant in the equipment 1 Make sure it has enough coolant If not turn off the power and then add coolant 2 After setting the temperature of BED SYRINGE of the parts to be used press the SET button 3 Do not turn off the power immediately after using the equipment Set the temperature to ...

Page 25: ...ait for the material to sufficiently melt i e 20 30 min Periodically press shot for checking whether the material comes out 6 Start the print 25 1 Turning the vaccum knob can often stop ooze from the printhead by applying a negative pressure on the total system 2 The maximum pressure is 9 9 bar 3 If you are not using the Air Dispenser lock the Air In switch on the back of the control box to reduce...

Page 26: ... pressure by controlling the pressure gauge of the Air Compressor 26 1 Loading of the Air Compressor starts at below 9 8 bar and stops when it reaches 11 3bar 2 Factory setting of the outlet pressure is 9 5 bar which can be controlled by the Pressure Regulating Valve Power Button Relay Timer Hour Meter Outlet Pressure Control Switch Outlet Pressure Control Gauge Total Pressure Gauge INV CHS 201912...

Page 27: ...ed feed the filament into the lower insertion hole of the motor until it is grabbed by the gear 4 Select 0 1MM 1MM or 10MM from Distance to discharge the filament 5 Select LOAD button on the Loading menu to extrude the filament until it is discharged from the nozzle 6 Check that the filament is discharged from the heated nozzle 1 The melting state viscosity and the extrusion speed of the filament ...

Page 28: ...e syringe piston wing with the dispenser mount This can be done by pressing the load and unload buttons 5 Select New Creator K APP Filament DISPENSER 1 RIGHT on the LCD display 6 Select between 0 1MM and 1MM to adjust dispenser mount s travel distance at Distance window 7 Select UNLOAD or LOAD to adjust the dispenser mount height to match the height of the piston 8 Select LOAD 0 1mm at a time to v...

Page 29: ...Place the dispenser into the dispenser module and connect the air tube to the appropriate air inlet located on the left wall of Dr INVIVO 6 Heat the barrel using the air dispenser controller and let the material melt This can take up to 30 minutes 7 On the LCD display select Settings Option Dispenser Type BIO Invivo ON 8 Return to the NewCreator K Materials Dispenser 2 L Select a distance between ...

Page 30: ...e center hole of the Dr INVIVO bed 7 When the right nozzle tip has been positioned to the bed center hole select SET button of the Right Offset 8 After 1 2 seconds the origin X Y coordinate value of the right nozzle is automatically calculated and entered X Y Positioning of the left nozzle 1 After X Y position set of the right nozzle select HOME button again to center the Dr INVIVO bed 2 Adjust th...

Page 31: ...MM to set distance first and click the arrow to move 3 When doing dual printing make sure to set the X Y positions of the right and left nozzles as accurately as possible 4 Start the X Y Position Set only after confirming that right and left printheads and nozzles have been installed properly to the system 5 Start the X Y Position Set only after removing objects such as Petri dishes from the Dr IN...

Page 32: ...i e with Petri Dish 1 Select New Creator K APP Printer View 2 In order to place a culture dish onto the print bed please adjust the location of the bed by using arrows on the display Please follow images below 1 Make sure the nozzle tip or needle doesn t hit the printing bed e g culture Dish 32 INV CHS 20191210 CAUTION ...

Page 33: ... axis up and down to adjust the gap between the nozzle tip and the bed 7 Use the thickness gauge to adjust distance between the nozzle tip and the bed Even if using the same nozzle diameter the ideal gap will vary across materials 8 Select FINISH to finish the bed leveling process 9 If you are leveling on the right side only use the micrometer to lift the left nozzle away from the bed for safety 1...

Page 34: ...ce the right and the left nozzle tips have been aligned in the Z axis with respect to the leveling jig bed leveling is complete 1 Please click on LCD button slowly Clicking on LCD button continuously may lead to malfunction on the display 2 Place printing bed e g Peri Dish before starting the bed leveling process 3 Be careful not to hit the right left nozzles or needles against the printing bed e ...

Page 35: ...rigin of the right nozzle set in Set X Y Position 4 Select HOME button of z axis After selecting this button nozzle can move below the z axis limit sensor 5 Select SET HOME POSITION and choose the travel distance among 0 1MM 1MM 10MM 6 Select the arrows on the Z axis up and down to adjust the gap between the nozzle tip and the bed 7 Use the thickness gauge to adjust distance depending on the chara...

Page 36: ...ick the Slicing button at the top to create a G Code file and then click the SAVE button to save the file 1 Every time X Y coordinates are updated on New Creator K on PC a new G Code file must be created 2 For details on how to use New Creator K refer to the NewCreatorK User s Guide 3 NewCreatorK does not support files with an extension of 3ds 4 NewCreatorK supports file names up to 26 English cha...

Page 37: ...ch object and select the desired dispenser type 5 In OBJECT you can individually move and rotate set the dimensions of each file Press the Ctrl key to do it with the both file simultaneously 6 In SLICER enter the printing setting parameters output speed output nozzle temperature fill etc 7 Click the Slicing button at the top to create a G Code file and then click the SAVE button to save the file 1...

Page 38: ...Reserved Dr INVIVO 4D User Guide Printing Files via an External USB Drive 1 Insert an external USB into the USB port on the top right of the Dr INVIVO body 2 Select New Creator K APP File Print USB on INIVIVO display 3 Select the file to print 38 INV CHS 20191210 ...

Page 39: ...1 Run New Creator K and click the CONNECT icon 2 Enter DEBUG NETWORK IP address 192 168 7 2 and click the Connect button on the right 3 Once your computer is connected to Dr INVIVO you will see the word Operational appear in the status line Upload your G code file and click the Print icon to begin printing 39 INV CHS 20191210 ...

Page 40: ...IVO display 2 Touch the Network tab to check your WIFI NETWORK IP 3 Run New Creator K and click the CONNECT icon 4 Type in the appropriate Network IP address Press the Connect button on the right 5 Once your computer is connected to Dr INVIVO you will see the word Operational appear in the status line Upload your G code file and click the Print icon to begin printing 40 INV CHS 20191210 ...

Page 41: ...rature panel increase the temperature setting of the nozzle sufficiently and preheat so that the cooled down filament can be melt and printed out 3 After warming up touch the UNLOAD button to remove the filament from the nozzle 4 While holding down the black one touch button at the top of the nozzle remove the inserted tube 41 1 After use remove the filament with the bobbin and seal it INV CHS 201...

Page 42: ...inge Bio Dispenser after Use 1 Select New Creator K APP Filament DISPENSER 1 RIGHT on Dr INVIVO display 2 Touch the UNLOAD button 3 Loosen the two screws holding the dispenser and remove the syringe from the dispenser mount As needed dispose the used syringe and wipe clean the dispenser mount 42 INV CHS 20191210 ...

Page 43: ...mers 1 You can store the spare syringes containing printing materials on the left bio ink warmer inside of the Dr INVIVO body 2 Select New Creator K APP Printer View on Dr INVIVO display 3 Set the desired temperature in TEMPERATURE 4 Get ready to pre heat the syringes at a desired temperature 43 INV CHS 20191210 ...

Page 44: ...the drive 2 Check the external USB drive type Use the FAT method 3 Clean any dust or residuals in the port of the external USB drive 4 Check the external USB drive capacity Dr INVIVO can read up to 2 gigabytes 5 All file names must be in English 04 I want to copy files to the internal memory when printing using an external USB drive 1 When you print from an external USB drive each file is automati...

Page 45: ...set has been performed and the X Y origin setting has been deleted 3 Cause 3 The X Y origin setting has been deleted by updating the firmware 4 Solution Make sure the NewCreator K is installed properly and reset the X Y origin 08 In the PC NewCreator K how can I adjust the screen view to move the bed around 1 To move the bed in X Y Z directions move while pressing down on a right click and the CTR...

Page 46: ... an appropriate software to convert the ascii types to binary types 2 Reduce the file size of 1 4G 1 7G files using Meshmixer 3 Reduce the object size of 70mm 90mm to a size apt for dual printing 4 Objects 90mm should be printed on a larger culture dish or glass plate without walls No File Name File Extension File Size File Type Object Size Reasons for Trouble 1 mockup stl 1 3M ascii 20mm x 20mm x...

Page 47: ... Speed at which the printhead hops 15 How do I use parameters in Quality on NewCreatorK slicing settings 1 Shell thickness mm Thickness of the outer shell 2 Initial layer height mm Z leveling How far away you start the print from the floor 3 Line Width Ratio Determines overlap between the infills 4 Cut off object bottom mm Distance at the object gets suck into the platform useful for objects that ...

Page 48: ...turning off 2 If the Temperature Controller had been at above room temperature it is okay to turn off immediately 20 How can I recalibrate the temperature measurements in the Temperature Controller 1 Press the set button for longer than 3 seconds Disp menu Press set longer than 1 second g cel menu press down arrow once g1 n press set button 6 times bias menu press the arrows up or down accordingly...

Page 49: ...sult the customer service after sales technicians 2 If the end user were to directly replace the filter open the INVIVO upper lid and remove the fan and brackets first before removing the filter Assemble in the reverse order 24 What is the maintenance guide for the extruder nozzles 1 If daily use the extruder nozzles should be replaced in 3 months Under normal circumstances the period is 6 months ...

Page 50: ...chamber of INVIVO at 99 9 disinfection rate in approximately 10 minutes 2 The default wavelength is 253 nm the power is 12 Watts 6 Watts per lamp 2 lamps 27 How do I use the camera If using the camera app 1 On Google Play store download the app V380 2 Find the serial code of the installed camera in the INVIVO 3 Go to Settings on the smartphone and select Wi Fi 4 On Wi Fi window please select the s...

Reviews: