background image

• The start menu is only displayed the first time the projector is used. However, the start menu is

displayed when the projector is turned on after [Reset All] in [Default Settings] is executed.

• The display language and lamp power level can also be changed in the menu screen. For details,

see p.90 "Default Settings Menu".

Selecting an Input Signal

Select a signal that is compatible with the equipment that is connected to the projector.

1.

Turn on the equipment that is connected to the projector.

To project the image of a video player, press the play button on the video player.

2.

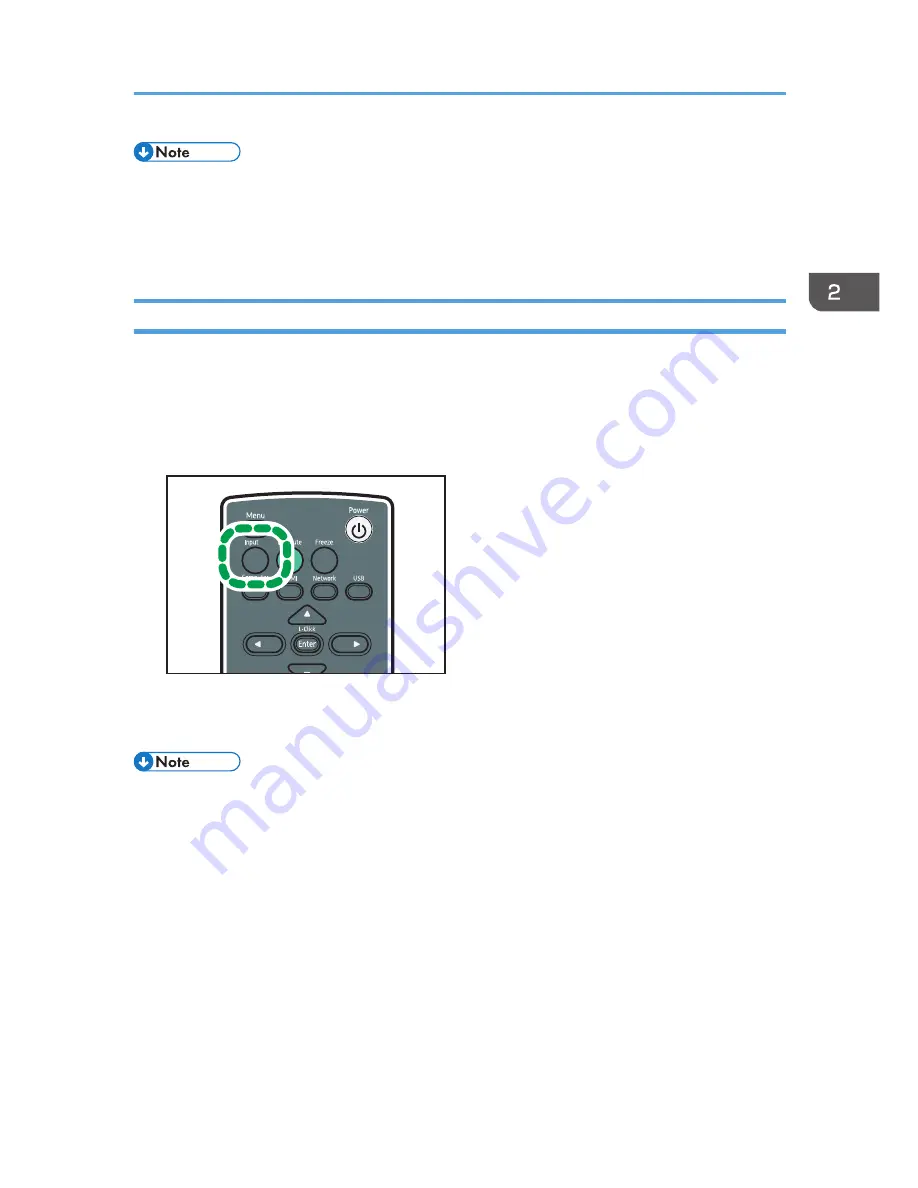
Press the [Input] button.

CLB019

The input signal is detected automatically and the image is projected. The input signal changes
each time the [Input] button is pressed.

• In step 2, the input signal selection screen appears if [Off] is specified for [Auto Input Search] in

[Default Settings]. Select a signal that is compatible with the equipment that is connected.

• Switch the computer's image output when projecting a notebook computer's screen. For details, see

p.36 "When projecting the screen of a notebook computer".

• You can also select the input signal directly with the [Computer], [HDMI], [Network], or [USB]

button on the remote control.

• The standby screen for the network input is displayed if the signal is lost or there is no signal being

input from the connected equipment. Check that the equipment is turned on and that it is properly
connected to the projector.

• If the project does not support the input signal, a "Unsupported signal" message is displayed.

Basic Operations

35

Summary of Contents for PJ WX4130n

Page 1: ...Operating Instructions For safe and correct use be sure to read Safety Information before using the machine...

Page 2: ......

Page 3: ...View 15 Front and Left Side View 16 Rear and Right Side View 17 Remote Control Parts and Their Functions 18 How to Use the Remote Control 20 Effective Range of the Remote Control 20 Loading Batteries...

Page 4: ...Projector via a Network Connecting the Projector to a Network 53 Connecting Using an Ethernet Cable 55 Connecting Using a Wireless LAN 57 Wireless LAN Connection Workflow 57 Simple Wireless LAN Setup...

Page 5: ...ctor 116 Cleaning the Projection Window 116 Cleaning the Projector 116 Replacing the Lamp 117 Managing the Projector Using Projector Management Utility 120 Installing Projector Management Utility 120...

Page 6: ...Control Port 135 Copyrights 137 Updating the Firmware 138 Where to Inquire 139 Trademarks 140 INDEX 143 4...

Page 7: ...f parts other than genuine parts from the manufacturer with your office products Notes to Users Viewing 3D Images Pay attention to the following points when viewing images using 3D glasses with the pr...

Page 8: ...the screen may result in eye strain The distance between the screen and you should be at least three times the height of the screen Adult supervision is required for children using 3D glasses Viewing...

Page 9: ...basic information about how to install the projector Since the contents of this manual are a summary of Operating Instructions see Operating Instructions for detailed information Operating Instructio...

Page 10: ...Manual Name Printed Manuals Provided PDF Manuals Provided Operating Instructions No Yes 8...

Page 11: ...included in the following folder on the CD ROM Manual language 1 Insert the CD ROM in the CD ROM drive of your computer 2 Specify a language The launcher screen appears 3 Click Read PDF manuals The P...

Page 12: ...d remote control It also indicates items displayed on the menu screens Notes Contents of this manual are subject to change without prior notice Two kinds of size notation are employed in this manual S...

Page 13: ...ge temporarily Magnify Zoom Pressing the Magnify button enlarges the projected image Pressing the Zoom button reduces the projected image Wall color correction You can adjust the hue of the image in a...

Page 14: ...te the mouse pointer on a computer by using the remote control provided with the projector Network Utility Network Utility is an application that is provided with the projector and is used for connect...

Page 15: ...is included in the package If anything is missing or damaged contact your sales representative or service representative Remote control AAA battery LR03 2 ea RGB cable 3 m Power cord Mouse remote con...

Page 16: ...perating Instructions and various applications are on the provided CD ROM For procedures about how to read Operating Instructions see p 9 Viewing the PDF Manual on the CD ROM For instructions about us...

Page 17: ...f Flashing at 1 or 3 second intervals Standby Flashing at short intervals Starting up or cooling 2 Input button Switches the signal input The input signal changes each time the button is pressed 3 AV...

Page 18: ...3 4 5 1 Remote control receiver LED indicators Receives the signal from the remote control You can confirm the status of the projector by referring to the LED indicators The left LED shows the status...

Page 19: ...putting RGB signals from a computer or component image signals Y Pb Pr from a video player 5 Video In port For inputting image signals from a video player 6 Audio In port For inputting audio signals f...

Page 20: ...o go to the previous page These buttons can be used when the mouse remote control receiver is connected to a computer 4 Magnify buttons Enlarges the image Press the button to enlarge the image Press t...

Page 21: ...sed to enter numbers 15 Auto set button Automatically adjusts the image to match the signal input from a computer 16 Picture button Switches the screen mode 17 Clear button Deletes entered characters...

Page 22: ...ol Effective Range of the Remote Control Point the remote control at the remote control receiver on the projector to use it The effective range of the remote control is about 4 5 meters 14 7 feet from...

Page 23: ...ccording to the polarity Do not charge non rechargeable batteries Do not heat or throw the batteries into fire or water Do not connect the positive and negative terminals on a battery with a wire Remo...

Page 24: ...batteries if the remote control does not work or if the effective distance becomes too narrow Inputting Text Use the keyboard that is displayed on screen to input text on the setting screen 1 Use the...

Page 25: ...computer A computer with a USB port that supports USB 2 0 can be used Supported operating systems are Windows XP Vista and 7 Connect the mouse remote control receiver to a computer only when operatin...

Page 26: ...se remote control receiver To drag and drop hold down the Enter button while moving the pointer with the arrow buttons and then release the button at the targeted location Operating Multiple Projector...

Page 27: ...as the controller ID specified in the projector s Default Settings menu The ID number specified in the remote control is effective until a different ID number is specified The ID number in the remote...

Page 28: ...f two ways Select the setting according to the position of the projector in Projection Mode under Default Settings For details see p 90 Default Settings Menu Standard The projector is placed in front...

Page 29: ...ion height 48 inches 12 cm 4 6 inches 9 cm 3 7 inches 60 inches 17 cm 6 5 inches 12 cm 4 7 inches 80 inches 25 cm 9 8 inches 16 cm 6 2 inches 1 The sizes of the projected images are for a full size im...

Page 30: ...signals connect an audio cable to the Audio In port of the projector and to the audio output of a computer If an HDMI interface is available on a computer you want to use connect an HDMI cable to the...

Page 31: ...audio output of the recorder or the player If an HDMI interface is available on a device you want to use connect an HDMI cable to the HDMI ports of the projector and the device CLB026 4 3 6 7 1 2 5 1...

Page 32: ...ld result in electric shock Do not place the power cord and connection cable in a way that might cause someone to trip and fall The product might fall over and cause an injury Push the power plug all...

Page 33: ...projector CLB028 2 Insert the power plug into a power outlet Do not place anything near the power outlet When Power On Method in Default Settings is specified as Auto the projector turns on as soon a...

Page 34: ...1 Preparations for Using the Projector 32...

Page 35: ...an extended period of time If the lamp is used for an extended period of time it may not light up or the image may become dark If this happens replace the lamp In some rare cases the lamp s brightness...

Page 36: ...s displayed The password input screen is displayed if a password for the projector is specified in Password under Default Settings Enter a password When Power On Method in Default Settings is specifie...

Page 37: ...ojected The input signal changes each time the Input button is pressed In step 2 the input signal selection screen appears if Off is specified for Auto Input Search in Default Settings Select a signal...

Page 38: ...c Toshiba Fn F5 Hitachi IBM lenovo Sony Fn F7 Asus Dell Epson Hitachi Fn F8 Fujitsu Fn F10 Depending on the computer the image may not be projected properly if it is displayed on the computer s LCD di...

Page 39: ...angle If Auto Keystone in Default Settings is specified as Off manually adjust for keystone distortion For details see p 39 Adjusting for keystone distortion Adjusting the Image Adjust the focus of th...

Page 40: ...essed The image is enlarged until it reaches the original size You can also adjust the size of the projected image from the control panel on the projector The image may sometimes be disrupted while it...

Page 41: ...be lost or the image quality may be degraded depending on the degree of the keystone adjustment and the type of the image You can manually adjust for keystone distortion even if Auto Keystone is spec...

Page 42: ...p 127 List of Compatible Signals Adjusting the Volume of the Speaker 1 Press the Volume and Volume buttons to adjust the volume CLB035 The value bar appears at the bottom of the screen Press the butto...

Page 43: ...he Magnify button to reduce the image The ratio decreases each time the button is pressed The image is reduced until it reaches the original size An icon appears on the screen when the image is enlarg...

Page 44: ...n the control panel is pressed You can also use the AV Mute button on the projector s control panel Pausing the image Pauses the video or moving image that is being projected 1 Press the Freeze button...

Page 45: ...e image quality 1 Press the Picture button CLB039 2 Select a setting from the list using the and buttons and then press the Enter button You can also change the screen mode with Image Adjustment For i...

Page 46: ...is too bright or when projecting images in a dark room 1 Press the Eco button CLB042 The mode changes each time the button is pressed You can also change the lamp power level with Default Settings For...

Page 47: ...fter turning the projector off wait about five minutes for the lamp to cool before turning the projector on again The lamp may not light if it is very hot The projector turns off as soon as the power...

Page 48: ...JPEG The supported video file formats are MPEG 2 Video Compression and MPEG Audio Compression Layer 3 The maximum number of files that can be displayed in the list is 512 per folder Characters that ca...

Page 49: ...hubs cannot be connected Projecting Still Images Connect the USB memory device or digital camera to the projector For details see p 47 Connecting the USB Device A projected image can be controlled usi...

Page 50: ...ile the projector may not be able to display it If the file cannot be displayed converting the file with JPEG Conversion Tool may enable the projector to display it For details about JPEG Conversion T...

Page 51: ...d increases three levels each time the button is pressed To reduce the speed to its original pause the video by pressing the Enter button and then press it again to restart the video Disconnecting the...

Page 52: ...ted into the JPEG Conversion Tool dialog box To manually specify the file enter the file name in File Location 3 Specify the destination to which you want to save the converted file To save to a compu...

Page 53: ...e a shortcut icon on the desktop click OK 6 Close the screen To start JPEG Conversion Tool double click the shortcut icon on the desktop or RICOH JPEG Conversion Tool TypeA exe in the folder You can a...

Page 54: ...2 Projecting an Image 52...

Page 55: ...work you must specify settings such as the IP address in Network Settings The required settings are described below Wired LAN Item Wired LAN Wireless LAN Wired LAN Settings As necessary TCP IP Setting...

Page 56: ...k Settings When operating the projector from a computer via a network use Network Utility which is provided with the projector For details see p 61 Projecting Images Using Network Utility 3 Using the...

Page 57: ...k connection You can confirm the status of the network connection by the patterns in which the LEDs on the Ethernet interface light up If the projector is not connected to a network no LEDs light up C...

Page 58: ...ded To use the projector via a network you must specify settings such as the IP address in the Network Settings menu For items that must be specified see p 53 Connecting the Projector to a Network 3 U...

Page 59: ...Confidential information may be accessed illegally To minimize the possibility of these problems occurring it is recommended to check the functions built into the wireless LAN devices such as the pro...

Page 60: ...less LAN settings have already been configured use the following method Action Method Refer to Wireless LAN settings Write Settings to USB Memory Network Utility p 65 Copying computer settings to the...

Page 61: ...following method Action Method Refer to Wireless LAN settings Write Settings to USB Memory Network Utility p 65 Copying computer settings to the projector Image projection Network Connection Network U...

Page 62: ...ector 1 Press the Menu button CLB046 2 Select the Network USB Settings menu 3 Select Network Settings 4 Select Wireless LAN 5 Select either Connect by PIN or Connect by Push in Simple Wireless LAN Set...

Page 63: ...s LAN settings using a USB memory device There are two methods to do this one method is to copy the computer settings to the projector and the other method is to copy the projector settings to the com...

Page 64: ...RICOH PJ NetworkUtility Type A folder that is on the provided CD ROM into the computer or a USB memory device To delete Network Utility delete the Network Utility folder Simple 1 1 Connection You can...

Page 65: ...g the connection register Network Utility in the antivirus program s exclusion list For details about the procedure for excluding a program see your antivirus application s Help A client computer whic...

Page 66: ...multiple projectors they will all project the same image Make sure the projector s Connection Method is Network Connection You can confirm the projector s Connection Method on Network Information disp...

Page 67: ...to do this one method is to copy the computer settings to the projector and the other method is to copy the projector settings to the computer Copying computer settings to the projector 1 Insert the U...

Page 68: ...B074 11 Insert the USB memory device into the USB port on the projector The confirmation screen is displayed 12 Select OK The wireless LAN settings saved to the USB memory device are reflected in the...

Page 69: ...mory device 14 Insert the disconnected USB memory device into the USB port on the computer 15 Double click the Network Utility icon on the computer Network Utility starts 16 Click Menu 17 Click Read S...

Page 70: ...l the ASP module The following settings are required on the network server that is used as a projection server Creating a virtual directory Create a directory virtual directory that the projector acce...

Page 71: ...ttp hostname and the alias name is document enter http hostname document An IP address can be used as the projection server URL If you select Access Number in Access Restriction Type add n at the end...

Page 72: ...4 Select OK The list of files in the root directory is displayed 5 Select the file to be projected If you select a folder the file list within the folder is displayed Repeat these steps until you can...

Page 73: ...Image Adjustment menu settings see p 83 Image Adjustment Menu 2 Display Settings menu tab Enables the screen display items to be configured For the Display Settings menu settings see p 87 Display Set...

Page 74: ...ormation such as input signals and lamp usage time etc to be displayed For item that can be displayed see p 106 Display Status 6 Settings The settings and information for each menu can be displayed Fo...

Page 75: ...for changing the menu screen using the remote control 1 Press the Menu button CLB046 2 Select the menu tab using the and buttons If you select the Display Status tab you can confirm the information i...

Page 76: ...menu screen 5 Press the Enter button If Execute is displayed to the right of the item you select the function is executed in this step 6 Change the settings The method for changing the settings depend...

Page 77: ...ecting the value from a list Change the value using the and buttons and then press the Enter button Inputting numbers Use the number buttons on the remote control to input numbers Using the Menu Scree...

Page 78: ...some settings are changed The Network USB Settings menu has three submenu screens USB Settings Network Settings and Network Application Settings Open the submenu according to the settings you want to...

Page 79: ...tion explains the method for restoring the projector settings to the default values using the remote control 1 Press the Menu button CLB046 2 Select the Default Settings menu tab and then press the bu...

Page 80: ...settings cannot be reset with this function User Logo in Display Settings To reset the registered user logo select Reset Logo in Display Settings Password in Default Settings Administrator Password i...

Page 81: ...level of red in the image G level Adjust the level of green in the image B level Adjust the level of blue in the image RGB Input Range Select the RGB input range Auto Set Automatically adjust the item...

Page 82: ...ettings menu Item Summary Auto Input Search Select whether or not to only select inputs with signals when switching input signals Auto Keystone Select whether or not to implement keystone correction a...

Page 83: ...defaults Password Register a password for the projector Network USB Settings menu USB Settings Item Summary Settings Specify the file projection method using a USB device Display Status Confirm the st...

Page 84: ...s the synchronous signal polarity Signal Format Displays the Y Pb Pr signal format Video Mode Displays the video signal color format Lamp Time Displays the lamp usage time Lamp Reset Count Displays th...

Page 85: ...mage contrast The greater the value the stronger the image contrast Default 0 16 to 16 Brightness Adjust the image brightness The greater the value the brighter the image Default 0 16 to 16 Color Satu...

Page 86: ...the color red is in the image Default 0 16 to 16 G level Adjust the level of green in the image The greater the value the stronger the color green is in the image Default 0 16 to 16 B level Adjust th...

Page 87: ...ow Low High Position Adjust the values for the image position This function is available when you select Computer as an input signal Phase Adjust to eliminate image flicker Default 16 0 to 31 Frequenc...

Page 88: ...0 to 255 Clamp Pulse 2 Adjust the clamp pulse width 0 to 255 4 Changing the Projector Settings 86...

Page 89: ...1280 720 resolution Full Display using 1280 800 resolution Native Display the image without changing the resolution of the input signal Zoom Display the image width as the projection screen width whil...

Page 90: ...play the start up screen when the projector is turned on Default On On Off User Logo Register and confirm user logos User logos can be displayed in the start up screen or as the background when there...

Page 91: ...Reset Logo Delete the registered user logo Display Settings Menu 89...

Page 92: ...n the projector is placed in front of a screen Rear Select this mode when the projector is placed behind a screen Closed Caption Select the closed caption display method The projector supports closed...

Page 93: ...to synchronize 3D images and DLP images Default On On Off L R Reverse Select whether or not to reverse left and right in a 3D image Default Normal Normal Reverse Language Select the language in which...

Page 94: ...saving while on standby You can save power by using this function The energy saving level is highest when you select High and lowest when you select None However this function affects network functio...

Page 95: ...anel for 10 seconds Default Off On Off Reset All Reset all menus to their defaults This function cannot restore the default settings of User Logo in Display Settings Password in Default Settings and A...

Page 96: ...Default Off On Off 4 Changing the Projector Settings 94...

Page 97: ...nterval sec Enter the slide show switching interval from 5 to 999 seconds Default 5 seconds Remove Device The USB device can be removed when this command is executed Display Status USB Memory Display...

Page 98: ...ded that Auto Negotiation be selected Default Auto Negotiation Auto Negotiation 10BASE T Full Duplex 10BASE T Half Duplex 100BASE TX Full Duplex 100BASE TX Half Duplex MAC Address Display the projecto...

Page 99: ...ter Simple Wireless LAN Setup Acquire the wireless LAN settings registered in the access point and specify infrastructure mode wireless LAN settings for the projector automatically This function may n...

Page 100: ...used The channels available might differ depending on the country Default 11 For IEEE 802 11 b g n 2 4 GHz 1 2 3 4 5 6 7 8 9 10 11 Security Authentication Method Select the wireless LAN authentication...

Page 101: ...II When using 128 bit WEP up to 26 characters can be used for hexadecimal and up to 13 characters for ASCII Enter PSK when WPA PSK or WPA2 PSK is selected in Authentication Method When using a PSK up...

Page 102: ...N Priority Give priority to wired LAN if connected to the network via an Ethernet cable Disconnect the Ethernet cable when using a wireless LAN Disable DNS Settings Primary DNS Server Address Enter th...

Page 103: ...HTTP Server Settings HTTP Port Enter an HTTP port that is between 0 and 65535 Default 80 Manage Certificate Import Device Certificate Import the device certificate saved on the USB memory device to th...

Page 104: ...lay the SSID of the connected wireless LAN network Authentication Method Display the wireless LAN authentication method Encryption Method Display the wireless LAN encryption method IP Address Display...

Page 105: ...ible with PJLink PJLink Authentication Select whether or not to set PJLink authentication Default Off On Off PJLink Password Enter a password used when setting the PJLink authentication that is up to...

Page 106: ...name of the index file on the projection server Enter up to 31 characters HTTP Proxy Server Usage Select whether or not to use a proxy server Default No Yes No Access Restriction Type Select whether o...

Page 107: ...Energy Saving IO Firmware Version Display the energy saving IO firmware version Network USB Settings Menu 105...

Page 108: ...al format This item appears when you select Y Pb Pr as an input signal Video Mode Displays the video signal color format This item appears when you select Video as an input signal Lamp Time Displays t...

Page 109: ...ndicators are on the front of the projector For details see p 15 Projector Parts and Their Functions 2 1 3 CLA036 1 Power button 2 Lamp indicator 3 Temp indicator Status Causes Solutions The projector...

Page 110: ...representative The projector turned off during operation or it does not turn on Flashing interval 1 second The lamp cover is not installed correctly Disconnect the power cord and reinstall the lamp c...

Page 111: ...was displayed and the projector turned off during operation or it does not turn on The projector s angle is too great Place the projector at a proper angle and then turn it on again means the indicat...

Page 112: ...he input signal is switched correctly if Auto Input Search in Default Settings is set to Off For details see p 90 Default Settings Menu Make sure the mute function is not turned on For details see p 4...

Page 113: ...put signal is compatible with the projector For details see p 127 List of Compatible Signals Check the status of the video tape or other video source Image is blurred Image is partially out of focus M...

Page 114: ...r details see p 90 Default Settings Menu Color is faded Tint is poor Check the settings of Color Saturation R level G level and B level in Image Adjustment For details see p 83 Image Adjustment Menu M...

Page 115: ...e control receiver is not exposed to strong light Display language is unknown Press the Menu button and then select the display language in XXX Language XXX differs from the current display language u...

Page 116: ...og in to the computer using administrator privileges to configure the wireless LAN settings using Simple 1 1 Connection or a USB memory device For details see p 61 What Is Network Utility Make sure th...

Page 117: ...ty is still in effect Do not use locations that may be hot such as near a heater Doing so may cause the projector to malfunction or reduce the service life Avoid locations that may become smoky Partic...

Page 118: ...leaning the projection window make sure to do the following Use a commercially available blower or cloth for cleaning glass cleaning paper lens cleaner etc The projection window surface scratches easi...

Page 119: ...r damage it This projector s lamp contains trace amounts of environmentally harmful inorganic mercury Be careful not to break used lamps and dispose of them in accordance with local regulations or con...

Page 120: ...2 Turn the knob counterclockwise and then open the lamp cover CLB059 3 Raise the metal handle CLB061 4 Hold the handle and then pull the lamp unit out of the projector CLB062 6 Maintenance 118...

Page 121: ...outer lamp cover Incorrect installation may prevent the lamp or projector from turning on 7 Reset the lamp time For the reset method see the manual provided with the lamp The lamp s service life can...

Page 122: ...size for the operating system of the computer you are using Display resolution 800 600 pixels or more This software is to control and monitor projectors manufactured by our company The software may no...

Page 123: ...agement Utility acquires the projector registration information from the configuration file when it is launched The following information can be obtained Projector status power on and off input signal...

Page 124: ...is displayed If the connection failed due to an incorrect password or other reason is displayed The details displayed in the Projector Management Utility Input and the corresponding projector input si...

Page 125: ...Consumables Lamp unit Replacement Lamp Type 3 Contact your sales or service representative for information about consumables Consumables 123...

Page 126: ...6 Maintenance 124...

Page 127: ...ternal dimensions not including protruding parts 257 144 221 mm 10 1 5 7 8 7 inches Operating environment Temperature 5 to 35 C 73 to 95 F Humidity 30 to 70 Display element Display method Single chip...

Page 128: ...High bandwidth Digital Content Protection is a copyright protection method to encrypt digital signals across the DVI HDMI interface and prevent unauthorized copying The HDCP specification was develope...

Page 129: ...mpressed when displayed so some of the information may be lost or the image may deteriorate Computer Input Mode Resolution Frequency Horizontal pixel Vertical pixel Vertical Hz Horizontal kHz Clock MH...

Page 130: ...8 682 100 001 1280 720 1280 720 60 000 45 000 74 250 1280 768 1280 768 59 995 47 396 68 250 59 870 47 776 79 500 74 893 60 289 102 250 84 837 68 633 117 500 1280 800 1280 800 59 910 49 306 71 000 59 8...

Page 131: ...5 136 750 84 842 80 430 157 000 1600 900 1600 900 60 000 60 000 108 000 1600 1200 1600 1200 60 000 75 000 162 000 1680 1050 1680 1050 59 883 64 674 119 000 59 954 65 290 146 250 Y Pb Pr Input Mode Res...

Page 132: ...080 50p 1920 1080 50 000 56 250 148 500 1080 60p 1920 1080 60 000 67 500 148 500 Video Input Mode Frequency Vertical Hz NTSC 59 940 PAL 50 000 SECAM 50 000 PAL M 59 940 PAL N 50 000 PAL60 59 940 NTSC4...

Page 133: ...1080 24p 1920 1080 24 000 27 000 74 250 1080 30p 1920 1080 30 000 33 750 74 250 1080 50p 1920 1080 50 000 56 250 148 500 1080 60p 1920 1080 60 000 67 500 148 500 640 480 640 480 59 940 31 469 25 175...

Page 134: ...8 682 100 001 1280 720 1280 720 60 000 45 000 74 250 1280 768 1280 768 59 995 47 396 68 250 59 870 47 776 79 500 74 893 60 289 102 250 84 837 68 633 117 500 1280 800 1280 800 59 910 49 306 71 000 59 8...

Page 135: ...500 1400 1050 1400 1050 59 948 64 744 101 000 59 978 65 317 121 750 74 867 82 278 156 000 1440 900 1440 900 59 901 55 469 88 750 59 887 55 935 106 500 74 984 70 635 136 750 84 842 80 430 157 000 1600...

Page 136: ...put During Y Pb Pr input 1 Video signal R Color difference signal Pr 2 Video signal G Luminance signal Y 3 Video signal B Color difference signal Pb 4 N C 5 GND 6 GND R GND Pr 7 GND G GND Y 8 GND B GN...

Page 137: ...ommunication format 23h Command CR 0Dh Only 1 command valid per communication For the available commands see Main commands Data format For input commands only ASCII compliant all uppercase alphanumeri...

Page 138: ...INP 1 Y Pb Pr input INP 2 INP 2 HDMI input INP 5 INP 5 Video input INP 9 INP 9 Network input INP 12 INP 12 USB input INP 13 INP 13 CR is added to the end of Acknowledge Normally ended The control port...

Page 139: ...Copyrights This product uses open source and or third party software To check the information about software copyrights see the documents in the Copyrights folder on the supplied CD ROM Copyrights 137...

Page 140: ...check the current firmware version on the menu screens of the projector Main FW Version Display Status menu Network USB Function Firmware Version Energy Saving IO Firmware Version Network USB Settings...

Page 141: ...Where to Inquire Contact your sales or service representative for further information about topics covered in this manual or to inquire about topics not covered in this manual Where to Inquire 139...

Page 142: ...product names used herein are for identification purposes only and might be trademarks of their respective companies We disclaim any and all rights to those marks The proper names of the Windows opera...

Page 143: ...08 R2 are as follows Microsoft Windows Server 2008 R2 Foundation Microsoft Windows Server 2008 R2 Standard Microsoft Windows Server 2008 R2 Enterprise Microsoft Windows Server 2008 R2 Datacenter Micro...

Page 144: ...7 Appendix 142...

Page 145: ...ommon problems 110 Compatible signals 127 Compatible signals Computer input 127 Compatible signals HDMI input 130 Compatible signals Video input 130 Compatible signals Y Pb Pr input 129 Computer butto...

Page 146: ...ool 49 51 K Key Lock 93 Keystone 87 Keystone button 18 39 Knowledge Base 114 L Lamp 117 Lamp power 44 Lamp Power 92 Lamp Reset Count 106 Lamp Time 106 LAN Common 100 LAN port 17 Language 34 91 Left si...

Page 147: ...eceiver 16 Replacing the lamp 117 Reset All 77 93 Resolution 106 Restoring the settings 77 RGB Input Range 84 Right side view 17 S Safety Information 7 Screen size 26 Security 103 Security slot 17 Sel...

Page 148: ...V Video In port 17 Video Mode 106 Virtual directory 68 Volume button 18 40 W Wall Color Correction 87 Where to inquire 139 Wired LAN 55 96 Wireless LAN 57 97 Z Zoom button 18 37 146...

Page 149: ...MEMO 147...

Page 150: ...MEMO 148 EN GB EN US EN AU Y012 7511A...

Page 151: ......

Page 152: ...EN GB EN US EN AU Y012 7511A 2011 2012 Ricoh Co Ltd...

Reviews: