6.Troubleshooting
228
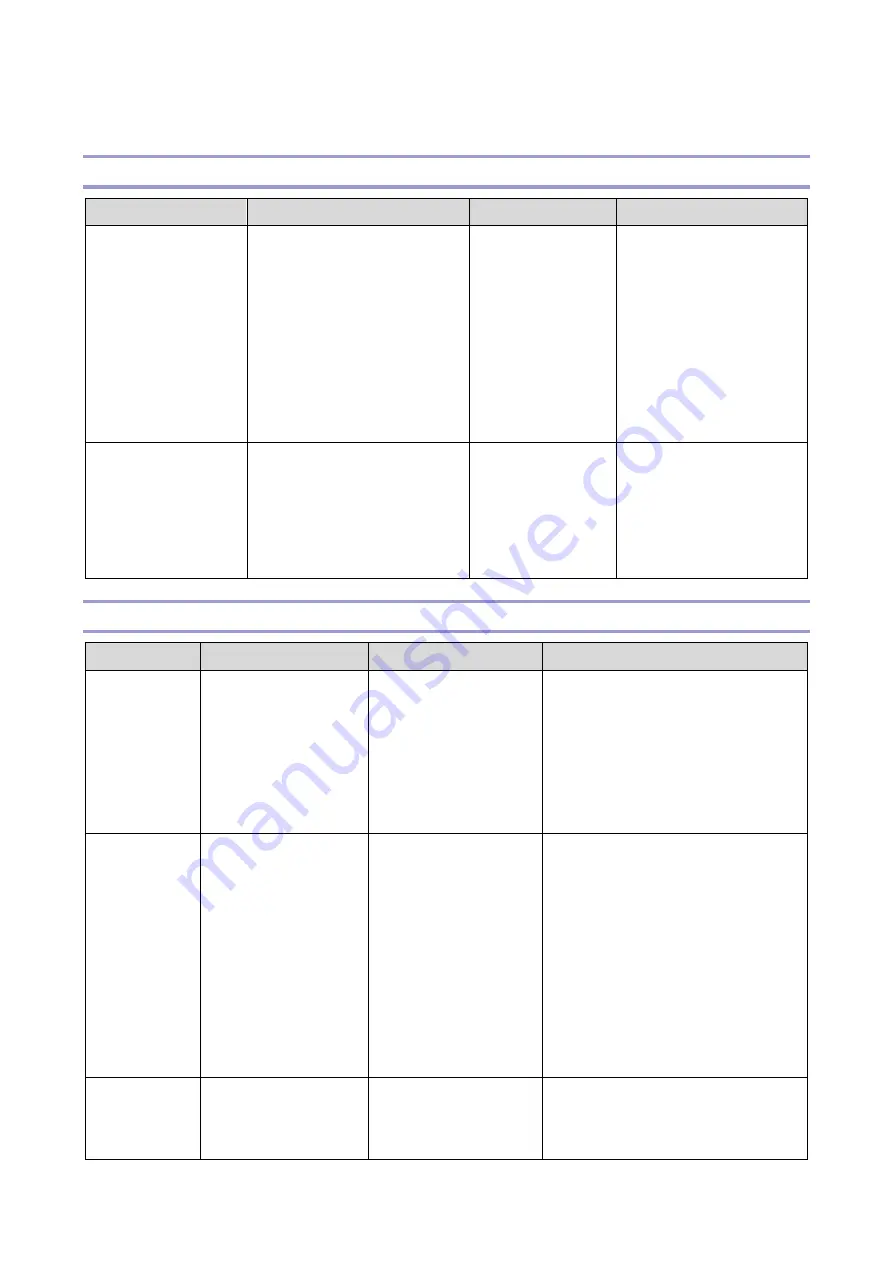
Paper Delivery Problems
Image Has Shifted Out of Position
Problem
Cause
Details
Solution
Double colors
(colors out of
position) in text or
heavy coverage
areas
Poor positioning caused by
the change in temperature
during printing.
Can occur at the
beginning of
machine use or
over time.
Can occur during
a long print job.
To correct out of position
colors:
Printer model
: Menu
key > System settings >
Color Den/Reg
MF model
: Settings icon
> System settings >
Color Registration
Image slipped out of
position at the
leading edge of the
paper
Paper tray was set without
pushing down the bottom
plate of the tray, causing the
leading edge to slip.
Can occur at the
beginning of
machine use or
over time.
•
Check installation of
the paper tray.
•
Adjust paper
registration in the
SP mode.
Poor Paper Transport
Problem
Cause
Details
Solution
Tears occur in
the center of
paper leading
edges
Paper tray was set
without pushing
down the bottom
plate of the tray,
causing the leading
edge to slip.
Can occur after
adding fresh paper to
paper tray.
Can occur at the
beginning of machine
use or over time.
Check installation of the paper tray.
Both corners
of leading
edge become
dog eared
Dog-earing can be
caused by both
corners of the
leading edge getting
caught in the paper
transport path.
If the paper is thick
and has been left
unwrapped for a long
time, or it is recycled
paper, replace with
normal paper.
•
Confirm that paper is set
correctly in the tray. (Problems
can occur with leading/trailing
edges, front/back sides of
paper in the paper feed path
with paper from different lots.)
•
Make sure that paper is stored
correctly in its vinyl packs until
ready for use.
Paper double
feeds
Paper in the feed tray
can easily stick
together.
Leading edges of the
paper are burred.
Fan the paper stack before loading
it in the tray (this gets air between
the sheets of paper).
Summary of Contents for M C250FW
Page 2: ......
Page 8: ......
Page 12: ......
Page 34: ...3 Preventive Maintenance 22 to remove any remaining moisture ...
Page 45: ...4 Replacement and Adjustment 33 6 Release the belt A and then remove the front cover unit B ...
Page 103: ...4 Replacement and Adjustment 91 MF model 11 Remove the fusing transport drive unit A ...
Page 112: ...4 Replacement and Adjustment 100 MF model 8 Remove the belt cover A ...
Page 183: ...5 System Maintenance 171 8 Press OK on the screen or press on the number keys to exit ...
Page 188: ...5 System Maintenance 176 Special Sender List Configuration Page Printer model ...
Page 189: ...5 System Maintenance 177 MF model ...
Page 260: ...6 Troubleshooting 248 Flowchart ...
Page 271: ...7 Detailed Descriptions 259 ...
Page 297: ...7 Detailed Descriptions 285 Boards Block Diagram Printer Model ...
Page 301: ......


