Promise Technology SmartStor NAS, Product Manual
The Promise Technology SmartStor NAS is a reliable and high-performance network-attached storage device. Simplify data storage with its user-friendly interface and seamless connectivity options. Access the comprehensive Product Manual, available for free download at manualshive.com, to maximize your SmartStor experience.
Share
Download


Reviews:
No comments
Related manuals for SmartStor NAS
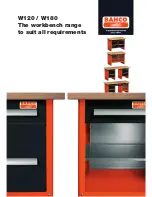
W120
Brand: Bahco Pages: 4

Eglu Go Up
Brand: Omlet Pages: 4

XCubeNAS XN7012R
Brand: Qsan Pages: 16

DMS platform
Brand: SanDisk Pages: 4

t-series
Brand: TrekStor Pages: 100

HazMat station EPO-2
Brand: Denios Pages: 6

OPATSFP
Brand: Forest garden Pages: 4

301336U
Brand: LaCie Pages: 24

Maxtor OneTouch 4
Brand: Maxtor Pages: 84

BAULE EVO 80 BAULE EVO 120
Brand: garofalo Pages: 16

N7800
Brand: IBM Pages: 182

DESK-E144WC
Brand: Vivo Pages: 8

ZT-ST
Brand: AEG Pages: 16

tuff-nano
Brand: CalDigit Pages: 14

GSS1508G
Brand: Sealey Pages: 13

GSS150815G
Brand: Sealey Pages: 19

GSS1515G
Brand: Sealey Pages: 17

GSS3030G
Brand: Sealey Pages: 20


