82
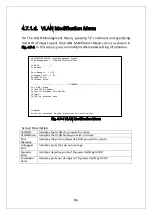
Available commands are listed below.
N Display the next page.
Press "N" to display the next page.
P Display the previous page.
Press "P" to display the previous page.
C Create new VLAN.
Pressing "C" opens the "VLAN Create Menu" screen. For details, refer to the section
(4.7.1.c).
D Delete a VLAN that has been configured.
Press "D." The command prompt changes to "Enter VLAN ID>." Enter VLAN ID you
wish to delete with a value of 2 to 4094.
M Set the management VLAN.
Press "R." The command prompt changes to "Enter index number>." Enter VLAN ID
you wish to configure as a management VLAN with a value of 1 to 4094.
I Configure Internet Mansion mode.
Press "I." The command prompt changes to "Enable or Disable Internet Mansion
Function? (E/D>." Enter "E" to enable or "D" to disable Internet Mansion mode,
respectively. If you press "E", the command prompt changes to "Uplink port?>."
Enter a port number you wish to configure as Uplink port. By this setting, you can
set the device to be optimum environment as a Switching Hub used in Internet
Mansion. By this setting, the specified port becomes an Uplink port, and other
ports become possible to communicate only with downlink port. Downlink ports
become impossible to communicate each other. So, it becomes possible to ensure
security between each resident. (There are some constrained conditions for use.
Please execute configuration after confirming the precautions shown in the next
page.)
O Configure a port structure in VLAN.
Press "O." The command prompt changes to "Enter VLAN ID>." Enter VLAN ID you
wish to configure with a value of 1 to 4094. Then, the screen changes to "VLAN
modification Menu" screen. For details, refer to the section (4.7.1.d).
S Configure and confirm PVID by port.
Pressing "S" opens the "VLAN Port Configuration Menu" screen. For details, refer
to the section (4.7.1.e).
G Configure a status of GVRP.
Press "G." The command prompt changes to "Enable or Disable GVRP status
(E/D)>." Enter "E" to enable or "D" to disable GVRP, respectively.
Q Return to the previous menu.
Note: When creating a new VLAN, PVID is not changed interlocked with
this new creation.
After registering VLAN on this screen, make sure to confirm the
configuration operation and configuration content on configuration
screen of Fig. 4-7-5 and Fig. 4-7-6.
When you wish to delete VLAN, you cannot delete VLAN if VLAN ID
of VLAN to be deleted is still remained as PVID. Delete VLAN after
changing PVID to other VLAN ID.
Summary of Contents for Switch-M12PWR
Page 17: ...17 Fig 2 2 Mounting to Wall ...
Page 20: ...20 function does not work Therefore use a cross cable to connect them ...
Page 30: ...30 ...
Page 36: ...36 ...
Page 49: ...49 ...
Page 69: ...69 ...
Page 81: ...81 setting and the management VLAN status of VLAN ID 1 is UP ...
Page 96: ...96 Press S Q Return to the previous menu ...
Page 98: ...98 ...
Page 122: ...122 Q Return to the previous menu ...
Page 125: ...125 ...
Page 130: ...130 ICMP Type Displays the ICMP type ...
Page 156: ...156 Threshold Displays the threshold of the number of packets per second ...
Page 173: ...173 Fig 4 7 49 Display of values accumulated after resetting the counters ...
Page 185: ...185 Q Return to the previous menu ...
Page 211: ...211 Q Return to the previous menu ...
Page 232: ...232 IEEE8021 PAE MIB IEEE802 1X IEEE8023 LAG MIB IEEE 802 3ad ...
Page 237: ...237 IEEE 802 3af standard ...
Page 240: ...240 P0813 1084 ...


