ITALIANO
ENGLISH
FRANÇAIS
DEUTSCH
16
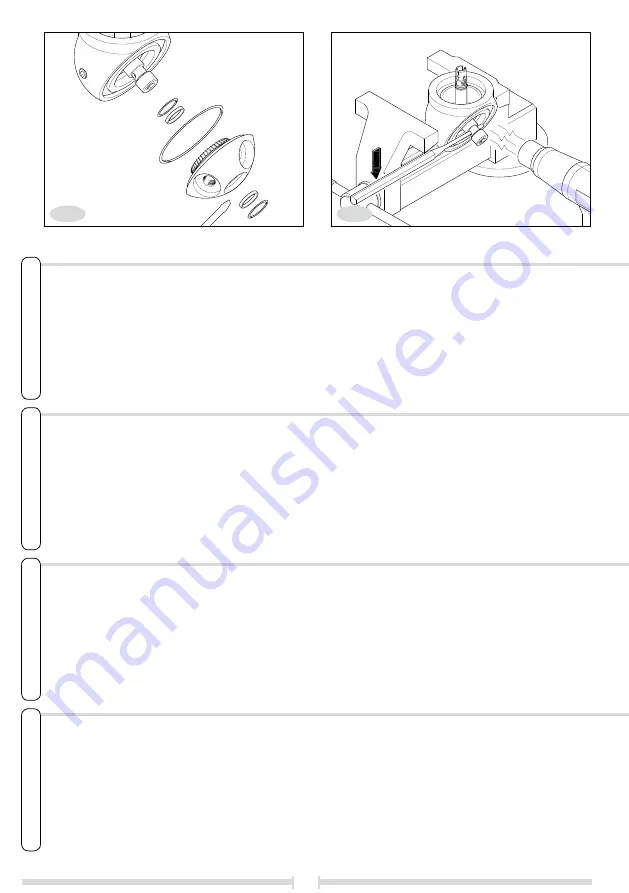
Se è necessario togliere le guarnizione, occorre utilizzare un utensile appuntito in modo da fare leva
tra la sede e la guarnizione stessa, piegandola (fi g.21).
Verifi care l'anello OR posto sul lato interno del portaugelli.
Verifi care che l'ingranaggio del portaugelli (coppia conica) non sia danneggiato. In tal caso sostituire
il portaugelli, che comprende anche l'ingranaggio.
Con un cacciaspine, svitare il perno dalla calotta, prendendo in morsa la calotta come in fi g.22. Se
il perno appare bloccato si consiglia di riscaldare la zona bloccata.
Verifi care che le pareti del perno siano liscie, i fori non siano ostruiti e il perno non risulti piegato.
21
22
If the seal has to be removed, use a pointed tool to lever between the seat and the seal itself,
bending it (fi g.21).
Check the O-ring on the inside of the nozzle holder.
See that the nozzle holder’s bevel gear is not damaged. If it is, the nozzle holder with damaged
gear must be replaced.
Using a pin-remover, unscrew the pivot from the cap gripping the latter with the vice, as illustrated
in fi g.22. If the pivot appears to be stuck we suggest warming it.
Make sure the walls of the pivot are smooth, the holes are not clogged and the pivot isn’t bent.
S’il faut enlever le joint, utilisez un outil pointu de manière à faire levier entre son emplacement et
le joint, en le pliant (fi g.21).
Vérifi ez la bague OR située sur le côté interne du porte-buses.
Vérifi ez que l’engrenage du porte-buses (couple conique) n’est pas endommagé. Si c’est le cas,
remplacez le porte-buses, qui comprend aussi l’engrenage.
A l’aide d’un chasse-goupilles, dévissez le pivot de la calotte, en prenant en étau la calotte comme
dans la fi g.22. Si le pivot est bloqué, réchauffez la zone bloquée.
Vérifi ez que les surfaces du pivot sont lisses, que les trous ne sont pas obstrués et le pivot n’est
pas tordu.
Hebeln Sie mit einem spitzen Werkzeug zwischen dem Sitz und der Dichtung und biegen Sie die
letztere, falls die Dichtung entfernt werden muss (Abb.21).
Überprüfen Sie den O-Ring auf der Innenseite der Düsenhalterung.
Stellen Sie sicher, dass das Zahnrad der Düsenhalterung (Kegelpaar) nicht beschädigt ist. Ersetzen
Sie anderenfalls die Düsenhalterung, die auch das Zahnrad umfasst.
Schrauben Sie den Bolzen mit einem Stifttreiber von der Kalotte ab und setzen Sie die Kalotte wie
auf Abb.22 gezeigt in den Schraubstock ein. Wir empfehlen, den Bereich zu erwärmen, falls der
Bolzen blockiert ist.
Stellen Sie sicher, dass die Wände des Bolzens glatt sind, dass die Bohrungen nicht verstopft sind
und dass der Bolzen nicht verbogen ist.
Summary of Contents for A42R
Page 16: ...ITALIANO ENGLISH FRANÇAIS DEUTSCH 19 27 ...
Page 33: ...36 NOTE NOTES ...
Page 34: ...37 NOTES ANMERKUNGEN ...
Page 35: ...38 NOTE NOTES ...
Page 36: ...39 NOTES ANMERKUNGEN ...
Page 38: ......


