


Operator's Manual
Issue 14
/
Mar 2016 / UMC0071
Mercury
iPS
©2016 Oxford Instruments NanoScience. All rights reserved.
Page
64
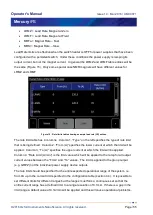
5 Tap the
Excitation
parameter box and select an excitation mode from the drop-down menu
(see section 6.5.5).
6 Tap the
Magnitude
parameter box and enter an excitation value using the numeric keypad:
(a) If
Sensor Type
is set to PTC, enter an excitation current in
A.
(b) If
Sensor Type
is set to Diode, enter an excitation current in
A.
(c) If
Sensor Type
is set to NTC, enter an excitation voltage in mV.
(d) If
Sensor Type
is set to Thermocouple, this value is ignored.
Tap OK to accept the value and return to the
Sensor Details
page.
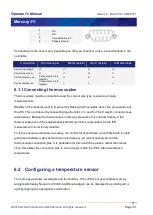
7 If desired, tap the parameter box containing the name of the sensor and enter a new name.
(e.g. Change
DB3.T1
to
Example
).
8
Cal Adj
Tap once to access the Generic Sensor Adjustment page (see section 6.4.2). This allows
the user to adjust the scale and offset of a generic calibration curve to suit a particular
sensor.
9
Calibrate
Tap once to calibrate this measurement circuit. This routine takes approximately one
minute. An error message is generated if the calibration fails for any reason.
10 Tap
Home
. The Home page is displayed. If the sensor has been configured correctly (and is
connected), the selected page will display a sensor reading.
6.2.2 To clear a widget configuration
1 Double-tap the widget on the
Home
page.
2 Tap the
Device
parameter box and select
None
from the drop-down menu.
3 Tap
Assign
.
The widget on the Home page should now display the name None.


