


7 - 2
TROUBLESHOOTING
NOTE:
When the REC. PAPER JAM message is
displayed, always remove paper jammed in the unit
before removing the cassette.
The fixing area becomes very hot. Do not
touch any parts in the fixing area when you
are removing a paper jam.
When removing jammed paper, be careful not
to get toner on your hands or clothing. If you
do, wash it off immediately with cold water.
Do not use warm or hot water as the toner will
fix to your hands or clothes and will be harder
to remove.
The illustration below shows the area where paper jams
may occur.
[1] OUTPUT AREA
[2] PAPER CASSETTE
RIGHT COVER AREA
[4] STACK BYPASS
AREA
[3] TONER CARTRIDGE
AREA
Remove any metallic jewellery before
removing any paper jams. The jewellery may
come into contact with the components inside
the unit and could cause burns or electric
shock.
NOTE:
Remove any media from the stack bypass and
close the stack bypass before performing any of the
procedures on the following pages. Not doing so may
cause damage to the stack bypass.
ERROR #1 JAMS
1. Open the front cover.
2. Turn the fixing unit release lever in the direction
indicated by the arrow. Remove the jammed paper
from the output area.
❏
When you have removed the jammed paper,
return the lever to its original position.
FIXING UNIT RELEASE LEVER
3. Close the front cover.
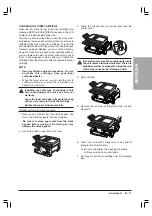
ERROR #2 JAMS
1. Open the paper cassette right cover.
PAPER CASSETTE
RIGHT COVER
❏
If you have purchased one of the optional paper
cassettes, open the right cover of that cassette
to check if the paper jam has occurred there
2. Remove the jammed paper from the unit by pulling
gently in the direction indicated below.
❏
If there is no jammed paper in this area, follow
the procedure for error #3.
3. Close the paper cassette right cover.
4. Open then close the front cover.
Summary of Contents for Copia 9916
Page 1: ......