


6 - 2
MAINTENANCE
TRANSPORTING THE UNIT
When you plan to transport or move the unit, you need to
prepare it so that it will not be damaged during the move.
1. Turn the power switch off (
).
2. Disconnect the power cord from the power outlet
and from the unit.
3. Disconnect the telephone line from the unit and from
the wall jack.*
4. Disconnect the optional handset or telephone (if you
have connected one to the unit).*
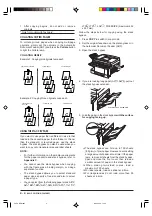
5. Remove the toner cartridge from the unit.
❏
Store the toner cartridge in its original protective
bag or wrap it in a thick cloth to avoid exposure
to light.
6. Remove the document tray** and output tray from
the unit.
7. Replace all tapes and shipping materials you
removed when you first unpacked the unit.
* Models with incorporated fax board.
** Optional for base model, standard for all others
models.
8. Pack the unit and all its components into its original
shipping carton. Refer to the Installation Guide
included in the packaging.
❏
You will need to have more than one person
available to lift the unit. Be sure to grip the
recessed areas on each side of the unit and to
hold the unit firmly and level.
Before moving the unit, be sure to disconnect
the power cord and telephone line from the
unit, and from the wall outlet or jack. Not doing
so may damage the cord or line, resulting in
fire or electric shock.
Be sure to grasp the unit only in the areas
indicated in the illustration above. Grasping
the unit in other areas may cause damage to
the unit.
NOTE:
If you no longer have the shipping carton your
unit came in, pack the unit in a suitably sized, sturdy
cardboard box, using bubble wrap or other suitable
packing material.
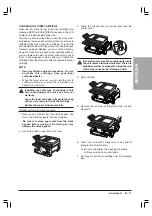
TONER CARTRIDGE
HANDLING CARTRIDGES
■
Do not remove the toner cartridge from its protective
bag until you are ready to install it.
■
Save the protective bag. You may need it later to re-
pack the cartridge temporarily to protect it from
exposure to light.
■
Never expose a toner cartridge to direct sunlight, and
do not leave it exposed to normal room light (about
1,000 lux) for longer than five minutes.
■
There are strong magnets inside a toner cartridge. To
avoid possible destruction of valuable data on disks
or other media, keep the toner cartridge away from
computer screens, hard disks, floppy disks, or any other
kind of material sensitive to magnetic fields.
■
Never touch or try to open the protective shutter that
protects the light-sensitive drum inside the toner
cartridge. If the drum is exposed to light, this can
cause printing quality to deteriorate.
■
Handle the toner cartridge with care. Do not subject it
to shock or vibrations.
■
Always set toner cartridges down with the arrow on
the cartridge facing up.
STORING CARTRIDGES
■
Store a toner cartridge in the original box and
protective bag until you are ready to install it.
■
Store toner cartridges at a constant temperature
within a range of 0° to 35°C. Do not store cartridges
in locations subject to extreme fluctuation of tem-
perature and humidity.
■
To prevent caking in the toner, never stand the
cartridge on its end and do not store it upside down.
If the toner does become caked, it may be
impossible to dissolve it completely, even by
shaking the cartridge.
■
Do not store the cartridge in salty or corrosive air.
■
Never attempt to disassemble a toner cartridge or
attempt to refill it.
■
Make sure that you use a stored toner cartridge
before the expiration date printed on the toner
cartridge box.
Summary of Contents for Copia 9916
Page 1: ......