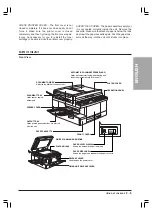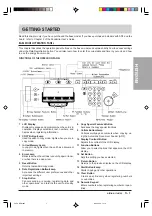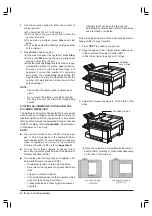
2 - 4
SETTING
UP
YOUR
UNIT
■
Make sure nothing is lying on the power cord,
and that the cord cannot be walked on or tripped
over.
■
Do not overload the electrical outlet. Make sure
the total amperage used by all the machines
plugged into the outlet does not exceed the
ampere rating of the outlet’s circuit breaker.
■
Connect the power cord as follows:
Before connecting the power cord to your unit
and the power source, make sure the power
switch of the unit is turned off (O).
1. Connect the power cord provided into the power
connector on the right side of the unit.
2. Connect the other end of the power cord into the
power source.
CONNECTING A TELEPHONE
To connect a telephone to the unit you have to use the
handset jack.
Only one jack is provided to be used with the optional
handset or a telephone. A separate jack is not provided
for a telephone.
1. Connect the telephone cord to the jack marked
on the back of the unit.
TURNING ON THE POWER
Use the power switch on the right side of the unit to turn
the power on (|).
The unit will take a few seconds to warm up:
When either of the displays below appear, the unit has
warmed up and is ready to be used:
Copy mode:
COPY RATIO PAPER SELECT SCAN MODE
100%
1
TEXT
21/08 '99
SAT 15:30
READY TO COPY
A4
Fax mode:
AUTO RX
READY TO SEND
STANDARD
STANDARD
TEXT
BOOK SENDING
21/08 '99
SAT 15:30
=
RESOLUTION
DENSITY
IMAGEQUALITY
SHEET
If the display is too bright or too dark, you can adjust
the contrast of the LCD display by pressing and turning
the
Display Contrast
button on the left of the LCD
display.
Display Contrast Button
The above displays show the unit is in standby mode
and is ready to be used. If the red
Error
lamp starts
blinking, wait for one of the following messages to appear:
INSTALL CARTRIDGE -
There is no toner cartridge
installed in the unit. Install a toner cartridge.
REPLACE CARTRIDGE
- The toner cartridge has run
out of toner. Replace the toner cartridge.
Summary of Contents for Copia 9916
Page 1: ......


