background image

156

5

4

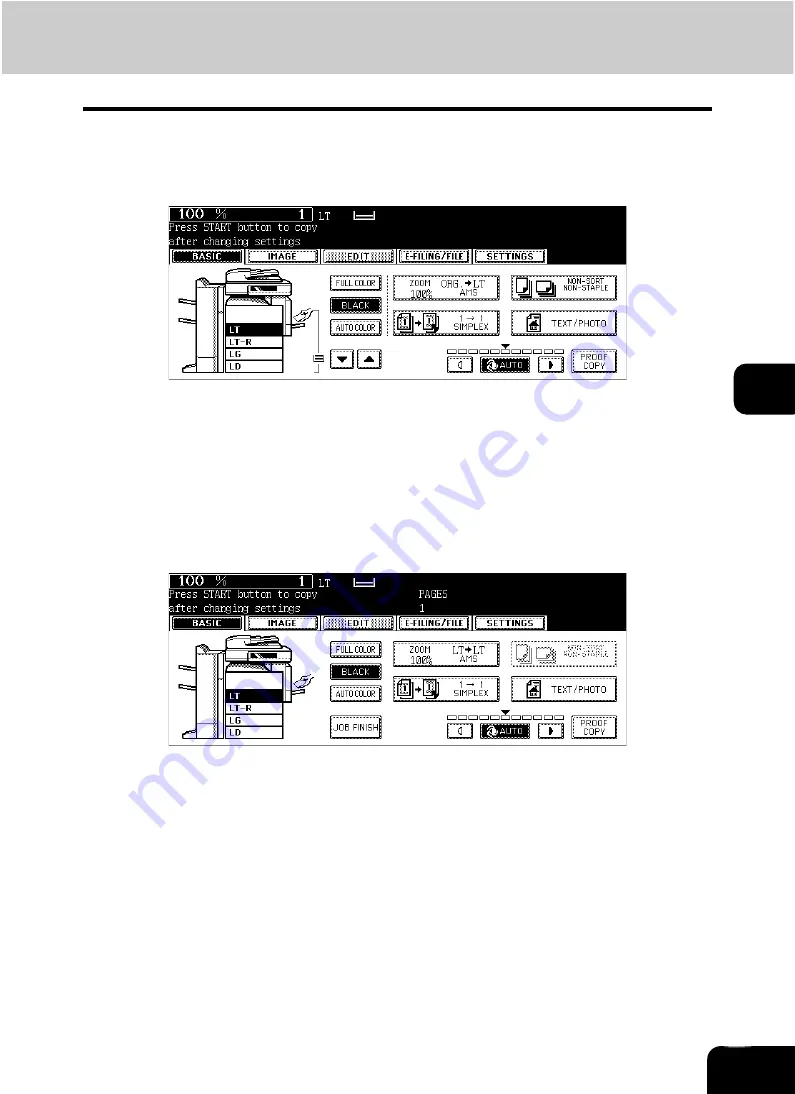
After “Press START button to copy after changing settings.” appears, 
perform the settings for the 1st job and the common settings for all 
jobs.

• Press the [SETTINGS] button to confirm the settings.
• To change the settings, press the [FUNCTION CLEAR] button, and then start the procedure again from step 1.

5

Press the [START] button.

• The scanning of the originals for the 1st job starts.

6

After “Press START button to copy after changing settings.” appears, 
place the originals of the 2nd job. Perform the settings for the 2nd job.

• Note that copying will be performed in the same modes as those of the 1st job if the settings are not changed.
• Press the [SETTINGS] button to confirm the settings.

7

Press the [START] button.

• The scanning of the originals for the 2nd job starts.
• Repeat steps 6 to 7 until all the originals have finished being scanned.

8

After all the originals have finished being scanned, confirm the num-
ber of copies on the menu and change if needed.

Summary of Contents for CX 1145 MFP

Page 1: ...Operator s Manual for Basic Functions CX1145 MFP 59315701 Rev 1 0...

Page 2: ...versing Automatic Document Feeder optional 47 2 Making Copies 50 Initial Default settings 50 Copying procedure 51 Scanning the next originals during copying Auto job start 55 Interrupt copying in prog...

Page 3: ...TABLET 160 16 ADF SADF 161 6 e FILING 164 1 e Filing 165 2 Creating User Boxes 167 3 Changing Data of User Boxes 169 4 Deleting User Boxes 172 5 Storing Documents in e Filing 174 6 Printing Stored Do...

Page 4: ...the Saddle Stitch Unit 304 6 READY CHECK SADDLE STITCH STAPLER 307 7 READY HOLE PUNCH DUST BIN IS FULL 308 8 POWER FAILURE 310 9 Time for periodic maintenance 311 10 Check paper size setting on contr...

Page 5: ...5 CONTENTS Cont...

Page 6: ...5 2 Turning Power On Shutdown 19 Turning power on 19 When department or user management is used 20 Turning power off Shutdown 25 3 Energy Saving Mode 28 4 Setting Copy Paper 29 About the width and the...

Page 7: ...genta Yellow 3 Operator s Manual pocket Back side 12 Original glass 4 Power switch 13 Touch panel 5 Automatic duplexing unit 14 Control panel 6 Bypass tray 15 Black toner cartridge 7 Paper size indica...

Page 8: ...5 Paper Feed Pedestal KD 1011 Adds one drawer to the equipment This also enables you to install the Additional Drawer Module MY 1021 optional 6 Additional Drawer Module MY 1021 This drawer is for add...

Page 9: ...available are as follows Contact your service technician or OKI product distributors for details Work Table KK 3511 This is a small table for placing originals while the equipment is operated Cannot...

Page 10: ...pment to be used in a wireless LAN environment The Antenna GN 3010 is necessary The equipment cannot be connected to the wireless and wired LAN at the same time Bluetooth Module GN 2010 This module en...

Page 11: ...and recall frequently used copy scan and Fax settings as a template 4 EXTENSION button Any operation with this button is invalid at present This button is to extend functions in the future 5 e FILING...

Page 12: ...ION CLEAR button When this button is pressed all selected functions are cleared and returned to the default settings If the default setting is changed on the control panel and copying scanning Fax or...

Page 13: ...ands in the gap between the equipment and the control panel This could injure you When fixing the angle of the control panel The angle of the control panel can be fixed by using the stopper on the bac...

Page 14: ...Fit the latches of the stopper in the hole of the position B and insert them turning the stopper itself 3 Shift the stopper to the left until it clicks The angle of the control panel is fixed at 7 de...

Page 15: ...h buttons Press these buttons on the touch panel lightly to set various functions Index buttons Press these buttons to switch menus The type and number of the index buttons vary depending on the funct...

Page 16: ...16 1 SETTINGS button Press this button to confirm currently set functions An example is shown below Buttons appearing on the various menus are as follows some buttons may not appear on the menu...

Page 17: ...on This function returns all the function settings to default without the need to press the FUNC TION CLEAR button When the department or user management function is being used the display returns to...

Page 18: ...ENTER button The menu will be changed The following buttons are used for letter entry Space Press this to enter a space CANCEL Press this to cancel the entry of letters ENTER Press this to fix all ent...

Page 19: ...rn the power of the equipment OFF do not simply turn the power switch to turn it off but be sure to shut it down P 25 Turning power off Shutdown When ERASING DATA appears This message appears when the...

Page 20: ...See the User Functions Guide for setting and registration of the department codes When the power is turned on the following menu appears This menu also appears when the ACCESS button is pressed or the...

Page 21: ...n required e g user name password to use the equipment The menu for entering user information also appears when you pressed the ACCESS button on the control panel or automatic function clear has worke...

Page 22: ...al authentication LDAP authentication Windows Domain Authentication The domain name previously set by the network administrator is displayed in DOMAIN If the domain name belonging to your organization...

Page 23: ...ning Power On Shutdown Cont 1 2 Press the USER NAME button 3 Enter the user name maximum 128 letters and then press the ENTER button 4 Press the PASSWORD button 5 Enter the password maximum 64 letters...

Page 24: ...he upper right of the screen COLOR Available number of copies for color copying BLACK Available number of copies for black and white copying The available number of copies is displayed only when both...

Page 25: ...ation lamps should be blinking If the equipment is shut down while any of the above lamps is blinking jobs in progress such as FAX recep tion will be aborted No PC should access the equipment via the...

Page 26: ...matically returns to the OFF position Turning the power off Shutting down with the USER FUNCTIONS button The equipment can also be shut down by following the procedure below 2 Press the USER button on...

Page 27: ...re you sure you want to shutdown appears on the menu Press the YES button To cancel the shutdown operation press the NO button 4 Shutdown in progress appears on the menu After a while the equipment is...

Page 28: ...eception of print data Fax data Internet Fax data or E mails They are also cleared by pressing the START button 1 This period is set at 3 minutes by factory default See the User Functions Guide to cha...

Page 29: ...figure below is called length and B is called width In the figure below the operator is standing in front of the equipment When B is shorter than A it is called placing the original in a portrait dir...

Page 30: ...LG LT LT R ST R COMP 13 LG 8 5 SQ A B format A3 A4 A4 R A5 R B4 B5 B5 R FOLIO K format 8K 16K 16K R 600 sheets 17 lb Bond 550 sheets 20 lb Bond Thick 1 28 lb Bond 450 sheets Large Capacity Feeder opt...

Page 31: ...on another machine and also avoid performing double copying on the same side of the paper since this may cause a malfunction Do not use paper with creases wrinkles or curls paper prone to curling smo...

Page 32: ...e drawer 1 Turn the power on 2 Pull out the drawer carefully until it comes to a stop 3 Push the lower part of the end guide in the direction of the arrow to remove it then reinstall it at the desired...

Page 33: ...ay be described on the wrapping paper For the maximum number of sheets that can be set see P 30 Acceptable copy paper Fan the paper well before placing it in the drawer Be sure that the paper height d...

Page 34: ...you press the NO button you do not need to continue with step 11 and subsequent steps This menu may not be displayed under a certain equipment setup In this case see the procedure in P 36 Changing the...

Page 35: ...g Copy Paper Cont 1 11Press the paper size button corresponding to the paper that has been set in the drawer 12When you want to change the setting of the drawer for special uses P 38 press the paper t...

Page 36: ...change the setting of the paper size according to the following pro cedure 2 Press the USER button on the touch panel to enter the user setting menu and then press the DRAWER button 3 Press the drawer...

Page 37: ...ide up The copy side may be described on the wrapping paper For the maximum number of sheets that can be set see P 30 Acceptable copy paper Be sure that the paper height does not exceed the line indic...

Page 38: ...py side up Set the paper size as required P 36 Changing the setting of paper size Paper type Purpose Indication Reference Cover sheet Sheet used in the cover copying mode COVER P 145 9 COVER SHEET Ins...

Page 39: ...e touch panel to enter the user setting menu then press the DRAWER button 4 Press the desired drawer and paper type button on the touch panel E g When Cover sheet is set in the 1st drawer Press the RE...

Page 40: ...e whose setting you want to clear and then press the button indicating the paper type in this drawer The paper type setting is cleared and the indication of drawer returns to the original state When b...

Page 41: ...41 1 BEFORE USING EQUIPMENT 4 Setting Copy Paper Cont 1...

Page 42: ...optional 47 2 Making Copies 50 Initial Default settings 50 Copying procedure 51 Scanning the next originals during copying Auto job start 55 Interrupt copying in progress and make other copies Interru...

Page 43: ...62 in height can be placed on the Reversing Automatic Document Feeder optional regardless of their sizes When you copy a large number of landscape originals using the Reversing Automatic Document Feed...

Page 44: ...job When the number of scanned sheets has exceeded the above limit a message The number of originals exceeds the limits Will you copy stored originals appears If you want to print out the data of ori...

Page 45: ...eeder optional Raise it 60 degrees or more for detecting the original 2 Place the original with its face down on the original glass and align it against the left rear corner of the glass A Original 3...

Page 46: ...when the original is very thick There will be no problem in copying even if the Reversing Automatic Document Feeder is not fully lowered Do not look fully at the original glass because intensive ligh...

Page 47: ...ginals with holes or tears 6 Damp originals 7 OHP films or tracing paper 8 Coating paper coated with wax etc Use types of original 9 and 10 shown below with extra care 9 Originals which cannot be move...

Page 48: ...ol panel 1 Align all the originals Then place them face up and align the side guides to the original length Place the originals straight along the side guides Collate the originals in the order that y...

Page 49: ...he YES button 4 After all originals have finished being fed press the FINISHED but ton If the FINISHED button is not pressed copying is started when the automatic function clear is operated P 17 Clear...

Page 50: ...ing various copy modes The table below lists the various items of the initial settings at the time of installation of this equipment These initial settings can be changed as desired See the User Funct...

Page 51: ...es as required When you want to copy more than one set key in the desired number of copies Press the CLEAR button on the control panel to correct the number keyed in Note that some combinations of cop...

Page 52: ...utton on the control panel to correct the number keyed in Note that some combinations of copy modes are restricted P 338 4 Copying Function Combination Matrix P 340 5 Image Quality Adjustment Combinat...

Page 53: ...NISHED button on the touch panel Copying starts The paper exits with its copied side down When the drawer runs out of paper during copying the corresponding drawer on the touch panel and the JOB STATU...

Page 54: ...nu is displayed press the MEMORY CLEAR button on the touch panel During scanning The data scanned up to then are deleted During continuous copying Copying stops and the data scanned up to then are del...

Page 55: ...the job starts in the copy modes of the previous job unless you set new ones particularly for this job 3 Press the START button on the control panel Up to 10 jobs can be stored in the memory When an...

Page 56: ...To cancel auto jobs see P 225 Deleting print jobs Canceling auto job Press the STOP button on the control panel to stop a job while originals are being scanned To restart the job press the START butto...

Page 57: ...ou have finished the interrupt copying press the INTERRUPT button again The message READY to resume job 1 appears and the interrupted job resumes Interrupt copying is automatically canceled after a ce...

Page 58: ...e the corre sponding page for the operating procedure of each size The table below shows these pages Bypass copying stops when the paper placed on the bypass tray runs out during copying even if the s...

Page 59: ...on the bypass tray Align the side guides to the paper length while holding A The message Ready for bypass feeding appears Rear side of the side guides of the bypass tray has an indicator for paper hei...

Page 60: ...ss the ENTER button on the touch panel Set other copy modes as required If a media type which is not same as the one you have set is selected here this may cause a paper jam or sig nificant image trou...

Page 61: ...owing step 1 and 2 in Copying on LD LT LG and ST R size paper P 59 2 Press the OTHER SIZE button on the touch panel 3 Press the button of the same size as the one of the paper you have set on the tray...

Page 62: ...tton on the touch panel E g When Thick 1 paper is set Set other copy modes as required If a media type which is not same as the one you have set is selected here this may cause a paper jam or sig nifi...

Page 63: ...guides to the paper length while holding A The message Ready for bypass feeding appears Rear side of the side guides of the bypass tray has an indicator for paper height The height of the sheets must...

Page 64: ...each dimension following the procedure below The Length and Width are indicated as follows A Length B Width Using the digital keys Key in the value in Length and press the SET button on the touch pane...

Page 65: ...is as follows Length 100 mm 3 94 to 297 mm 11 69 Width 148 mm 5 83 to 432 mm 17 01 To register the dimension data in the memory see P 65 Registering non standard size in the memory Set other copy mode...

Page 66: ...MORY button on the touch panel Key in its length in Length and press the SET button on the touch panel Set its width in the same manner Paper size that can be set is as follows Length 100 mm 3 94 to 2...

Page 67: ...be changed after having made the proof copy Press the MEMORY CLEAR button to clear the proof copy before changing the setting of the zoom or copy density etc When you make copies again after changing...

Page 68: ...n be changed If you want to change the setting of the copy density original mode zoom or simplex duplex press the MEMORY CLEAR button to clear the proof copy After the change perform the instructions...

Page 69: ...69 2 HOW TO MAKE COPIES 4 Proof Copy Cont 2...

Page 70: ...Mode 76 3 Enlargement and Reduction Copying 77 4 Selecting Finishing Modes 83 Type of finishing mode 83 Name of each part in the Finisher optional 84 Sort Group copying 85 Rotate sort mode 87 Staple...

Page 71: ...iginal s 3 Confirm that automatic paper selection has been selected on the basic menu Automatic paper selection is selected by default at the installation of the equipment If Change direction of origi...

Page 72: ...72 3 2 Press the APS button 4 Press the START button...

Page 73: ...riginals e g newspapers magazines When the desired size of paper is not set in any of the drawers place this size of paper in the selected drawer or place the paper on the bypass tray manually P 32 Pl...

Page 74: ...only in the following combinations LD LG LT LT R 8 5 SQ COMP Note that the copied image may be dislocated depending on the combination 1 Place paper in the drawer s Bypass copying is not available 3 P...

Page 75: ...Copies all in one size P 77 Before you use automatic paper selection be sure that all paper sizes corresponding to the original sizes have been set in the drawers In automatic magnification selection...

Page 76: ...even though they are colored Also yellowed originals or originals with a colored background may be automatically copied in full color even though they are black and white Select the full color mode or...

Page 77: ...fers depending on whether the originals have been set on the original glass or on the Reversing Automatic Document Feeder optional On the original glass 25 to 400 On the Reversing Automatic Document F...

Page 78: ...ize paper is selected The copy paper size can also be set by pressing the drawer button on the touch panel 4 Press the AMS button 5 Place the original s If Change direction of original appears make th...

Page 79: ...py paper size E g When LD for the original size and LT for the copy paper size are selected The copy paper size can also be set by pressing the drawer button on the touch panel When the original size...

Page 80: ...aper to the OTHER button with the following procedure The registered paper size is automatically selected when the OTHER button is pressed 1 Press the OTHER SIZE button 2 Press the paper size button c...

Page 81: ...n ZOOM button 4 Press the following buttons to set the desired reproduction ratio A Zoom Up and Down buttons The reproduction ratio changes by 1 every time it is pressed When you hold down either of t...

Page 82: ...on representing the desired copy paper size E g When LD size paper is selected The copy paper size can also be set by pressing the drawer button on the touch panel Set other copy modes as required 6 P...

Page 83: ...Position Staple Finisher MJ 1101 Finisher MJ 6004 The Hole Punch Unit for MJ 1024 and MJ 1023 MJ 6101 Hole Punch Unit for MJ 1101 Finishing device Type of finishing mode Sort Group Rotate sort Staple...

Page 84: ...in the Finisher optional 1 Tray 2 Sub tray 3 Upper cover 4 Front cover 5 Hole Punch Unit MJ 6101 6 Hole Punch Unit MJ 6004 7 Saddle stitch tray 8 Fixed tray 3 8 2 2 1 2 1 1 2 2 1 1 3 6 5 4 4 6 4 7 MJ...

Page 85: ...G size copy paper pull out the sub tray in advance The copied paper may fall or may not be sorted properly without the sub tray 1 Place paper in the drawer s 2 Place the original s 3 Press the finishe...

Page 86: ...86 3 4 Press the SORT or GROUP button Set other copy modes as required 5 Press the START button...

Page 87: ...vailable paper sizes for this mode is LT LT R Set the LT LT R size paper in the drawers or on the bypass tray in advance Paper exits to the receiving tray in this mode This mode cannot be used with au...

Page 88: ...of sheets for stapling Special paper such as OHP films or sticker label cannot be used for stapling Copies in different size cannot be stapled When the lengths of the copies are the same they can be...

Page 89: ...ading capacity see P 332 2 Specifications of Options Two covers of 17 lb Bond to 110 lb Index can be added In this case the covers are included in the maximum number of sheets that can be stapled Sadd...

Page 90: ...cable for this mode is 17 to 28 lb Bond When placing portrait originals horizontal to you in the magazine sort mode set the Image Direction in the edit menu Otherwise the originals will not be copied...

Page 91: ...y 3 Place the original s When placing originals on the Reversing Automatic Document Feeder see the illustrations P 90 for the proper page order of the copies When placing originals on the original gla...

Page 92: ...ing Available paper sizes are LD LT R and LG 1 When the cover is added the tray loading capacity is always 5 sets One cover of 17 lb Bond to 110 lb Index can be added In this case this cover is includ...

Page 93: ...LT LT R and COMP The paper weight applicable for this mode is 17 lb Bond to 110 lb Index Special paper such as OHP films or sticker label cannot be used for hole punching 1 Place paper in the drawer s...

Page 94: ...ni cian Number of punch holes and hole diameter Available paper sizes MJ 6004E MJ 6101E Japan and most of Europe 2 holes 0 26 dia LD LG LT LT R COMP A3 A4 A4 R B4 B5 B5 R FOLIO MJ 6004N MJ 6101N North...

Page 95: ...is opened 2 Press the Stapling position button to switch the stapling position Stapling positions are the front and the other end The stapling position lamp corresponding to the selected stapling posi...

Page 96: ...on The shutter in the paper exit area is closed and the operation of the manual stapling is finished Specification Acceptable paper size LD LG LT LT R COMP 13 LG 8 5 SQ 8K 16K A3 A4 A4 R B4 Maximum nu...

Page 97: ...sided original 1 sided copy default setting at installation 2 1 sided original 2 sided copy 3 2 sided original 2 sided copy 4 2 sided original 1 sided copy 5 Book type original 2 sided copy Duplex co...

Page 98: ...s 2 Place the original s 3 Confirm that the simplex duplex button on the basic menu is 1 1 SIMPLEX If 1 1 SIMPLEX is not shown press the simplex duplex button to display the next menu and then press...

Page 99: ...e direction mode in the edit menu P 158 14 IMAGE DIRECTION 1 Place paper in the drawer s When using this mode in bypass copying specify the paper size in advance P 58 3 Bypass Copying 2 Place the orig...

Page 100: ...in advance P 58 3 Bypass Copying 2 Place the original s 3 Press the simplex duplex button on the basic menu 4 Press the 2 2 DUPLEX button Set other copy modes as required 5 Press the START button Whe...

Page 101: ...ing the image direction mode in the edit menu with 2 Sided Originals to 1 Sided Copies copies can be adjusted to the same direction P 158 14 IMAGE DIRECTION 1 Place paper in the drawer s 2 Place the o...

Page 102: ...iguration in which the original is The acceptable paper size for this function is LT only 1 Place paper in the drawer s When using this mode in bypass copying specify the paper size in advance P 58 3...

Page 103: ...g should start at a right hand page and end at a right hand page Other copying types are selectable by pressing any of the RIGHT LEFT LEFT LEFT and LEFT RIGHT buttons e g If pages 2 to 6 of a book whi...

Page 104: ...page and set the booklet on the original glass again Repeat the procedures above until all the desired pages have been scanned If the last copy is only a single page press the COPY FINAL PAGE button o...

Page 105: ...C COPY MODES 5 Duplex Copying Cont 3 8 When all the pages have been scanned press the FINISHED button on the touch panel The scanned pages will be copied For setting image shift see P 125 Creating a b...

Page 106: ...th text and photographs mixed Default setting TEXT Originals with text or text and line art only PHOTO Originals with general photographs on photographic printing paper PRINTED IMAGE Originals with ph...

Page 107: ...3 4 Select and press the button for the most appropriate original mode for your original The selectable original mode differs depending on the color mode as follows Full color Black Auto color Set ot...

Page 108: ...density of the original In the manual copy density mode you can adjust the copy density manually according to the conditions of the original Default setting Manual density mode for FULL COLOR AUTO COL...

Page 109: ...mode 1 Place paper in the drawer s 2 Place the original s 3 Press either the or button to adjust the copy density to the desired level The copied image becomes lighter as you press the button and dark...

Page 110: ...110 4 4 IMAGE ADJUSTMENT 1 Color Balance YMCK Adjustment 111 2 RGB Adjustment 112 3 One Touch Adjustment 113 4 Background Adjustment 114 5 Sharpness 115 6 Twin Color 2 Color Copy 116...

Page 111: ...R BALANCE button 4 Press the or button of the color to obtain the desired color bal ance Then press the ENTER button 0 is the standard setting Pressing the button strengthens the adjusted color and pr...

Page 112: ...ENT button 4 Press the or button of the color to obtain the desired color bal ance Then press the ENTER button 0 is the standard setting Pressing the button strengthens the adjusted color and pressing...

Page 113: ...e touch operation See Color Guide for the adjustment results This function is available only in the full color mode 1 Place paper in the drawer s 2 Place the original s 3 Press the IMAGE button to ent...

Page 114: ...density mode P 108 1 Place paper in the drawer s 2 Place the original s 3 Press the IMAGE button to enter the image menu and then press the BACKGROUND ADJUSTMENT button 4 Press the LIGHT or DARK butto...

Page 115: ...IMAGE button to enter the image menu and then press the SHARPNESS button 4 Press the SOFT or SHARP button to adjust the sharpness and then press the ENTER button When the sharpness level is adjusted...

Page 116: ...which have been manually specified RED BLACK The red part in the original is copied in red and the parts other than red are copied in black and white The color may not be correctly reproduced dependi...

Page 117: ...the original Press the CHANGE BLACK TO button and then select the desired color 6 Select a color for the parts other than black in the original Press the SECOND COLOR button and then select the desir...

Page 118: ...ginal s 3 Press the IMAGE button to enter the image menu and then press the TWIN COLOR COPY button 4 Press the RED BLACK button 5 To adjust the red color press the ADJUST button If you do not change t...

Page 119: ...DJUSTMENT 6 Twin Color 2 Color Copy Cont 4 6 Press the or button of the color to obtain the desired color bal ance Then press the ENTER button 7 Select other copy modes as required and then press the...

Page 120: ...UAL PAGE 131 5 2IN1 4IN1 133 6 MAGAZINE SORT 136 7 EDITING 138 Trimming Masking 138 Mirror image 141 Negative Positive reversal 142 8 XY ZOOM 143 9 COVER SHEET 145 10 SHEET INSERTION 148 11 TIME STAMP...

Page 121: ...gins in the center inner margin Bookbinding margin Select this setting when using Book type original 2 sided copy P 102 The Top or Bottom margin can be used in combination with the Right or Left margi...

Page 122: ...100 mm button and then press the ENTER button The default width of the margin is 7 mm 0 276 In duplex copying margins on the back are created on the other side of those in the front P 97 5 Duplex Copy...

Page 123: ...p or bottom margin 1 Place paper in the drawer s When using this mode in bypass copying P 58 be sure to specify the paper size 2 Place the original s 3 Press the EDIT button to enter the edit menu and...

Page 124: ...e margin width by pressing the 2 mm or 100 mm button and then press the ENTER button The default width of the margin is 7 mm 0 276 6 Press the ENTER button Select other copy modes as required 7 Press...

Page 125: ...copying The margin is created in the center inner margin Acceptable paper sizes for this function is LT only 1 Press the EDIT button to enter the edit menu and then press the IMAGE SHIFT button 2 Pres...

Page 126: ...126 5 4 Press the ENTER button Set Book type original 2 sided copy P 102 in duplex copying as well...

Page 127: ...e edges of the copy eliminating those black stains This function is available only in the case of standard size originals The width of the edge erase margin can be adjusted in 1 mm increments 1 Place...

Page 128: ...5 4 Adjust the width by pressing the 2 mm or 50 mm button and then press the ENTER button The default width of the white border is 5 mm 0 197 Select other copy modes as required 5 Press the START but...

Page 129: ...center erase is set The width of the book center erase margin can be adjusted in 1 mm increments 1 Place paper in the drawer s When using this mode in bypass copying P 58 be sure to specify the paper...

Page 130: ...10 mm 0 393 Select other copy modes as required 5 Place a book original on the original glass Align its center with the yellow guide line near the center of the original glass Do not place heavy obje...

Page 131: ...eets of paper Acceptable paper sizes for this function is LT only 1 Place paper in the drawer s 2 Press the EDIT button to enter the edit menu and then the DUAL PAGE button 3 Press the 1 SIDE or 2 SID...

Page 132: ...e originals have finished being scanned 7 After all the originals have finished being scanned press the FIN ISHED button Press the COPY FINAL PAGE button if the last original is a 1 sided page 5 Place...

Page 133: ...rigi nals are copied onto a single sheet In addition duplex 2IN1 4IN1 modes are available where four eight originals can be copied to 2 sides of a single sheet of paper 2IN1 4IN1 2IN1 DUPLEX a Side 1...

Page 134: ...ize as the original is selected To make copies on paper which is not the same size as the original press the ZOOM button on the basic menu to enter the following menu select the desired paper size and...

Page 135: ...l is placed on the original glass perform steps 7 and 8 7 Place the next original and press the START button Data scanning of this original starts The next original will also be scanned in the same ma...

Page 136: ...atically folded in half and stapled along their center line Example of copying with the Saddle Stitch Finisher optional The Magazine sort function has 2 procedures operating from the basic menu and op...

Page 137: ...tton To staple the center line using the Saddle Stitch Finisher optional press the STAPLE ON button For the maximum number of sheets that can be stapled see P 92 Available conditions for saddle stitch...

Page 138: ...ly available with standard size originals If the original and copy paper sizes are set incorrectly the image in the specified range may not be copied correctly 1 An example of trimming 2 An example of...

Page 139: ...after specifying the area 4 Place the original with its face up on the original glass Set the original with its face up and bottom toward you and fit its top left corner against that of the original...

Page 140: ...he START button 8 Place the original s with its face down Set the original with its face down and bottom toward you and fit its top left corner against that of the original glass Select other copy mod...

Page 141: ...d right and left 1 Place paper in the drawer s When using this mode in bypass copying be sure to specify the paper size P 71 1 Paper Selection 2 Place the original s 3 Press the EDIT button to enter t...

Page 142: ...nly when the color mode is BLACK or FULL COLOR 1 Place paper in the drawer s When using this mode in bypass copying be sure to specify the paper size P 71 1 Paper Selection 2 Place the original s 3 Pr...

Page 143: ...t is in the range of 25 to 200 When the color mode is FULL COLOR or AUTO COLOR When the original mode is IMAGE SMOOTHING When TWIN COLOR COPY is used When the original is set on the Reversing Automati...

Page 144: ...sing the 25 and 400 buttons set the reproduction ratio for X and press the SET button Then set the reproduction ratio for Y 5 Press the ENTER button Select other copy modes as required 6 Press the STA...

Page 145: ...the cover sheet Place the cover sheet in the drawer selected for cover sheets or on the bypass tray When it is placed in the drawer for the cover sheets you must set the paper type cover sheet size a...

Page 146: ...add blank front and back cover sheets TOP COPIED BACK BLANK To add copied front and blank back cover sheets When 1 Sided Original to 2 Sided Copy with the TOP COPIED or TOP COPIED BACK BLANK button pr...

Page 147: ...erform steps 8 and 9 8 Place the next original and press the START button Data scanning of this original starts The next original will also be scanned in the same manner when you press the YES button...

Page 148: ...ge previous to the specified one BLANK 1 Place the special sheets of paper P 38 Drawer for special uses Place the special sheets of paper on the bypass tray or in the drawer selected for sheet inserti...

Page 149: ...INSERT SOURCE 2 button 7 Key in the desired page number 3 digits or less for insertion and press the SET button When COPIED is selected on step 5 a copied sheet is inserted into the specified page Wh...

Page 150: ...used the original is scanned and copying starts When the original is placed on the original glass perform steps 11 and 12 11Place the next original and press the START button Data scanning of this or...

Page 151: ...a landscape copy 1 Place paper in the drawer s 2 Place the original s 3 Press the EDIT button to enter the edit menu and then press the TIME STAMP button 4 Select the orientation Short edge or Long ed...

Page 152: ...to the copies 1 Printed at the bottom center of a portrait copy 2 Printed at the top right of a landscape copy 1 Place paper in the drawer s 2 Place the original s 3 Press the EDIT button to enter th...

Page 153: ...or Long edge and position TOP LEFT TOP CENTER TOP RIGHT BOTTOM LEFT BOT TOM CENTER or BOTTOM RIGHT of the page number to be printed and then press the ENTER button 5 Key in the starting page number a...

Page 154: ...ber of scanned original pages reaches 1000 There are restrictions on the settings for JOB BUILD Settings not available for JOB BUILD common set tings which are set before scanning the first job and ap...

Page 155: ...he Reversing Automatic Document Feeder see P 74 Copying mixed size originals in one go mixed original size Select the drawer if you want to specify it 2 Press the EDIT button to enter the edit menu Th...

Page 156: ...tarts 6 After Press START button to copy after changing settings appears place the originals of the 2nd job Perform the settings for the 2nd job Note that copying will be performed in the same modes a...

Page 157: ...157 5 USING THE EDITING FUNCTIONS 13 JOB BUILD Cont 5 9 Press the JOB FINISH button on the basic menu The copying of the originals starts When copy and e Filing file functions are set storing starts...

Page 158: ...2 sided open toward the left Book portrait LD LT LG ST R original etc is copied using this function with 2 Sided Originals to 1 Sided Copies copies can be adjusted to the same direction IMAGE DIRECTI...

Page 159: ...159 5 USING THE EDITING FUNCTIONS 14 IMAGE DIRECTION Cont 5 5 Press the ENTER button Select other copy modes as required 6 Press the START button...

Page 160: ...en to top Tablet and the opposite condition is available 1 Place paper in the drawer s 2 Place the original s 3 Press the EDIT button to enter the edit menu Then press the Next button to switch the me...

Page 161: ...enter the edit menu Then press the Next button to switch the menu and press the SADF button If the ADF button is already displayed the continuous feed mode is set In this case skip to step 5 3 Press t...

Page 162: ...Press the START button Single feed mode 1 Place paper in the drawer s 2 Press the EDIT button to enter the edit menu Then press the Next button to switch the menu and press the ADF button If the SADF...

Page 163: ...is displayed If there are more originals set them in the same way The same operation is performed whether or not you press the YES button 5 After all originals have finished being fed press the FINIS...

Page 164: ...e Filing 165 2 Creating User Boxes 167 3 Changing Data of User Boxes 169 4 Deleting User Boxes 172 5 Storing Documents in e Filing 174 6 Printing Stored Documents 178 7 Deleting Folders or Documents...

Page 165: ...d to store a shared document that can be accessed by any users without restrictions User box Up to 200 boxes can be created Passwords can be set for each user box Up to 100 folders per one box can be...

Page 166: ...to a client PC using the File Downloader See the e Filing Guide for details For setting the storing period of the documents in e Filing ask the network administrator Be sure to back up the data stored...

Page 167: ...up a user box following the procedure below 2 Select a blank box number between 001 and 200 and then press the SETUP button If the desired box is not displayed press the Prev or Next button to switch...

Page 168: ...ed To correct the entered password press the CLEAR button on the control panel When the SET button is pressed Retype Password becomes highlighted 5 Key in the password in Retype Password asterisk is d...

Page 169: ...e Filing Guide for details 2 Select the desired box and then press the EDIT button If the desired box is not displayed press the Prev or Next button to switch the menu To display the applicable menu i...

Page 170: ...ton Be sure to key in the 5 digit password asterisk is displayed in Password when the password is entered To correct the entered password press the CLEAR button on the control panel When the SET butto...

Page 171: ...171 6 e FILING 3 Changing Data of User Boxes Cont 6 7 Press the ENTER button The box settings are updated...

Page 172: ...and then press the DELETE but ton If the desired box is not displayed on the menu press the Prev or Next button to switch the menu To display the applicable menu immediately key in the box number 3 Ke...

Page 173: ...173 6 e FILING 4 Deleting User Boxes Cont 6 4 Are you sure you want to delete this box appears Press the Yes button to delete the box The box is deleted...

Page 174: ...canning function can be also stored in e Filing The stored data can be downloaded to the client PC as a JPEG PDF TIFF or XPS file For details refer to the Scanning Guide and the e Filing Guide 1 Place...

Page 175: ...the ENTER button If the desired box is not displayed on the menu press the Prev or Next button to switch the menu To display the applicable menu immediately key in the box number When the password en...

Page 176: ...n the selected folder is displayed Press the ENTER button to store in this folder If you want to close the folder and go back to the box above press the CLOSE FOLDER button Creating the folder can be...

Page 177: ...or on the Reversing Automatic Document Feeder optional in the Single original feeding mode the following menu is displayed Setting the original on the original glass When the next original is placed...

Page 178: ...Printing the stored document after changing the settings 2 Select the box in which the desired printing document is stored and then press the ENTER button If the desired box is not displayed on the me...

Page 179: ...you want to print the document out and press the OPEN FOLDER button Select the desired document on the menu 5 Press the PRINT button Printing starts To stop printing a stored document during the oper...

Page 180: ...ed according to steps 1 to 4 of P 178 Printing the whole document 2 Press the TEST PRINT button 3 Key in the number of the last page and press the SET button Then key in the number of the first page T...

Page 181: ...s are available before the stored document is printed 1 Paper source Press the drawer icon to be set as a paper source However the paper in the drawer selected for the paper source is used only when i...

Page 182: ...e the eight items mentioned above for the setting mode To set items 3 to 8 press the button and set the required setting on the menu 4 Press the PRINT button Printing starts To stop printing a stored...

Page 183: ...e folder or document and then press the ENTER button If the desired box is not displayed on the menu press the Prev or Next button to switch the menu To display the applicable menu immediately key in...

Page 184: ...which you want to delete the document and press the OPEN FOLDER button Select the desired document and press the DELETE button 5 Are you sure you want to delete this folder or Are you sure you want to...

Page 185: ...the black mode at 600 dpi resolution They can be stored in the color mode using the scanning function Data can be stored in the MFP LOCAL hard disk in the equipment as well as REMOTE 1 and REMOTE 2 h...

Page 186: ...45 letters can be entered 5 Select the destination you want to store the data Any two of the destinations MFP LOCAL REMOTE 1 and REMOTE 2 can be selected at one time If you press the REMOTE 1 or REMOT...

Page 187: ...e PDF files TIFF MULTI Scanned originals are stored as one TIFF file TIFF SINGLE A folder is created and each page of the scanned original is stored into this folder separately as a PDF file E g A thr...

Page 188: ...ng mode the following menu is displayed Setting the original on the original glass When the next original is placed the YES button and then the START button are pressed storing of the document starts...

Page 189: ...189 6 e FILING 8 Appendix Cont 6...

Page 190: ...190 7 7 TEMPLATE 1 Template 191 2 Registering User Groups and Templates 193 3 Changing Data of User Groups and Templates 205 4 Recalling Templates 213 5 Deleting User Groups or Templates 218...

Page 191: ...tion shows the outline of a template function 1 Register the combination of the functions to the template 2 Place the original 3 Recall the desired template and then make a copy Template in Useful Tem...

Page 192: ...r of this equipment as a PDF file A 1 sided original is scanned in the black and text photo mode at 400 dpi res olution then stored in the shared folder of this equipment as a PDF file A 1 sided origi...

Page 193: ...an be registered When registering a template in the public template group keying in the Admin Password is required USER GROUP Up to 200 groups can be registered It is useful if you register each depar...

Page 194: ...n the letter entry menu and the digital keys and then press the ENTER button If an incorrect Admin Password is entered three times in a row this equipment will not be able to be operated for approx 30...

Page 195: ...oth are entered NAME 1 is displayed on the upper side and NAME 2 on the lower side of the button When the NAME 1 or NAME 2 button is pressed the letter entry menu P 18 is displayed Up to 11 let ters c...

Page 196: ...is entered To correct the entered password press the CLEAR button on the control panel When the SET button is pressed Retype Password becomes highlighted 11Key in the password in Retype Password and t...

Page 197: ...omatically started by pressing the template button with the icon when the template is recalled How ever if a password is set for the template you need to key it in when an operation with the function...

Page 198: ...on If the desired user group is not displayed on the menu press the Prev or Next button to switch the menu To display the applicable menu immediately key in the user group number 4 Press the NAME butt...

Page 199: ...played Up to 30 letters can be entered To set the password proceed to step 6 If not skip to step 8 6 Key in the password in Password as required and then press the SET button Be sure to key in the 5 d...

Page 200: ...rect the entered password press the CLEAR button on the control panel 8 Press the ENTER button The user group is registered Registering a template in the user group 1 Set every function you want to in...

Page 201: ...elect the desired user group and then press the ENTER button If the desired user group is not displayed press the Prev or Next button to switch the menu 5 Key in the password 5 digits for the selected...

Page 202: ...NAME 1 is displayed in the upper side and NAME 2 is displayed in the lower side of the template button Enter NAME 1 and or NAME 2 When both are entered NAME 1 is displayed in the upper side and NAME...

Page 203: ...e password in Password as required and then press the SET button Be sure to key in the 5 digit password asterisk is displayed in Password when the password is entered To correct the entered password p...

Page 204: ...tions is automatically started by pressing the template button with the icon when the template is recalled How ever if a password is set for the template you need to key it in when an operation with t...

Page 205: ...d from the control panel but from TopAccess For details see the TopAccess Guide Changing the data of a user group 2 Press the REGISTRATION button on the touch panel 3 Select the user group you want to...

Page 206: ...p 5 5 Press the NAME button and then enter the new name of the user group When the NAME button is pressed the letter entry menu P 18 is displayed Up to 20 letters can be entered 6 Press the USER NAME...

Page 207: ...tered To correct the entered password press the CLEAR button on the control panel When the SET button is pressed Retype Password becomes highlighted 8 Key in the password in Retype Password and then p...

Page 208: ...in which the template to be changed was registered and then press the ENTER button If the desired user group is not displayed on the menu press the Prev or Next button to switch the menu To display th...

Page 209: ...ted for approx 30 sec In that case wait until it becomes available and then enter the correct Admin Password again When the user group is selected Key in the password 5 digits for the selected user gr...

Page 210: ...is pressed the letter entry menu P 18 is displayed Up to 11 let ters can be entered The following symbols cannot be used for NAME 1 and NAME 2 8 Press the USER NAME button and then enter the new user...

Page 211: ...Password when the password is entered To correct the entered password press the CLEAR button on the control panel When the SET button is pressed Retype Password becomes highlighted 10Key in the passwo...

Page 212: ...The operation of the setting functions is automatically started by pressing the template button with the icon when the template is recalled How ever if a password is set for the template you need to k...

Page 213: ...If ENABLE is selected for AUTOMATIC START when the template is registered operation of the setting functions is automatically started by pressing the template button When recalling a template in a pu...

Page 214: ...peration of the registered setting functions is automati cally started 6 Key in the password 5 digits for the selected template and then press the ENTER button If no password was set when the template...

Page 215: ...ace the original s 4 Select the user group in which the template to be recalled is regis tered If the desired user group is not displayed on the menu press the Prev or Next button to switch the menu T...

Page 216: ...ate button If the desired template is not displayed on the menu press the Prev or Next button to switch the menu If you press the template button with the icon the operation of the registered setting...

Page 217: ...TEMPLATE 4 Recalling Templates Cont 7 8 Confirm that Updated the template setting appears on the menu The message appears for approx 3 seconds Select other copy modes as required 9 Press the START bu...

Page 218: ...leting a user group 2 Press the REGISTRATION button on the touch panel 3 Select the user group you want to delete and then press the DELETE button If the desired user group is not displayed on the men...

Page 219: ...its for the selected user group and then press the ENTER button If no password was set when the user group was registered skip to step 5 5 DELETE OK appears Press the DELETE button The selected user g...

Page 220: ...ress the ENTER button When the public group is selected Press the PASSWORD button and then key in the Admin Password 6 to 10 digits with the keys on the letter entry menu and the digital keys If an in...

Page 221: ...the desired template is not displayed on the menu press the Prev or Next button to switch the menu 6 Key in the password 5 digits for the selected template and then press the ENTER button If no passwo...

Page 222: ...rint jobs 228 Private print jobs 231 When using department codes 234 3 Confirming Scan Job Status 237 4 Log List 238 Confirming job history in log list 239 Registering into address book from log lists...

Page 223: ...st of jobs print sending receiving scan performed Print status You can also start pause release delete and move the job which is in waiting For the status confirmation of Fax jobs see the Operator s M...

Page 224: ...e job was registered Paper Paper size to be printed Pages Number of pages to be printed Sets Number of sets to be printed Status Status of jobs Scheduled is displayed for the scheduled print 4 jobs ar...

Page 225: ...d printed on the print job list Displaying print job list Deleting print jobs 1 Select the job you want to delete on the print job list then press the DELETE button If the subject job is not displayed...

Page 226: ...t job is started Releasing print job Press the RESUME button A job once paused will not be printed out unless the RESUME button is pressed Moving print jobs The job in waiting can be moved to a specif...

Page 227: ...227 8 JOB STATUS 2 Confirming Print Job Status Cont 8 2 Select the position where you want to move the job The job comes right under the job you selected on the list...

Page 228: ...roof print and then select whether you print the rest of the documents or quit printing to change the setting on the proof print job list If you want to print the rest you can change the number of pri...

Page 229: ...ding job is not displayed on the page press the Prev or Next button to switch the page 2 Press the RELEASE button Printing starts The printing status can be confirmed on the print job list When you wa...

Page 230: ...b you want to delete on the proof print job list and then press the DELETE button If the corresponding job is not displayed on the page press the Prev or Next button to switch the page 2 Delete OK app...

Page 231: ...IVATE button 3 Select the appropriate user name When you perform the operation as an administrator do not press the user name but press the ADMIN PASSWORD button The letter entry menu P 18 Setting let...

Page 232: ...t is displayed A list of private print jobs for which the same password has been set appears Printing private print jobs 1 Select the job you want to print on the private print job list If the corresp...

Page 233: ...lect the job you want to delete on the private print job list and then press the DELETE button If the corresponding job is not displayed on the page press the Prev or Next button to switch the page To...

Page 234: ...jobs stored in the invalid queue can be printed when the correct department code is newly keyed in A print job whose number of pages exceeds that specified for a particular department code will not b...

Page 235: ...department code again to print the subject job 1 Select the job you want to print on the menu for the invalid queue If the corresponding is not displayed on the page press the Prev or Next button to...

Page 236: ...b you want to delete on the menu for the invalid queue then press the DELETE button If the corresponding job is not displayed on the page press the Prev or Next button to switch the page 2 Delete OK a...

Page 237: ...1 page Up to 250 pages 1000 jobs can be displayed When you want to confirm the 5th and the following jobs press the Next button and when you want to return to the previous page press the Prev button D...

Page 238: ...t You can also register unregistered Fax numbers or E mail addresses into the address book from the log list of the Fax and Internet Fax or the log list of scan jobs The FAX Unit optional is necessary...

Page 239: ...pages 120 jobs can be displayed When you want to confirm the 5th and the following jobs press the Next button and when you want to return to the previous page press the Prev button The following butt...

Page 240: ...Order of job registered To Recipient s Fax number or E mail address of Internet Fax Date Time Date and time the Fax or Internet Fax was sent Pages Number of pages of the Fax or Internet Fax sent Statu...

Page 241: ...ed File No Order of job registered From Sender s Fax number or E mail address of Internet Fax Date Time Date and time the Fax Internet Fax or E mail was received Pages Number of pages of the Fax Inter...

Page 242: ...g E mails Job history of the following functions using the Received Internet Fax Forward function Storing job in e filing Storing job in a shared folder Sending E mails The following information is di...

Page 243: ...s manually entered or which was searched for by the LDAP server The following information can be registered from the Receive log Remote FAX number which was dialed by direct entry using the digital ke...

Page 244: ...on the touch panel FAX NO Enter the Fax number 2ND FAX Enter the second Fax number E MAIL Enter the E mail address CORP Enter the company name DEPT Enter the department name KEYWORD Enter a keyword w...

Page 245: ...end and receive logs 1 page or the 120 latest send and receive logs 3 pages can be printed out You can also select and print only 1 log For details see the Operator s Manual for Facsimile Function 1 P...

Page 246: ...but ton being used for the feeding of this printing is highlighted Releasing print job errors If the specified size of paper is not in the drawer when printing is to be performed from a client PC a pr...

Page 247: ...rmed Press the JOB STATUS button when printing is completed Printing by placing appropriate size of sheets in the drawer 2 Press the drawer button whose size you want to change on the touch panel You...

Page 248: ...rawer When the specified size of paper is not in the drawer you can release the error by selecting another size of paper already placed in another drawer instead of placing the specified size of paper...

Page 249: ...00E8 HDD error Retry communications Internet Fax 1C10 System access abnor mality Turn the power OFF and then back ON Perform the job in error again If the error still occurs contact your service repr...

Page 250: ...heck if the SMTP server is operating properly 1C69 SMTP server connec tion error Ask your administrator to set the login name or password of SMTP server and perform the job again Check if the SMTP ser...

Page 251: ...or occurs because the paper empty occurs and too much waiting jobs are stored in the hard disk add the paper to activate other jobs 3A70 Interrupt partial E mail reception Ask your administrator to en...

Page 252: ...nt cannot perform the offramp gate way transmission for more than 40 destinations 3D30 Fax unit is not installed Make sure the Fax unit is installed or connected correctly 3E10 POP3 server commu nicat...

Page 253: ...the power OFF and then back ON and perform the job again 2C40 Failed to convert image file format Turn the power OFF and then back ON Retry the scan If the error still occurs contact your service rep...

Page 254: ...Turn the power OFF and then back ON and retry the job If the error still occurs contact your service representative 2D15 Exceeding maximum file capacity Divide the file into several files or retry in...

Page 255: ...retry the scan 2D66 Failed to process your job Insufficient storage space Delete the data in the local storage folder in the equipment and retry the scan 2D67 FTP service is not available Ask your ad...

Page 256: ...n this error occurs for the print of the data in the e Filing perform the print with the administrator s password If the recovery is still not completed or in case of invalid password for the operatio...

Page 257: ...r authentication or user registra tion 4040 No authority to execute a job The user has not been assigned the Role to perform this opera tion by the Administrator 4050 The connection with the LDAP serv...

Page 258: ...503 Check if the mail server is operating properly Turn the power OFF and then back ON and perform the job in error again If the error still occurs contact your service representative 2504 HOST NAME...

Page 259: ...259 8 JOB STATUS 6 Error Code Cont 8...

Page 260: ...BLINKING GRAPHIC SYMBOLS 1 Blinking Graphic Symbols 261 2 Drawer Display on the Touch Panel 262 3 Replace Toner Cartridge Symbol 263 4 Replace Toner Bag Symbol 269 5 Jam Symbols 271 6 Call Service Sym...

Page 261: ...eplace toner cartridge symbol P 263 3 Replace Toner Cartridge Symbol 5 Replace toner bag symbol P 269 4 Replace Toner Bag Symbol 6 Jam symbol P 271 5 Jam Symbols 7 Call service symbol P 291 6 Call Ser...

Page 262: ...262 9 2 Drawer Display on the Touch Panel When the drawer runs out of paper the drawer display on the touch panel starts blinking Add paper to the drawer...

Page 263: ...Yellow Y Magenta M Cyan C The following message appears when yellow and magenta toners have run out at the same time Install new Y M toner cartridge Never attempt to incinerate toner cartridges Dispos...

Page 264: ...it clockwise If it cannot be pulled out close the front cover turn the power OFF and then ON again When Install new Black toner cartridge appears start the procedure again from step 1 Never attempt t...

Page 265: ...artridge completely Match the label orange on the equipment with the shutter orange on the toner cartridge then insert it If the inside of the equipment becomes dirty with toner clean it before insert...

Page 266: ...Toner Cartridge in Chapter 3 SETTING ITEMS USER in the User Functions Guide 1 When the color toner in the cartridge has run out the following menu appears Press the button corresponding to the color t...

Page 267: ...ppropriate position to be replaced 3 Open the front cover 4 Push on the latch and then pull out the cartridge Never attempt to incinerate toner cartridges Dispose of used toner cartridges and toner ba...

Page 268: ...replace the desired cartridges and then press the FINISH button Wait adding toner appears The equipment automatically starts supplying toner 6 Holding the new toner cartridge pull out the seal in the...

Page 269: ...er bag symbol blinks and Dispose of used toner appears Replace the toner bag following the procedure below 1 Open the front cover 2 Pull the toner bag out carefully Never attempt to incinerate toner b...

Page 270: ...270 9 4 Set a new toner bag and then close the front cover Check that the model name TB 281C is written on the toner bag...

Page 271: ...uidance 1 Reversing Automatic Document Feeder optional P 271 2 Fuser Unit P 278 3 Automatic Duplexing Unit P 277 4 Bypass tray P 276 5 Drawer feeding area P 274 6 Large Capacity Feeder optional KD 101...

Page 272: ...2 Remove any misfed originals 3 Turn the dial to remove the misfed origi nal 4 Open the transport guide 5 Raise the guide plate under the transport guide and then remove the original under the guide...

Page 273: ...6 Close the transport guide and then the upper cover 7 Open the Reversing Automatic Docu ment Feeder 8 Open the reverse cover and then remove the original 9 Close the Reversing Automatic Docu ment Fee...

Page 274: ...9 12Lower the original feeding tray Releasing a paper misfeed in drawer feeding area 11Raise the original feeding tray and then remove the original under the tray 13Close the upper cover 1 Open the co...

Page 275: ...MBOLS 5 Jam Symbols Cont 9 3 Close the cover Releasing a paper misfeed in the Large Capacity Feeder optional 3 Close the cover 2 Remove any misfed paper 1 Open the cover of the Large Capacity Feeder 2...

Page 276: ...r misfeed in the Paper Feed Pedestal optional Releasing a paper misfeed on the bypass tray 1 Open the cover of the Paper Feed Pedes tal 2 Remove any misfed paper 3 Close the cover 1 Pull out misfed pa...

Page 277: ...This could injure you Do not touch the metal portion of a guide plate as it could burn you 3 Lower the paper guide and return the automatic duplexing unit to the original position Be sure to close bot...

Page 278: ...ry hot you could be burned or the shock could cause an injury to your hand 1 Make sure that the bypass tray and the automatic duplexing unit are open Put your fingers into A push it up to release the...

Page 279: ...279 9 BLINKING GRAPHIC SYMBOLS 5 Jam Symbols Cont 9 2 Open the fuser unit cover 3 Holding the knob open the transport guide 4 Remove any misfed paper inside the fuser unit...

Page 280: ...atic duplexing unit and the bypass tray to the original positions Releasing a paper misfeed in the Bridge Unit optional 5 Pull the lever toward you to loose the misfed paper Hook a finger under the lo...

Page 281: ...asing a paper misfeed in the Finisher and the Hole Punch Unit optional MJ 1101 6101 A paper misfeed at the upper tray 2 Remove any misfed paper that is inside the Bridge Unit Remove the misfed paper f...

Page 282: ...2 Remove any misfed paper 3 Holding the cover handle of the Bridge Unit open the cover When the Hole Punch Unit optional MJ 6101 is installed pro ceed to step 5 4 Remove any misfed paper Proceed to s...

Page 283: ...Close the cover of the Bridge Unit 5 Open the cover of the Hole Punch Unit 6 Turn the knob counterclockwise to remove any misfed paper 7 Close the cover of the Hole Punch Unit 9 Close the upper tray P...

Page 284: ...per misfeed at the lower tray The upper tray can be closed by pressing the right side of the latch 1 Raise the lever and then open the upper tray 2 Remove any misfed paper 3 Lower the shutter of the p...

Page 285: ...e Punch Unit optional MJ 6101 4 Remove any misfed paper 5 Holding the cover handle of the Bridge Unit open the cover When the Hole Punch Unit optional MJ 6101 is installed pro ceed to step 7 6 Remove...

Page 286: ...ise to remove any misfed paper 9 Close the cover of the Hole Punch Unit 11Close the upper tray Place both hands at the shaded area of the upper tray and then push and close the upper tray until it loc...

Page 287: ...ny mis fed paper in the paper exit area When the Hole Punch Unit optional MJ 6004 is installed pro ceed to step 2 If not installed proceed to step 6 2 Open the front cover of the Hole Punch Unit 3 Tur...

Page 288: ...eed in the Saddle Stitch Unit optional 5 Return the Hole Punch Unit to the origi nal position and close the front cover 6 Open the upper cover of the Finisher until it locks 7 Remove any misfed paper...

Page 289: ...s Cont 9 2 Slide the green handle toward the right and remove the misfed paper 3 Move the green handle to the right hand side 4 Remove any misfed paper and return the handle to its original position 5...

Page 290: ...front cover 6 Turn the left hand knob clockwise while you are pushing it 7 Remove any misfed paper on the exit side of the Saddle Stitch Unit 8 Raise the lever and open the exit cover of the Saddle S...

Page 291: ...self You could cause a fire or get an electric shock Always contact your service representative for maintenance or repair of the internal parts of the equip ment When the call service symbol blinks an...

Page 292: ...CHECK STAPLER 303 5 Examine stapler in the Saddle Stitch Unit 304 6 READY CHECK SADDLE STITCH STAPLER 307 7 READY HOLE PUNCH DUST BIN IS FULL 308 8 POWER FAILURE 310 9 Time for periodic maintenance 31...

Page 293: ...e shown only if the finisher optional is installed When the staples in the stapler of the finisher run out this message appears Add staples to the cartridge according to the following procedure Finish...

Page 294: ...pty staple case out of the sta ple cartridge 4 Remove the seal bundling the staples Be careful that the staples are not misaligned 5 Install a new staple case into the staple cartridge Insert the new...

Page 295: ...Check staple cartridge remains repeat the above procedure from steps 1 to 7 Finisher optional MJ 1101 6 Install the staple cartridge onto the sta pler Insert the cartridge until it is caught by the l...

Page 296: ...4 Install a new staple case into the staple cartridge Insert the new case into the cartridge until you hear a click sound 5 Install the staple cartridge onto the sta pler When installing the staple c...

Page 297: ...r run out this message appears Replace the staple cartridge according to the following procedure 1 Open the front cover of the finisher 2 Slide the Saddle Stitch Unit carefully toward the front 3 Pull...

Page 298: ...Install the new staple cartridge When installing a staple cartridge push it downward until it is fixed with a click sound 6 Pull the handle of the stapler of the Sad dle Stitch Unit toward you to unl...

Page 299: ...EARS 10 3 Examine stapler This message appears when the staples in the finisher optional are jammed To remove them follow the procedure below Finisher optional MJ 1024 1023 1 Open the front cover of t...

Page 300: ...e 3 Lower the guide while holding the knob A Stapling area Do not touch the stapling area The stapler could injure you 4 Remove any jammed staples 5 Hold the knob and raise the guide and then return t...

Page 301: ...ose the front cover of the finisher Finisher optional MJ 1101 6 Install the staple cartridge into the sta pler Insert the cartridge until it is caught by the latch and fixed with a click sound 1 Open...

Page 302: ...ove any jammed staples 5 Hold the knob and raise the guide and then return the guide to its original posi tion 6 Install the staple cartridge into the sta pler When installing the staple cartridge hol...

Page 303: ...l be shown only when the finisher optional is installed It appears when the staples in the stapler of the finisher run out or when the staples in the finisher are jammed Clear the error according to t...

Page 304: ...move them follow the procedure below 1 Open the front cover of the finisher 2 Slide the Saddle Stitch Unit carefully toward the front 3 Pull the handle of the stapler of the Sad dle Stitch Unit toward...

Page 305: ...cartridge 5 While pushing the lever 1 downward pull up the shutter with the knob 2 6 Remove any jammed staples A Stapling area Do not touch the stapling area The stapler could injure you 7 Push the k...

Page 306: ...are not met Be sure to check the items mentioned in step 11 and open the front cover of the finisher and then close it again before performing test sta pling Test stapling is necessary to prevent voi...

Page 307: ...ow steps 1 to 6 of P 297 2 Check staple cartridge in the Sad dle Stitch Unit Do not close the front cover of the Saddle Stitch Finisher 2 Check the following 2 items to perform test stapling Whether t...

Page 308: ...Punch Unit optional becomes full To dispose of the paper bits follow the procedure below Hole Punch Unit optional MJ 6004 3 Dispose of the punched paper bits 4 Attach the hole punch dustbin 5 Close th...

Page 309: ...PUNCH DUST BIN IS FULL Cont 10 Hole Punch Unit optional MJ 6101 3 Dispose of the punched paper bits 4 Attach the hole punch dustbin 5 Close the cover of the Hole Punch Unit 1 Open the cover of the Hol...

Page 310: ...a job is interrupted due to a power failure etc The print or Fax job in progress at the time of a power failure may not be completed Confirm the job status by pressing the JOB STATUS button To clear t...

Page 311: ...311 10 WHEN THIS MESSAGE APPEARS 10 9 Time for periodic maintenance This message appears when assistance from a qualified service technician is required Contact your ser vice representative...

Page 312: ...l and the Additional Drawer Module optional are installed Check paper size setting on control panel for Bypass In case that a paper misfeed occurs and one of the above messages consequently appears an...

Page 313: ...Cont 10 6 Press the USER button on the touch panel to display the USER menu and then press the DRAWER button 3 Pull out the drawer mentioned in the message Then remove all the paper in it 4 Close the...

Page 314: ...ing to the one placed in the drawer P 29 4 Setting Copy Paper 9 Place the paper removed in step 3 in the drawer 10Press the USER FUNCTIONS button to return to the basic menu Set the original and start...

Page 315: ...Place paper on the bypass tray and select the paper size P 58 3 Bypass Copying 6 Place the original and try to copy again When POWER FAILURE appears press the FUNCTION CLEAR button twice to clear the...

Page 316: ...a drawer 2 Remove the jammed paper P 271 5 Jam Symbols 1 Turn the power of the equipment OFF You cannot shut down the equipment 3 Pull out the drawer mentioned in the message Then remove all the paper...

Page 317: ...mentioned in the message P 29 4 Setting Copy Paper 7 The job is resumed If you change the paper size again after the completion of the job check that the paper size placed in the drawer is the same a...

Page 318: ...rresponding to the one shown next to the message Place Paper in the Bypass tray on the bypass tray 7 Press the START button 3 Remove all the paper from the bypass tray 4 Turn the power ON 5 Press the...

Page 319: ...the finisher as an exit tray and try again Printing can be performed without deleting the print job in the following two ways However some parts of the original image may be missing because the paper...

Page 320: ...message appears when the equipment cannot be operated normally because an error occurs but it may be released by rebooting the equipment Since the equipment cannot be shut down with the control panel...

Page 321: ...10 321 10 WHEN THIS MESSAGE APPEARS...

Page 322: ...322 11 11 MAINTENANCE 1 Daily Inspection 323 2 Simple Troubleshooting 324...

Page 323: ...et Clean the surface as follows depending on the staining Clean it with a soft cloth Clean it with a soft cloth lightly moistened with water Clean it with a soft cloth lightly moistened with alcohol a...

Page 324: ...r Match the size of the paper placed in the drawer or on the bypass tray and the one regis tered to the equipment P 312 10 Check paper size setting on control panel for drawer N Does the paper placed...

Page 325: ...naged under user man agement is the correct informa tion entered Enter the user information cor rectly P 20 When department or user management is used Is the Warming up message displayed Wait until th...

Page 326: ...dirty Clean them up P 323 1 Daily Inspection Is the image density set prop erly Adjust the image density prop erly with the AUTO button or manual density buttons P 108 7 Copy Density Adjust ment Are...

Page 327: ...al size direction and the reproduction ratio suit able for the paper size Select copy paper of the same size as the original or set the reproduction ratio suitable for the paper size P 71 Automatic Pa...

Page 328: ...1 OKI CX1145 MFP Specifications 329 2 Specifications of Options 332 3 Packing List 337 4 Copying Function Combination Matrix 338 Combination Matrix 1 2 338 Combination Matrix 2 2 339 5 Image Quality A...

Page 329: ...able copy paper weight Drawer 17 28 lb Bond Bypass 17 55 lb Bond or 17 lb Bond 110 lb Index Warm up time Approx 40 seconds First copy time LT portrait Black and white Approx 6 8 Color 16 2 seconds or...

Page 330: ...are subject to change without notice in the interest of product improve ment Dimensions equipment only 25 98 W x 29 84 D x 29 09 H Weight Approx 249 1 lb equipment including developer and drum Space...

Page 331: ...for the values of this specification above Paper type Paper size Feeder Sheets Min Plain paper 17 20 lb Bond LT ST R 8 5 SQ A4 A5 R B5 Drawer 11 Bypass 11 LT R A4 R B5 R Drawer 5 4 Bypass 5 4 LG COMP...

Page 332: ...wer consumption 49 5 W max Model name KD 1012 Acceptable paper size LT Paper weight 17 28 lb Bond Maximum capacity 2500 sheets 22 lb Bond Height approx 5 4 x 2 Power source DC 5 V DC 24 V supplied fro...

Page 333: ...ing 2 covers 17 lb Bond to 110 lb Index Paper size 17 20 lb Bond 21 24 lb Bond 25 28 lb Bond LT A4 B5 8 5 SQ 50 sheets 30 sheets 30 sheets LD LG LT R COMP 13 LG A3 A4 R B4 FOLIO 30 sheets 15 sheets 15...

Page 334: ...size 20 lb Bond 24 lb Bond 28 lb Bond LT A4 B5 50 sheets 30 sheets 30 sheets LD LG LT R COMP A3 A4 R B4 FOLIO 30 sheets 15 sheets 15 sheets Stapling position Front Rear Double Stitching capacity Inclu...

Page 335: ...stapled at a time Including 2 covers 17 lb Bond 110 lb Index Paper size 20 lb Bond 24 lb Bond 28 lb Bond LT A4 B5 50 sheets 30 sheets 30 sheets LD LG LT R COMP A3 A4 R B4 FOLIO 30 sheets 15 sheets 15...

Page 336: ...es switchable 0 32 dia 2 holes LG LT R A4 R 3 holes LD LT A3 A4 France MJ 6101F 4 holes 0 26 dia 3 15 pitch LD LT A3 A4 Sweden MJ 6101S 4 holes 0 26 dia 2 76 and 0 83 pitch LD LG LT R COMP A3 A4 A4 R...

Page 337: ...337 12 SPECIFICATIONS OPTIONS 12 3 Packing List Packing list Operator s Manual Photoconductive drum Operator s Manual pocket Setup report Warranty sheet CD ROM 2 pcs Stopper for control panel...

Page 338: ...3 4 Yes Yes Yes Yes Yes Yes Yes Yes Yes Yes Yes 6 Yes Yes Yes 3 3 No Yes No No No No No No No No No No No No No Yes Yes 4 Yes No No No No No No No No No Yes No Yes Yes Yes No Yes Yes Yes Yes Yes Yes...

Page 339: ...copying 3 The function set later will be valid 4 The setting cannot be changed from 2nd job or later 5 Up to 15 pages can be registered 6 Bookbinding margin is not available 7 Available when the paper...

Page 340: ...No No No No No No No Yes Yes No No No No No No Yes Yes No No No No No No No No No No No No No No No No No Yes 1 Available for manual adjustment only Yes 2 The function is determined by that set last...

Page 341: ...12 341 12 SPECIFICATIONS OPTIONS...

Reviews: