Chapter 5 Settings
134
5.1 FUNCTION
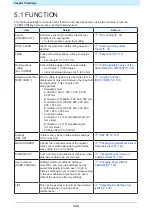
This features settings for various useful functions and operations when using the machine. Press the
[FUNCTION] key and execute or set the following items:
Item
Details
Refer to
Square
[SQUARE CUT]
Performs a test cut to confirm that the tool
conditions are appropriate.
• Cuts two squares using test cutting.
DATA CLEAR
Clears the data when data cutting has been
aborted.
FEED
Pulls out the sheet before cutting to provide
slack.
• Feed length: 0.1 to 51.0 m
Multiple sheet
cutting
[No. COPIES]
Cuts multiple copies of the received data.
• Cut copies: 1 to 999 copies
• Interval between images cut: 0 to 30 mm
"Cutting Multiple Copies of the
Same Data [No. COPIES]"(P. 106)
Distance correction
[DIST.COMP.]
When cutting long data, discrepancies in the
displacement may arise between the sheet left
and right sides. This corrects such
discrepancies.
• Standard value:
A direction: 500, 1,000, 1,500, 2,000,
2,500 mm
B direction (CG-60AR): 200, 400, 600 mm
B direction (CG-100AR): 200, 400, 600,
800, 1,000 mm
B direction (CG-130AR): 200, 400, 600,
800, 1,000, 1,200 mm
• Correction value:
A direction: ± 5 % of standard length (0.1
mm steps)
B direction: ± 5 % of standard length
(0.1mm steps)
• Plotting offset: 0 to 300 mm
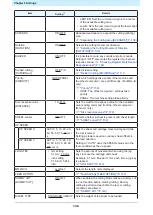
Settings
[SET UP]
In this menu, you can make various settings
on the machine.
MARK SENSOR
Checks the responsiveness of the register
mark sensor when data with register marks
was unable to be cut correctly.
"Checking Register Mark Sensor
SAMPLE CUT
Cuts a sample to troubleshoot problems when
data was unable to be cut correctly.
User selection
[USER CHANGE]
Settings (cutting conditions, distance
correction, and main unit settings) can be
saved individually for each user. (Up to 8)
Simply selecting a user number corresponding
to the user allows the machine to be used
without the need to alter any settings.
LIST
This can be used as a record by the customer
or for faxing when inquiring about
maintenance.
Summary of Contents for CG-100AR
Page 39: ...Chapter 1 Before Using This Machine 39 2 Shut down the computer connected to the machine 1 ...
Page 76: ...Chapter 2 Cutting 76 ...
Page 98: ...Chapter 3 Cutting Data with Register Marks 98 ...
Page 131: ...Chapter 4 Helpful Tips 131 4 Press the END key several times to exit 4 ...
Page 132: ...Chapter 4 Helpful Tips 132 ...
Page 133: ...Chapter 5 Settings This chapter Describes the individual settings FUNCTION 134 SET UP 135 ...
Page 150: ...Chapter 6 Maintenance 150 ...
Page 158: ...Chapter 7 Options 158 ...
Page 178: ...Chapter 9 Appendix 178 ...
Page 182: ...MEMO ...

