Chapter 3 Cutting Data with Register Marks
85
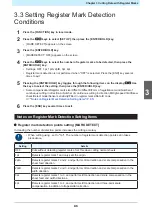
3.3 Setting Register Mark Detection
Conditions
1
Press the [FUNCTION] key in local mode.
2
Press the
keys to select [SET UP], then press the [ENTER/HOLD] key.
• [MARK DETECT] appears on the screen.
3
Press the [ENTER/HOLD] key.
• [MARKDETECT: OFF] appears on the screen.
4
Press the
keys to select the number of register marks to be detected, then press the
[ENTER/HOLD] key.
• Settings: OFF, 1pt, 1ptA, 2ptB, 3pt, 4pt
• Register mark detection is not performed when "OFF" is selected. Press the [END] key several
times to exit.
5
Pressing the [ENTER/HOLD] key toggles through the following items on the display.
Use
the keys to select the setting, then press the [ENTER/HOLD] key.
• Scale compensation/Register mark size/Offset A/Offset B/Form of registration mark/Number of
continuous cutting in direction A/Number of continuous cutting in direction B/High-speed limit/Skew
check/Detect mode/Sensor sensitivity/Filled in register marks/Data ID code
"Notes on Register Mark Detection Setting Items"(P. 85)
6
Press the [END] key several times to exit.
Notes on Register Mark Detection Setting Items
l
Register mark detection points setting [MARK DETECT]
Increasing the number of detection points increases the cutting accuracy.
• When cutting using , set to "1pt". The number of register mark detection points set in takes
precedence.
Setting
Details
OFF
Cuts without detecting register marks. Set this when cutting normal sheets.
1pt
Detects register mark 1 and only sets the origin.
2ptA
Detects register marks 1 and 2, and performs tilt correction and scale compensation in the
sheet feed direction.
2ptB
Detects register marks 1 and 3, and performs tilt correction and scale compensation in the
width direction.
3pt
Detects register marks 1 to 3, and performs tilt correction and scale compensation in the
sheet feed and width directions.
4pt
Detects register marks 1 to 4, and performs tilt correction and three-point scale
compensation in addition to trapezoidal correction.
3
Summary of Contents for CG-100AR
Page 39: ...Chapter 1 Before Using This Machine 39 2 Shut down the computer connected to the machine 1 ...
Page 76: ...Chapter 2 Cutting 76 ...
Page 98: ...Chapter 3 Cutting Data with Register Marks 98 ...
Page 131: ...Chapter 4 Helpful Tips 131 4 Press the END key several times to exit 4 ...
Page 132: ...Chapter 4 Helpful Tips 132 ...
Page 133: ...Chapter 5 Settings This chapter Describes the individual settings FUNCTION 134 SET UP 135 ...
Page 150: ...Chapter 6 Maintenance 150 ...
Page 158: ...Chapter 7 Options 158 ...
Page 178: ...Chapter 9 Appendix 178 ...
Page 182: ...MEMO ...

