background image

- 24 -

Microtech Systems

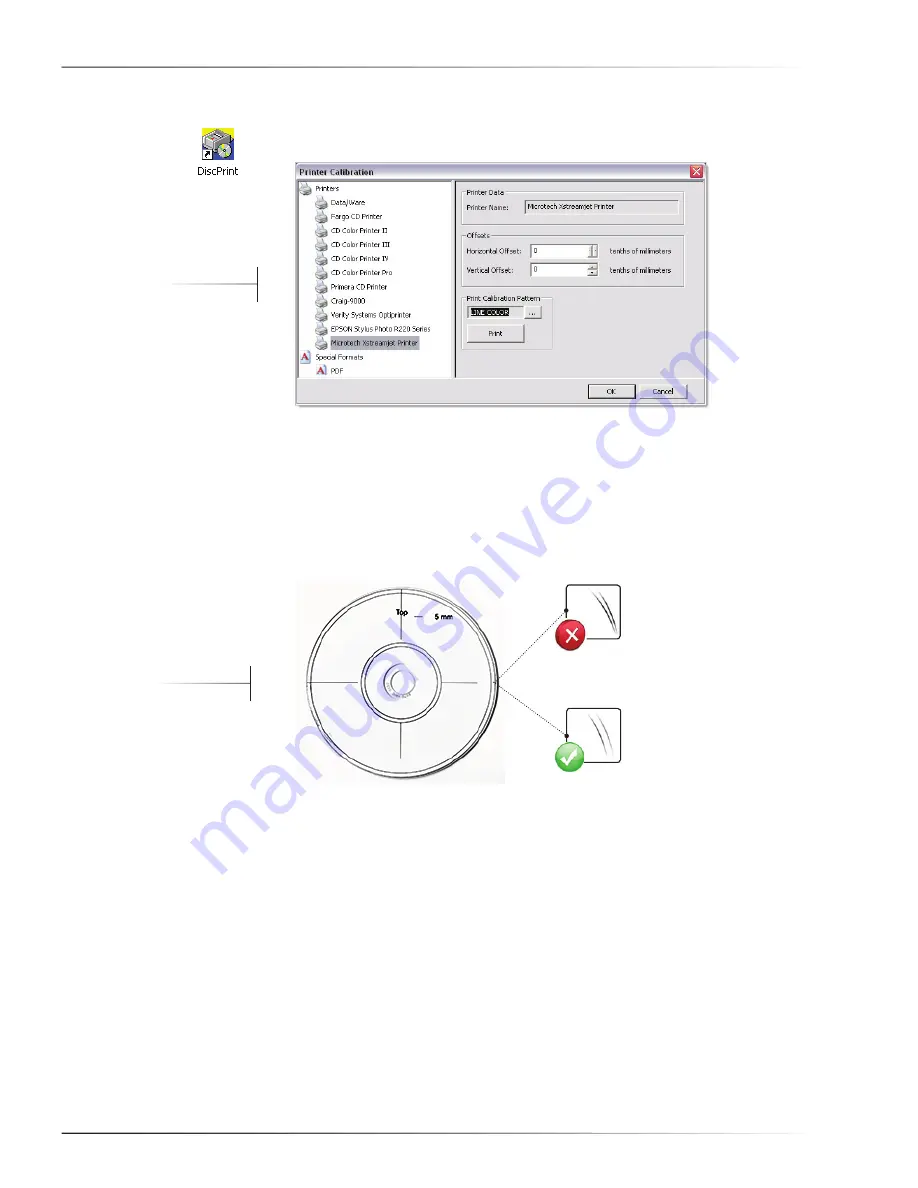
Calibrating the Printer’s Output Image

Start the 

1. 

DiscPrint

 program via its desktop icon.  Click 

File / Calibrate Printer

.  

The 

Printer Calibration

 window appears.

Set the values for 

2. 

Horizontal Offset

 and 

Vertical Offset

 to zero.

Open the disc tray via the Status LED / Tray Control button on front of printer. 

3. 

Place a blank disc on the printer tray.  Close the tray.  Click 

Print

.

A test pattern is printed onto the disc label.

Inspect the test pattern printed on the disc to ensure the alignment is optimal.  

4. 

Follow the instructions displayed in the window to make refinements.

Repeat steps 3 and 4 until you are satisfied with the alignment.

Click 

5. 

OK

 to close the 

Printer Calibration

 window.

Figure 28

Printer Calibration window

Figure 29

Output test pattern

Summary of Contents for Xstreamjet

Page 1: ...Inkjet Printer Manual Document 003 0109 02 November 2008...

Page 2: ...e user will be required to correct the interference at his own expense Modifications not expressly approved by the manufacturer could void the user s authority to operate the equipment under FCC rules...

Page 3: ...tech Systems logo are trademarks of Microtech Systems Inc All other products names and services are trademarks or registered trademarks of their respective owners Microtech Systems Inc 2 Davis Drive B...

Page 4: ...iv Microtech Systems...

Page 5: ...the Xstreamjet onto a Host System 13 Cabling the Xstreamjet 17 Installing and Configuring the Xstreamjet Software 19 Testing Printer Operations 21 Calibrating the Xstreamjet 23 Using Xstreamjet Softwa...

Page 6: ...Microtech Systems vi...

Page 7: ...hing system use it with an autoloader or automated disc duplicator for fast unattended publishing of discs at high volume Features Professional photo quality inkjet printer for any disc for example CD...

Page 8: ...2 Microtech Systems...

Page 9: ...shown below Status LED Tray Control The status LED glows continuously to indicate that the printer has power Error con ditions are indicated by a series of flashing patterns See the Troubleshooting c...

Page 10: ...te jacks are provided for printer control mini din style connector and user data USB 2 0 style connector Power Switch A switch that controls power to the printer is found at the rear of the unit AC Po...

Page 11: ...power cord If an extension cord is used with the printer ensure that the total ampere rating of the devices plugged into the extension cord does not exceed the cord s ampere rating Also ensure that th...

Page 12: ...rt objects through the slots in the printer Take care not to spill liquid on the printer Do not put your hand inside the printer or touch the ink cartridges during printing Do not move the print head...

Page 13: ...ng faces down Do not touch the green IC chip on the back of the cartridge Doing so may prevent normal operation and printing The IC chip retains a variety of cartridge related information such as the...

Page 14: ...density of the label design The most important printer settings are image quality option and print speed both found on the Printing Preferences window The following table presents representative outp...

Page 15: ...rinter disc tray and insert a disc With the printer turned on press the Status LED Tray Control button on the 1 front of the printer The disc tray extends Place a disc onto the tray Ensure the edge of...

Page 16: ...10 Microtech Systems...

Page 17: ...vent of a missing or damaged part notify the shipping carrier as soon as pos sible then contact Microtech Technical Support at 650 596 1900 Xstreamjet Printer Components An Xstreamjet shipment consist...

Page 18: ...ounting plate and accessory packages containing cables 2 cartridges and software media Place the printer of sturdy flat work surface 3 Remove the packing tape from the front cover 4 Open the cover Rem...

Page 19: ...gently on each cartridge until it clicks into place 4 Close the printer cover 5 Installing the Xstreamjet onto a Host System The Xstreamjet brings professional quality inkjet printing capabilities to...

Page 20: ...lates the product license and voids its warranty Xpress XE XP Installation Follow the steps below to install an Xstreamjet printer onto either an Xpress XE or Xpress XP system from Microtech Systems U...

Page 21: ...d to the section 7 Cabling the Xstreamjet below Xpress XL Installation Follow the steps below to install an Xstreamjet printer onto an Xpress XL system from Microtech Systems Unpack the mounting plate...

Page 22: ...plate Proceed to the section 6 Cabling the Xstreamjet below X100 Installation Follow the steps below to install an Xstreamjet printer onto an X100 system from Microtech Systems Unpack the mounting pl...

Page 23: ...e to each type of host are described separately below Connecting Cables to the Xstreamjet Follow these steps to connect the cables to the printer Connect USB data cable 1 a to port marked USB on back...

Page 24: ...i din cable b to the port marked Printer Right or Printer Left on back of XL depending on position of printer Note determine Right or Left by looking at system from in front of it Connecting to an Xpr...

Page 25: ...ftware and configure it for production use Turn the host system on 1 Insert the 2 Xstreamjet Installation software media into the host system s CD DVD drive With the printer turned off specify the typ...

Page 26: ...in tab specify the following settings Quality Option Best Photo Paper Options Source Sheet Paper Options Type Photo Quality Inkjet Paper Paper Options Size Letter 8 1 2 x 11 in Click the 7 Advanced bu...

Page 27: ...After installing and configuring the Xstreamjet print driver follow the steps below to verify printer connectivity and operations Start the 1 Configure ImageMaker application This program is found on...

Page 28: ...e selection Click 5 Test Ctrl and review the contents of the Testing Printer Control window After verifying printer control click 6 Test on the IcdrCfg window to test printed output Follow the instruc...

Page 29: ...sed This section provides a general description of the process Refer to the documentation of the host system for more information Calibrating the Printer to the Host System Start the 1 System Calibrat...

Page 30: ...Tray Control button on front of printer 3 Place a blank disc on the printer tray Close the tray Click Print A test pattern is printed onto the disc label Inspect the test pattern printed on the disc t...

Page 31: ...y do the following Run 1 Discprint From the 2 File menu click Print Click the 3 Properties or Preferences button Set the device options as necessary 4 Click 5 OK to save the settings or click Print to...

Page 32: ...est print speed Paper Options Paper Source retain the default setting of Sheet Do not change this setting Doing so may adversely impact printer performance Paper Type describes the type of printing su...

Page 33: ...1 2 x 11 in Do not change this setting Doing so may adversely impact printer performance Orientation Retain the default setting of Portrait Do not change this setting Doing so may adversely impact pri...

Page 34: ...28 Microtech Systems...

Page 35: ...tput contains white lines or gaps clean the prints heads Head Cleaning Output that is unexpectedly faint has streaks or areas without ink may indicate the need for a print head cleaning Cleaning the p...

Page 36: ...ting Do not use the printer 1 while cleaning the print head Access the Xstreamjet device control application either via 2 Discprint or the Printers Faxes window in Windows as noted in the section Star...

Page 37: ...ont 4 Gently push down on the cartridge until it clicks into place Repeat steps two through four above for each cartridge that requires attention 5 Close the cover 6 The printer automatically primes t...

Page 38: ...ste ink indicator 10 Turn the printer on before resuming operations 11 Packing and Shipping the Printer Before moving or shipping your Xstreamjet take care to pack it properly Best results are always...

Page 39: ...inter with a tape strip Remove the rear waste ink tank 5 On the back of the unit loosen the thumbscrew and carefully pull the rear waste ink tank out of the printer Squeeze the connector on the tube l...

Page 40: ...e Bag and pack the printer 9 Place the unit in its plastic bag and then settle the printer into the bottom of the foam packaging cradle Next push the top of the foam packaging cradle onto the printer...

Page 41: ...ly However to indicate an error it flashes a pattern Each pattern corresponds to a particular error code The patterns and their descriptions are listed in the table below along with recommended correc...

Page 42: ...Microtech or the party that supplied the printer for support The printer is on but nothing prints Ensure the USB cable is securely connected Verify configuration settings on Imagemaker s IcdrCfg windo...

Page 43: ...ove Select a higher print quality and disable High Speed mode on the Advanced Settings window refer to the Using Properties on the Main Tab section above Be certain the Type setting on the Printing Pr...

Page 44: ...the Head Cleaning Utility section above Colors will change slightly after drying Allow 24 hours drying time and reevaluate the output Printed image is inverted Turn off the Mirror Image setting on th...

Page 45: ...eft of the unit Problem Description a detailed statement of the problem s experienced including how long the condition has persisted and what occurred prior to the onset of the problem Support Resourc...

Reviews: