Troubleshooting
526
Type
Cause
Remedy
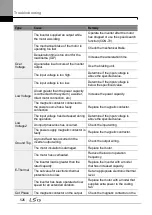
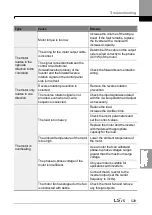
The inverter supplied an output while
the motor was idling.
Operate the inverter after the motor
has stopped or use the speed search
function (CON-70).
The mechanical brake of the motor is
operating too fast.
Check the mechanical brake.
Over
Voltage
Deceleration time is too short for the
load inertia (GD
2
).
Increase the acceleration time.
A generative load occurs at the inverter
output.
Use the braking unit.
The input voltage is too high.
Determine if the input voltage is
above the specified value.
Low Voltage
The input voltage is too low.
Determine if the input voltage is
below the specificed value.
A load greater than the power capacity
is connected to the system ( a welder,
direct motor connection, etc.)
Increase the power capacity.
The magnetic contactor connected to
the power source has a faulty
connection.
Replace the magnetic contactor.
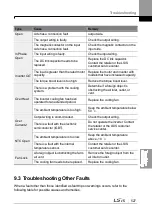
Low
Voltage2
The input voltage has decreased during
the operation.
Determine if the input voltage is
above the specified value.
An input phase-loss has occurred.
Check the input wiring.
The power supply magnetic contactor is
faulty.
Replace the magnetic contractor.
Ground Trip
A ground fault has occurred in the
inverter output wiring.
Check the output wiring.
The motor insulation is damaged.
Replace the motor.
E-Thermal
The motor has overheated.
Reduce the load or operation
frequency.
The inverter load is greater than the
rated capacity.
Replace the inverter with a model
that has increased capacity.
The set value for electronic thermal
protection is too low.
Set an appropriate electronic thermal
level.
The inverter has been operated at low
speed for an extended duration.
Replace the motor with a model that
supplies extra power to the cooling
fan.
Out Phase
The magnetic contactor on the output
Check the magnetic contactor on the
Summary of Contents for H100
Page 14: ......
Page 18: ...Preparing the Installation 4 37 90 kW 3 Phase ...
Page 27: ...Preparing the Installation 13 ...
Page 47: ...33 Installing the Inverter ...
Page 48: ...Installing the Inverter 34 Input and Output Control Terminal Block Wiring Diagram ...
Page 61: ...47 Installing the Inverter ...
Page 71: ...Learning to Perform Basic Operations 57 ...
Page 88: ...Learning to Perform Basic Operations 74 ...
Page 103: ...89 Learning Basic Features Code Description V1 Quantizing ...
Page 129: ...115 Learning Basic Features ...
Page 140: ...Learning Basic Features 126 ...
Page 148: ...Learning Basic Features 134 ...
Page 171: ...157 Learning Advanced Features Deceleration dwell operation ...
Page 183: ...169 Learning Advanced Features ...
Page 184: ...Learning Advanced Features 170 PID Command Block ...
Page 185: ...171 Learning Advanced Features PID Feedback Block ...
Page 186: ...Learning Advanced Features 172 PID Output Block ...
Page 187: ...173 Learning Advanced Features PID Output Mode Block ...
Page 197: ...183 Learning Advanced Features ...
Page 201: ...187 Learning Advanced Features Code Description 100 EPID1 Control block ...
Page 202: ...Learning Advanced Features 188 EPID2 Control block ...
Page 237: ...223 Learning Advanced Features Time Period Schedule AP3 38 Except3 Day 01 01 ...
Page 244: ...Learning Advanced Features 230 ...
Page 259: ...245 Learning Advanced Features Code Description Code Description Volt ...
Page 362: ...Learning Protection Features 348 ...
Page 415: ...401 RS 485 Communication Features Item Standards Parity check None ...
Page 524: ...Table of Functions 510 ...
Page 533: ...Table of Functions 519 ...
Page 547: ...533 Troubleshooting ...
Page 585: ...Technical Specification 571 ...
Page 594: ...580 ...
Page 595: ...581 ...
Page 596: ...582 ...


