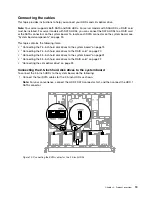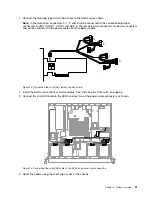
1. Connect the following type of mini-SAS cable to the RAID card as shown.
Note:
In the illustration, connectors 0, 1, 2, and 3 will be connected to the corresponding signal
connectors of HDD 0, HDD 1, HDD 2, and HDD 3. The remaining two connectors are power connectors
and will be connected to the power cables from the power supply.
0
1
2
3
Figure 12. Connecting the mini-SAS cable to the RAID card
2. Install the RAID card to the riser card assembly. See “Installing the PCIe card” on page 56.
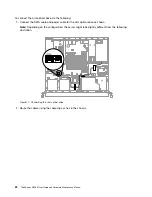
3. Connect the mini-SAS cable to the HDDs and any two of the power cable connectors as shown.
Figure 13. Connecting the mini-SAS cable to the HDDs and power cable connectors
4. Route the cables using the cable clips or ties in the chassis.
21
Summary of Contents for ThinkServer RS160
Page 14: ...xii ThinkServer RS160 User Guide and Hardware Maintenance Manual ...
Page 18: ...4 ThinkServer RS160 User Guide and Hardware Maintenance Manual ...
Page 42: ...28 ThinkServer RS160 User Guide and Hardware Maintenance Manual ...
Page 58: ...44 ThinkServer RS160 User Guide and Hardware Maintenance Manual ...
Page 118: ...104 ThinkServer RS160 User Guide and Hardware Maintenance Manual ...
Page 130: ...116 ThinkServer RS160 User Guide and Hardware Maintenance Manual ...
Page 141: ......
Page 142: ......

