00000
00000
00000
000
000
0
0000
0000
0000
000
000
00
00
00
00
0000
0000
0000
0
0
0
0
0
0
0
0
0
0
0
0
0
0
0
0
0
0
0
0
0
0
0
0
0
0
0
0
0
0
0
0
0
0
0
0
0
0
0
0
0
0
0
0
0
0
0
0
0
0
0
0
0
0
0
0
0
0
0
0
0
0
0
0
0
0
0
0
0
0
0
0
0
0
0
0
0
0
0
0
0
0
0
0
0
0
0
0
0
0
00
00
0
0
0
0
00
00
0
0
0
0
0
0
0
0
00
00
0
0
0
0
0
0
0
0
0
0
0
0
0
0
0
0
0
0
00
00
0
0
0
0
0
0
0
0
00
00
00
00
0
0
0
0
0
0
0
0
0
0
0
0
0
0
0
0
0
0
0
0
0
0
0
0
0
0
0
0
0
0
0
0
0
0
0
0
0
0
0
0
0
0
0
0
0
0
0
0
0
0
0
0
0
0
0
0
0
0
0
0
0
0
0
0
0
0
0
0
0
0
0
0
0
0
0
0
0
0
0
00000
00000
00000
00000
0000
0000
0000
0000
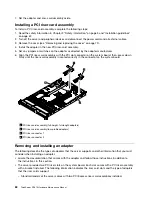
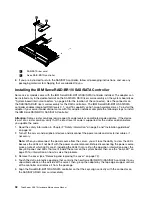
1
Adapter
2
Expansion slot cover
3
PCI riser-card assembly
4
PCI riser-card connector
7. If you are instructed to return the adapter, follow all packaging instructions, and use any packaging
materials for shipping that are supplied to you.
Installing an adapter
To install an adapter, complete the following steps:
Notes:
1. The instructions in this section apply to any PCI adapter (for example, video graphics adapters or network
adapters).
2.
Do not set the maximum digital video adapter resolution above 1600 x 1200 at 60 Hz for an LCD monitor.
This is the highest resolution that is supported for any add-on video adapter that you install in the server.
3. Any high-definition video-out connector or stereo connector on any add-on video adapter is not supported
1. Read the safety information in Chapter 2 “Safety information” on page 3 and “Installation guidelines”
on page 67.
2. Turn off the server and peripheral devices and disconnect the power cords and all external cables; then,
remove the server cover (see “Removing and replacing the cover” on page 72).
3. Follow the cabling instructions, if any come with the adapter. Route the adapter cables before you
install the adapter.
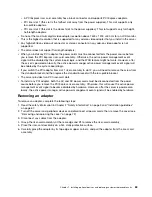
4. Insert the adapter into the riser-card assembly, aligning the edge connector on the adapter with the
connector on the riser-card assembly. Press the edge of the connector
firmly
into the riser-card assembly.
Make sure that the adapter snaps into the riser-card assembly securely.
Attention:
When you install an adapter, make sure that the adapter is correctly seated in the riser-card
assembly and that the riser-card assembly is securely seated in the riser-card connector on the system
board before you turn on the server. An incorrectly seated adapter might cause damage to the system
board, the riser-card assembly, or the adapter.
84
ThinkServer RD210 Hardware Maintenance Manual
Summary of Contents for ThinkServer RD210
Page 1: ...ThinkServer RD210 Hardware Maintenance Manual ThinkServer RD210 Types 3795 3796 3818 and 3819 ...
Page 2: ......
Page 3: ...ThinkServer RD210 Hardware Maintenance Manual ThinkServer RD210 Types 3795 3796 3818 and 3819 ...
Page 7: ...Korean Class A warning statement 172 Copyright Lenovo 2005 2010 vii ...
Page 8: ...viii ThinkServer RD210 Hardware Maintenance Manual ...
Page 22: ...14 ThinkServer RD210 Hardware Maintenance Manual ...
Page 26: ...18 ThinkServer RD210 Hardware Maintenance Manual ...
Page 70: ...62 ThinkServer RD210 Hardware Maintenance Manual ...
Page 74: ...66 ThinkServer RD210 Hardware Maintenance Manual ...
Page 142: ...134 ThinkServer RD210 Hardware Maintenance Manual ...
Page 172: ...164 ThinkServer RD210 Hardware Maintenance Manual ...
Page 181: ......
Page 182: ...Part Number 40M2493 Printed in USA 1P P N 40M2493 40M2493 ...

