Service & Repair 123
3.
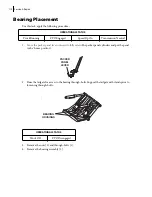
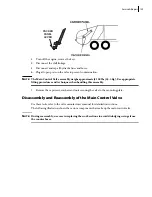
Shift the control levers and cycle the panels as necessary
to align the upper and lower wear shoes
with the
track holes.
4.
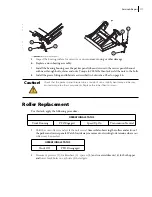
Adjust any wear shoe that needs to be adjusted.
4 a.
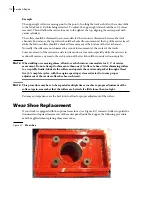
Remove all 4 screws that secure the plastic plates to the wear shoe assembly (see Figure
8-2).
4 b.
Take the plates off from the wear shoe assembly (see Figure 8-2).
4 c.
Add or remove the correct amount of shims in order to properly adjust the wear shoe.
Shims are placed against the interior main plate of the wear shoe assembly, just behind the
plastic plates (see Figure 8-2).
4 d.
After adding or removing shims, put both plastic plates back inside the wear shoe assembly
(see Figure 8-2).
4 e.
Put the screws back into the plastic plate holes.
5.
If need be, repeat step 4 if other wear shoes need to be adjusted.
N
OTE
:
When adding or removing shims, allow for each shim to accommodate for 1/8” of carrier
movement. Do not attempt to shim more than one (1) wear shoe at a time. After shimming
wear shoes to acceptable limits, lubricate the wear shoes and operate the carrier and packer
through at least five (5) complete cycles, with the engine speed up system activated, to ensure
that proper adjustment of the carrier wear shoes has been achieved.
OPERATIONAL STATUS
Truck Off
PTO Disengaged
TRAC
K
HOLES
Summary of Contents for 2R-III
Page 1: ...2R III MAINTENANCE MANUAL...
Page 2: ......
Page 3: ...2R III MAINTENANCE MANUAL...
Page 5: ......
Page 6: ......
Page 20: ...10 Introduction...
Page 42: ...32 Safety...
Page 58: ...48 Preventive Maintenance Figure 5 1 Hydraulic tank w return filter 1 2 3 4 5 6 7 8...
Page 66: ...56 Preventive Maintenance...
Page 102: ...92 Troubleshooting...


