


Document Box
7-5
7
Printing Documents (Print)
The procedure for printing documents in a custom box is explained below.
1
Press the
Document Box
key.
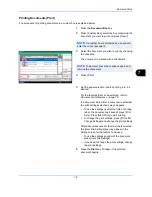
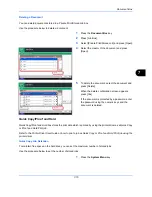
2
Press [Custom Box], select the box containing the
document you want to print and press [Open].
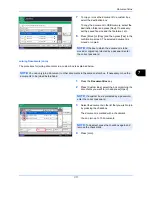
3
Select the document you wish to print by checking
the checkbox.
The document is marked with a checkmark.
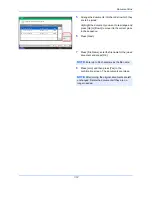
4
Press [Print].
5
Set the paper selection, duplex printing, etc., as
desired.
For the features that can be selected, refer to
Document print features on page 7-6
.
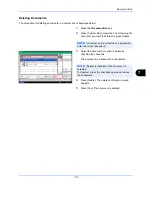
If a document stored from a computer is selected,
the print settings selection screen appears.
• To use the settings used at the time of printing
(when the document was saved), press [Print
As Is]. Press [Start Print] to start printing.
• To change the print settings, press [Print after
Change Settings] and change the print settings.
After a document saved in the machine is selected,
the [User File Settings] key may appear in the
setting screen for the feature to be used.
• To use the settings saved with the document,
press [User File Settings].
• If you need to change the print settings, change
the print settings.
6
Press the
Start
key. Printing of the selected
document begins.
NOTE:
If a custom box is protected by a password,
enter the correct password.
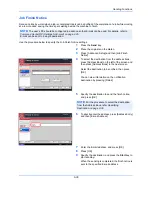
1/1
0001
2008101010574501
12/12/2011 09:40
21
Box:
File Name
Date and Time
Size
MB
Status
2008101010574511
2008101010574521
12/12/2011 09:50
12/12/2011 10:00
MB
MB
21
21
Send
Join
Move/Copy
Delete
Store File
Detail
Preview
Close
0002
0003
Search(Name)
12/12/2011 10:10
NOTE:
To deselect, press the checkbox again and
remove the checkmark.
Summary of Contents for TASKalfa 2550ci
Page 1: ...OPERATION GUIDE TASKalfa TASKalfa 2550ci ...
Page 254: ...Sending Functions 6 44 ...
Page 408: ...Default Setting System Menu 9 112 ...
Page 442: ...Management 10 34 ...
Page 480: ...Troubleshooting 12 26 5 Push the fuser cover back in place and close right cover 1 ...
Page 488: ...Troubleshooting 12 34 ...
Page 491: ...Appendix 3 Key Counter DT 730 Document Table ...
Page 516: ...Appendix 28 ...
Page 528: ...Index Index 12 ...
Page 529: ......
Page 532: ...Rev 1 2012 2 2MVKMEN001 ...


