background image

Instructions for use ESTETICA E70 Vision / E80 Vision

4 Operation | 4.10 Using functions through the touchscreen

Lamp settings

Tap the "Home screen" key to configure the home screen with up to six dir-
ect keys.

Draw the respective key to where you want it.

Select direct keys

Global settings

The following items can be selected in the "Global settings" menu:

▪ Display

▪ Sounds and volume

▪ Date and time

▪ Advanced settings

▪ Information

Global settings

Display

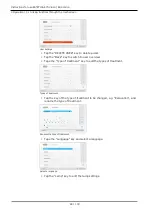
Tap the "Display" key to set the brightness and the time until activation of
standby mode.

89 / 178

Summary of Contents for ESTETICA E70 Vision

Page 1: ...Instructions for use ESTETICA E70 Vision E80 Vision...

Page 2: ...ributed by KaVo Dental Technologies LLC 11727 Fruehauf Drive Charlotte NC 28273 USA Tel 847 550 6800 Fax 847 550 6825 Manufacturer Kaltenbach Voigt GmbH Bismarckring 39 88400 Biberach Germany www kavo...

Page 3: ...ption 20 3 1 Treatment centre 20 3 1 1 KaVo ESTETICA E70 Vision E80 Vision T 20 3 1 2 KaVo ESTETICA E70 Vision S 21 3 1 3 KaVo ESTETICA E70 Vision E80 Vision Cart 22 3 2 Versions of the dentist elemen...

Page 4: ...10 1 Selecting the dentist 64 4 10 2 Status message 64 4 10 3 Treatment menu 64 4 10 4 Timer menu 76 4 10 5 CONEXIO menu 77 4 10 6 Hygiene functions 85 4 10 7 Cleaning menu 86 4 10 8 Using other funct...

Page 5: ...rgery mode 125 4 15 5 Mount or pull off the handpiece or contra angle handpiece 125 4 15 6 Start up the motor 126 4 15 7 Using the surgical motor with programme steps 126 4 15 8 Using the surgical mot...

Page 6: ...ice 151 7 2 2 Visual inspection 152 7 2 3 Measurements 154 7 2 4 Functional tests 163 7 2 5 Assessment and documentation 165 7 3 Test protocol for the safety check 166 8 Appendix Additional measuring...

Page 7: ...s for use AI Assembly instructions TI Technician s instructions IEC International Electrotechnical Commission RI Repair instructions RK Retrofitting kit AS Assembly kit CK Conversion kit EP Enclosed p...

Page 8: ...aVo cannot be held liable for defects and their consequences due to natural wear improper cleaning or servicing non compliance with operating servicing or connection instructions calcification or corr...

Page 9: ...ioned obligations will mean that the damage will be considered to have arisen following delivery in accordance with the General German Freight For warders Terms and Conditions Art 28 Outside Germany N...

Page 10: ...on Note Please keep the packaging in case you need to return the product for servi cing or repair The symbols printed on the outside are for transportation and storage and have the following meaning T...

Page 11: ...re designated as shown below DANGER In cases which if not prevented directly lead to death or severe in jury WARNING In cases which if not prevented can lead to death or severe injury CAUTION In cases...

Page 12: ...ely Accessories Use Name Material number Monitors Monitor 22 KaVo Screen HD 1 011 0302 Monitor 19 KaVo Screen One 1 011 0300 Cameras Intraoral camera ERGOcam One 130 ERGOcam One 160 1 011 2130 1 011 2...

Page 13: ...the operator meet the technical require ments in the present instruction for use for hardware and software and are installed and set up according to the descriptions of these components in the case of...

Page 14: ...ructions will be provided to you in the device software KaVo offers to provide the source code on a CD ROM efforts and costs incurred e g costs for auxiliaries transport and pro cessing will be invoic...

Page 15: ...use accessories that have been approved for combination with the product by the manufacturer or are equipped with standardised interfaces e g MULTIflex couplings INTRAmatic Do not make any modificatio...

Page 16: ...e wear and malfunctions from improper servicing and care Reduced product life Perform regular proper care and servicing Note The operator may only carry out repair work if the device is switched off a...

Page 17: ...is in horizontal orientation is asso ciated with a risk of injury Do not sit on the head or foot end of the patient chair when it is in a hori zontal position CAUTION Risk of injury if you support yo...

Page 18: ...ys vacations etc rinse or purge with air the air and water lines Carry out an intensive germ reduction Actuate the tumbler filler repeatedly CAUTION Risk of injury and material damage from incorrect u...

Page 19: ...or the headrest CAUTION Risk of injury when the dentist or assistant element is moved The patient or office staff may be injured or bruised Monitor the patient and office staff when moving the dentis...

Page 20: ...ment assistant element and a water unit The unit may also include a dental operating light and a monitor Various handpieces and ac cessories can be added to the ESTETICA Dental Treatment Unit and Acce...

Page 21: ...A E70 Vision E80 Vision 3 Product description 3 1 Treatment centre 3 1 2 KaVo ESTETICA E70 Vision S Patient element Assistant element Headrest Backrest Operating light Dentist element Seat Arm rest Ki...

Page 22: ...ision E80 Vision 3 Product description 3 1 Treatment centre 22 178 3 1 3 KaVo ESTETICA E70 Vision E80 Vision Cart Patient element Assistant element Headrest Backrest Operating light Dentist element Se...

Page 23: ...ment of the instruments can be changed as needed and does not have to follow the picture Tray holder Handle Three function handpiece or multi functional handpiece Air driven handpiece multiflex coupli...

Page 24: ...nly Note The holder assignment and arrangement of the instruments can be changed as needed and does not have to follow the picture USB port optional accessory Triple function handpiece or multi functi...

Page 25: ...ruments can be changed as needed and does not have to follow the picture Tray holder Touchscreen for display and opera tion Three function handpiece or multi functional handpiece Air driven handpiece...

Page 26: ...be changed as needed and does not have to follow the picture Control element Three function handpiece or multi functional handpiece 2nd Saliva ejector optional access ory Satelec Mini LED Saliva ejec...

Page 27: ...5 Multifunctional handpiece MF handpiece MF handpiece hose Gripping sleeve Media buttons air water Labelled gold Multifunctional hand piece MF handpiece Cannula 3 6 X ray viewer 1440 X ray viewer 1440...

Page 28: ...Vision E80 Vision Tab Treatment Tab Timer Tab CONEXIO optional Tab Cleaning Tab Settings 3 2 1 5 4 7 6 8 9 10 Tab Treatment Direct keys Chair functions Selection of type of treatment Most recent posi...

Page 29: ...2 Dentist s unit S table Tab Treatment Direct keys Chair functions Most recent position und Rinse position keys Display Time of day Display User Selection of type of treatment Automatic positions key...

Page 30: ...Chair functions Last position key Rinse position key Automatic positions keys Timer keys Bowl rinsing key Tumbler filler key Operating light dimming key Operating light key Lock screen key 3 7 4 Group...

Page 31: ...on 0 AP 2 key automatic position 2 Collapsed position key Chair up key Backrest up key Chair down key Backrest down key Mode key Direct keys for operating lights selectable in Settings tab Key Name Co...

Page 32: ...ly X ray image viewer key dentist element only Active keys show blue background 3 8 Foot control Cable connected foot control and wireless foot control Stirrup switch LP preselected spray foot oper at...

Page 33: ...of the patient chair 25 seconds Pause time of the patient chair 400 seconds The permissible operating times correspond to common dental pro cedure Fuse ratings The depend on the mains voltage and are...

Page 34: ...Vision 3 Product description 3 9 Signs on the product 34 178 Manufacturing date Can be sterilised at up to 135 C _V _Hz _VA Supply voltage frequency power Rating plate on the base of the unit Mounting...

Page 35: ...description 3 9 Signs on the product Rating plate and labelling on dentist and assistant elements Mounting location of rating plate and applied part mark on dentist and assistant elements Serial numbe...

Page 36: ...9 Signs on the product 36 178 Nameplate wireless foot control The wireless foot control nameplate is located on its underside Labelling and marking of the three function handpiece and multifunctional...

Page 37: ...ctured Serial number HIBC Code Read and take note of the content of accompanying documents CE mark GOST ID Rating plate 1440 1 3 2 4 5 6 8 9 7 Rating plate X ray viewer 1440 Device type SN Year and mo...

Page 38: ...band Sys tem Modulation GFSK Protocol KaVo specific RF Frequencies 2404MHz 2478MHz 38 Channels RF Power 0dBm 1mW Range Indoor 20m Supply Battery Type Varta PoLiFlex PLF503759 Number of cells 1 Chargin...

Page 39: ...3 2 V 0 15 V High pressure lamp power max 2 5 W Water supply Note If the water is very hard above 12 dH a water softening device must be fitted in the ion exchange process Insufficient water hardness...

Page 40: ...ouse plumbing For further information please refer to www dvgw de Free drainage according to DIN EN 1717 DVGW certified Register No AS 0630BT0111 Water quality Tap water cold water connection Water ha...

Page 41: ...mm with valve opened Suction Pressure drop at the connecting point Semi dry and wet suction Dry suction Note If the negative static pressure is 180 mbar the unit must be equipped with the negative pre...

Page 42: ...ce in accordance with DIN 18560 T 1 Ambient temperature 10 to 40 o C Optimum ambient temperature 15 C to 35 C Relative Humidity 30 to 75 non condensing Air pressure 700 hPa 1 060 hPa Max altitude for...

Page 43: ...E80 Vision gross 46 kg net 34 kg Table C E80 Vision gross 47 kg net 30 kg Chair E80 Vision gross 96 kg net 77 kg Unit E80 Vision gross 150 kg net 125 kg E80 Vision T gross 292 kg net 236 kg E80 Visio...

Page 44: ...1568 optional accessory 44 178 Operating light KaVoLUX 540 LED See also 2 Instructions for Use KaVoLUX 540 LED 3 11 KaVo Service table 1568 optional accessory Swivel arm Spring arm Rotary knob brake...

Page 45: ...ntist or assistant element 4 2 1 Moving the T table CAUTION Excessive load on the support system The patient or treatment personnel may be injured The support system may be damaged Do not exceed the p...

Page 46: ...st s unit make sure that nobody is injured Alert patients and care providers to the risk of injury NOTICE Damage from overloading the dentist element Exceeding the maximum weight of more than 2 kg by...

Page 47: ...ricted by the length of the lines and hoses that connect the cart to the base of the device Only move the cart within this range To change the position of the cart hold the cart by the bow type handle...

Page 48: ...nstruments accessories etc can cause damage Do not place more than 1 kg on the assistant s unit Note Touching the touch panel can trigger functions unintentionally Hold and posi tion the assistant ele...

Page 49: ...armrest can collide with the manually adjusted patient s unit when the chair moves Injury hazard Each time before the chair is adjusted automatic and manual swing the manually adjusted patient s unit...

Page 50: ...est motors are op erable Such temperatures are not reached in normal practice The shutoff temperature can be reached when the motors are frequently actuated in presentations and events approximately 8...

Page 51: ...backrest height 4 5 3 Automatically positioning the patient chair CAUTION Motorised movement of the chair The patient or treatment personnel can be clamped or crushed Monitor the patient and treatmen...

Page 52: ...try and exit position AP 1 button treatment position e g for lower jaw treatment AP 2 button treatment position e g for upper jaw treatment Collape position button collapse position Move the chair to...

Page 53: ...of the button wheel The active function level is indicated by the lighted quadrants 1 2 1 2 Illuminated segment indicating the function level Mode key Press the Ready key to switch between the functi...

Page 54: ...ed and lowered Requirement Function level 2 is active Quadrant 1 lights up If the desired function level is not activated press the Mode key possibly repeatedly if needed Please refer to Setting the f...

Page 55: ...ct position The headrest can be adjusted manually using the joystick switch on the head rest the dentist s or assistant s unit or automatically by means of a preset automatic position Requirement Func...

Page 56: ...ised headrest with the joystick The height and angle of the headrest can be adjusted with the soft silicone joy stick switch Press the joystick switch in direction to extend the bar length Move the jo...

Page 57: ...so that it forms a single plane with the backrest cushion Note While you press key do not readjust the angle with the joystick switch Press joystick switch for an extended time Signal sound is emitte...

Page 58: ...the headrest being adjusted Patients need to raise their head slightly during adjustment Use both hands to adjust the headrest The bar length and angle of the headrest can be adjusted Press the lock...

Page 59: ...Instructions for use ESTETICA E70 Vision E80 Vision 4 Operation 4 8 Adjusting double jointed headrests Evenly pull the cushion up and rotate it 180o Then snap the head cushion back on 59 178...

Page 60: ...side cover B E70 Vision Inner side cover A E80 Vision Support cover Backrest Seat Kick plate Seat base Clip on wireless foot control If a person or object triggers a safety shutoff the chair immediat...

Page 61: ...range of movement of the chair CAUTION Changing the chair s position when the safety circuit is on Personal injury Damage to the device Changing the chair position while a safety shutoff is active do...

Page 62: ...ove the chair using the button wheel buttons of the chair CAUTION Safety shutoff disabled move motors without monitoring Destruction of the motor Monitor the path of travel of the motor Do not move th...

Page 63: ...y Settings User Global settings Navigation Symbol Function Description Key Tap the key to open func tions or make settings Selection list Click the List key to se lect an option from a list Back key T...

Page 64: ...user in the status bar until the list of created users is displayed Tap a user to select a different user The status bar displays the active user 4 10 2 Status message The respective tab shows a messa...

Page 65: ...isabled and no preferential speed can be programmed The following symbols are available for navigation operation in the Treatment menu Symbol Function Tap the Spray water cooling status key to set the...

Page 66: ...eatment menu on the touch screen Type of treatment Speed power Cooling status Take air driven handpiece off the holder This causes the settings options for the air driven handpiece to be dis played Se...

Page 67: ...motor packaging The following settings can be changed in the Treatment menu on the touch screen Type of treatment Direction of motor rotation Speed Cooling status The settings of speed and cooling st...

Page 68: ...s no cooling spray water cooling Take the PiezoLED off the holder The following is shown on the display Setting the intensity Use the slider to set the intensity The intensity is displayed Define oper...

Page 69: ...For this purpose adjust the flow rate such the water is just between dripping and flowing during irrigation For the amount of spray water for each tip please refer to the PiezoLED In structions for Us...

Page 70: ...aneous application of the operating light KaVoLUX 540 LED and the KaVo KEY Laser III or KEY Laser 3 can lead to the unintentional activation of the KaVo KEY Laser III and KEY Laser 3 When using the Ka...

Page 71: ...t is too high can have a negative impact on the durability of the treatment Select the appropriate dimming level according to the processing time The KaVoLUX 540 LED operating light can be used in the...

Page 72: ...light is switched on with Normal light key is active blue Tap the Operating light key again or Hold your hand just in front of the sensor Operating light is switched off key is not active Setting the...

Page 73: ...perating light key switches on the COMPOsave mode The light can be dimmed in COMPOsave mode COMPOsave is a dimmer mode In the COMPOsave mode the hardening of the of the composite is greatly reduced by...

Page 74: ...for 2 seconds This switches the COMPOsave mode on The COMPOsave mode can be recognised by the yellow light Press the Dim operating light key or Put your hand in front of the sensor for 2 seconds The...

Page 75: ...home screen The laser mode switches on Laser mode is activated the operating light is on for 1 second in green and then changes to a white light or Put your hand in front of the sensor for 3 sec The l...

Page 76: ...ght Turn the switching ring to the right and it will spring back to its original pos ition If the treatment light is turned to the centre position zero position it will automatically lock into place i...

Page 77: ...pwatch counts the time Tap the arrow keys to set the timer time Tap the Save key to save the value Tap the Cancel key to quit without saving This causes the Timer menu to be displayed Tap the key next...

Page 78: ...layed Ensure that the CONEXIO unit is switched on and connected to the treat ment unit As soon as an imaging device is activated the CONEXIO menu automatic ally opens in live image mode The CONEXIO me...

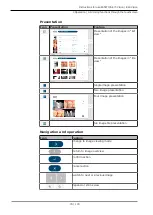
Page 79: ...tion of the images in list view Presentation of the images in tile view Single image presentation Two image presentation Four image presentation Six image tile presentation Navigation and operation Ic...

Page 80: ...ent room The patient is now automatically activated on the treatment centre 3 Selecting the patient on the treatment centre For this to work the patient must first be listed as the current patient Ref...

Page 81: ...gle or multiple image view up to 6 images is possible in the image view ing mode Tap display symbol for single image 2 image display 4 image display or 6 image display to change the number of images T...

Page 82: ...nt Image viewing mode is activated Tap the magnifier symbol to display the image magnified or smaller Tap navigation arrow left or right to scroll through the images Tap an image or several images for...

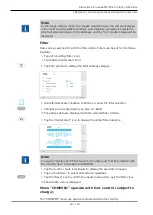
Page 83: ...e filter settings category Activate deactivate checkbox to define or cancel the filter selection Changes are accepted when you click on Back The patient data are displayed with the selected filter cri...

Page 84: ...ideo Screen display The number of displayed images Split View is reduced The live image is always shown as the last image in split view Screen display The number of displayed images Split View is incr...

Page 85: ...ition SP the bowl is rinsed for the full rinsing time Selectable for Home screen in Settings tab The function can be dis abled by a service technician Lock screen Locks the screen to allow it to be di...

Page 86: ...nsing time Actuate the Bowl rinsing time key until the desired rinsing time is achieved and the following view is shown Confirm the bowl rinsing time by saving once the desired rinsing time is reached...

Page 87: ...e viewer Off Key is inact ive Selectable for Home screen in Set tings tab 4 10 9 Settings menu Changes to the following areas can be made in the Settings menu User Global settings Tap the User key to...

Page 88: ...a user Tap the Back key to switch to user overview Tape the Type of treatment key to edit the types of treatment Types of treatment Tap the key of the type of treatment to be changed e g Excavation an...

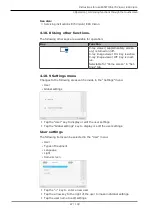
Page 89: ...screen with up to six dir ect keys Draw the respective key to where you want it Select direct keys Global settings The following items can be selected in the Global settings menu Display Sounds and v...

Page 90: ...se the sliders or arrow keys to make settings Date and time Tap the Date and time key to set the date and the time of day or Tap the time in the status bar until the window for setting the time is dis...

Page 91: ...ed after the unit has been switched on Advanced settings status after the unit is switched on Tap the Handpiece key to make the following settings Handpiece light and spray temperature Spray water for...

Page 92: ...y to make the following settings Automatic bowl rinsing Tumbler filling and tumbler sensor Advanced settings Tumbler and bowl Advanced settings Tumbler and bowl The Boiler temperature key to set the b...

Page 93: ...key to make the following settings Weekly cleaning Handpiece rinsing time in Mornings rinsing programme Handpiece rinsing time in After treatment Evenings rinsing programme Advanced settings Weekly c...

Page 94: ...n 94 178 Global settings Information Tap the Device information key to display information about the device Information Device information Tap the system check key to open the system check Information...

Page 95: ...tioned using the following buttons Key Function Move to the rinse position Move to most recent position before actuation of the SP Move to automatic position 0 Move to automatic position 1 Move to aut...

Page 96: ...Operating light Off Key is inactive press long until the Settings menu is displayed on the dentist element The brightness of the operating light can be set to one of five levels press briefly COMPOsav...

Page 97: ...hair Cross switch Counterclockwise motor rotation SP foot operated button Blower air footswitch Foot control Select type of treat ment Foot control instruments On Off and Intensity 4 12 2 Special func...

Page 98: ...y charge of the wireless foot control is indicated by the LED display and is signaled by a tone Residual capacity Foot control status Status display charge status display Beep 100 Idle state Foot cont...

Page 99: ...rollers or other wireless devices will be used in the same working environment Separate channels must be selected in this case A different channel has to be selected if there are interferences with ot...

Page 100: ...the 30 second period is over The display indicates if synchronisation was successful Display Meaning timeout A radio partner was not found ok The radio partner was successfully trained The connection...

Page 101: ...4 12 4 Position the patient chair with the foot control Automatically position the patient chair with the foot control Note The automatic chair positioning must be monitored by the treatment person ne...

Page 102: ...e foot operated button Manually position the patient chair with the foot control The 4 way switch of the foot control assumes the function of the button wheel function level 1 on the dentist element d...

Page 103: ...reless foot control is no longer feasible The type of treatment can still be selected but the foot pedal does not leave the middle position and cannot switch into the middle position The speed current...

Page 104: ...ece is active Press the Blown air foot button As long as the footswitch is pressed blown air exits the removed handpiece not with the PiezoLED 4 12 10 Preselect counterclockwise motor rotation Take mo...

Page 105: ...mage to the wireless foot control or the charger Do not use the treatment unit during the charging process Do not use the wireless foot control charger supplied to charge non re chargeable batteries C...

Page 106: ...suction device or saliva ejector from the holder The spray mist suction device or saliva ejector automatically turns on and then when it is placed in the holder it turns off The suction flow of the s...

Page 107: ...ion of the removed hose is stopped Chair kick plate Note For units with a BS selective holder a service technician can set the vacuum stop function to either stop all suction hoses or only stop the sp...

Page 108: ...the cannula of the handpiece into an operating position where there is no contact of the mucosa CAUTION Insufficient clearance between cannula and surface of gums or gin giva Injury hazard Adhere to...

Page 109: ...ucosa CAUTION Cannula that is worn or not locked into place Injury from swallowing the cannula Before each treatment ensure that the cannula is locked into place and firmly seated Use original KaVo ca...

Page 110: ...g Check the passage for the media in the cannula each time before using it on a patient Press the air button and continuously increase or decrease the exiting air flow by applying more or less pressur...

Page 111: ...heating are preselected Setting the cold light intensity Press the air button and or the water button or Press the Handpieces foot pedal The light turns on Replacing the lamp CAUTION Danger of injury...

Page 112: ...tly Push the holder forward and pull the defective KaVo MULTI LED lamp out of the socket Insert new Kavo MULTI LED lamp Mat no 1 007 5372 The following may happen after you turn on the KaVo MULTI LED...

Page 113: ...nstructions for Use Operation by means of the touchscreen See also 2 Changing settings for the PiezoLED Operation with the foot control Press the Instruments foot pedal The PiezoLED works at the set i...

Page 114: ...erial fatigue deformation or excessive stress and if such signs appear they must be replaced CAUTION Excessive torque Injury or damage to instruments Use root canal instruments in ENDO mode only Note...

Page 115: ...ons for the KL 703 LED in ENDO mode Note The technical specifications apply to the KL 703 LED in ENDO mode LED Speed range 200 to 3 200 min 1 Maximum torque 3 Ncm Operating mode Note 30 seconds operat...

Page 116: ...ted automatically when the endomotor is taken out provided Endodontics as the type of treatment was previously ended by re turning the endomotor Note The automatic start does not take place if the End...

Page 117: ...ach use the user must make sure that the values retrieved from the database are correct for the file in current use The safety mechanisms for ENDO mode checking of of speed torque etc used by the trea...

Page 118: ...l element to edit the sequence The display shows file sequence Profile 1 in editing mode Tap the Pen control element again to edit the profile name The display shows a keyboard Edit Profile 1 with the...

Page 119: ...tabase can be changed The data recommended by the manufacturer of the file are indicated by a factory sym bol Defining changing user defined files By selecting and adapting the data of user defined fi...

Page 120: ...file profiles Open the file editor then tap file profile Profile 1 to display the file profile selection list Each file profile has up to 10 files assigned to it Usually these 10 files are used in se...

Page 121: ...ap Current torque value in Ncm Font colour switches to blue Use slider to set the torque The torque is shown on the display and is effective immediately If the set torque differs from the recommended...

Page 122: ...ot selected otherwise The torque is limited to the set threshold The speed reduces until it stops de pending on the load The direction of rotation is always to the right Push 4 way button on the foot...

Page 123: ...cs Tap the Cancel key to exit from Endodontics as the type of treatment or Place the INTRA LUX KL 703 LED back in the holder Note If the unit was switched to Endodontics mode ENDO mode is only interru...

Page 124: ...surgical mode can only be accessed when the surgical motor is connec ted to the surgical connection of the dentist element Note The delivered parts are not sterile except for the coolant hose Before...

Page 125: ...ument packaging NOTICE Damage from changing the handpiece and angle piece during opera tion Wear to the catch on the straight and contra angle handpiece and motor Unbalanced motor axis Change the hand...

Page 126: ...not running Pull the coolant hose off the straight or contra angle handpiece Twist the straight or contra angle handpiece slightly to pull it off 4 15 6 Start up the motor CAUTION Incorrect input val...

Page 127: ...efault values have been set at the factory for the parameters speeds torques transmission ratios and coolant flow rate for every activity according to application The parameters can be changed only wi...

Page 128: ...ument settings The values shown for a programme step are default values that you can use to start work immediately These can all be changed and thus adapted to your in dividual work technique Changed...

Page 129: ...d rpm Torque Ncm Transmis sion ratio Form drilling 2 200 2 000 500 D 5 20 10 D 1 1 16 1 27 1 20 1 D Tapping 3 15 50 20 D 5 80 25 D 1 1 16 1 27 1 20 1 D Placing im plant 4 15 50 20 D 5 80 25 D 1 1 16 1...

Page 130: ...ll available values can be set Note The user should always check if the displayed transfer ratio is correct before turning on the device Setting the parameters The following parameters can be changed...

Page 131: ...aCl key to select the coolant flow rate Press the Preselect spray foot button to turn the coolant on or off and to adjust the coolant flow Setting the transmission factor Unfold the Transmission ratio...

Page 132: ...ction serves for control purposes Tap the Settings tab Select User and desired dentist Select Surgery as the Treatment mode from the corresponding list Operating light LUX Tap the Operating light sele...

Page 133: ...that the calibration was successful press the foot control again until the display shows a mes sage indicating that the calibration was successful Tap the Cancel key to terminate the calibration and...

Page 134: ...single use do not use again Dispose of the sterile hose kit in the prescribed manner Use a new sterile packed coolant hose with accessory for every treatment Note All liquid conducting parts are not s...

Page 135: ...sterilised before the first treatment All parts conducting liquids must be kept sterile See also 2 Servicing instructions Connect the coolant with the standard instrument hose Attach the pressure lin...

Page 136: ...N Running open hose pump Risk of injury Turn off the device before opening the hose pump CAUTION Danger of tipping due to the coolant containers being too heavy Malfunctions Use coolant containers wit...

Page 137: ...Hose clamp Lock Insertion needle Close the hose clamp of the hose set Attach the coolant hose to the straight or contra angle handpiece Place the coolant hose tightly without loops or kinks against th...

Page 138: ...e puncture needle closed Open the hose clamp before start up Note Using a new hose it may take up to approx 10 seconds for the coolant to exit on the handpiece depending on the feed rate 4 16 5 Turn o...

Page 139: ...container See also 2 Connecting the coolant container and hose set 4 16 7 After treatment disposal CAUTION Use of non sterile coolant hose with accessory Infection hazard The sterile hose kit is only...

Page 140: ...Vo COMFORTbase coupling The hose of the KaVo COMFORTbase is part of the coupling and cannot be re moved Operation and changing the settings via the control element is identical to the INTRA LUX motor...

Page 141: ...lamp and pull out the lamp axially Insert the new lamp into the lamp changer and introduce it into the hole in the face of the supply hose Carefully slide the lamp into the mount Carefully press out t...

Page 142: ...ble Only the cameras approved enclosed in the delivery by KaVo may be connected to these interfaces The USB port in the back is connected directly to the back of the head PC in the presence of the cor...

Page 143: ...the locking mechanism increases the maximum load to 5 kg 1 2 Rotate the rotary knob in counterclockwise direction to lock the service table in place Rotate the rotary knob in clockwise direction to u...

Page 144: ...Instructions for use ESTETICA E70 Vision E80 Vision 4 Operation 4 20 Service table 1568 optional accessory 144 178 Dimensions and swing ranges in mm...

Page 145: ...structions for use ESTETICA E70 Vision E80 Vision 5 Preparation methods DIN EN ISO 17664 5 Preparation methods DIN EN ISO 17664 Note The preparation methods can be found in the care instructions 145 1...

Page 146: ...aVo Screen One and KaVo Screen HD Service table 1568 It can be mounted on a device stand cart version Service table accessories X ray viewer 1440 Instrument tray Cup holder CENTRO Central organisation...

Page 147: ...ith Satelec Mini LED KaVo COMFORTdrive 200 XD KaVo COMFORTbase The KaVo COMFORTdrive 200 XD is a dental instrument for the high speed range up to 200 000 rpm It can be at tached only to the KaVo COMFO...

Page 148: ...startup during servicing during inspections and maintenance following repairs on the occasion of recurrent tests Note With regard to devices that have not been manufactured in accordance with IEC 6060...

Page 149: ...systems the person responsible for putting the system together must employ the necessary measuring parameters and measuring proced ures defined in IEC 60601 1 DIN EN 60601 1 Note Each individual devi...

Page 150: ...ce with IEC 62353 Note A measurement of the insulation resistance in accordance with IEC 62353 need not be carried out This check is covered by the measurement of the leakage current provided a safety...

Page 151: ...ions for the safety check 7 2 1 Preparatory measures on the device WARNING Electrical power Death or injury from electric shock Before servicing pull the mains plug out of the socket or completely dis...

Page 152: ...sponds to the rated values is no longer included in DIN EN 62353 2015 IEC 62353 2015 Visual inspection and assessment of the medical device and accessories The following list is for exemplary purposes...

Page 153: ...and completeness Check if all safety related markings plates and labels are present and legible Check if the rating plate and serial number plates are present and legible Mounting site for the rating...

Page 154: ...checks and tests in a manner that will ensure that there will be no danger to the testing personnel patients or other persons Note The safety tester must comply with the requirements defined in DIN EN...

Page 155: ...quipped with an X2 connector Connecting the safety tester to KaVo measuring cable on the treatment centre Remove plug X2 from the power input board and plug it into the matching connector X2 of the Ka...

Page 156: ...uring the measurement Connecting application parts AP to the safety tester TP1 Connect TP1 to the safety tester Note If a curing light is installed on the assistant element the curing light must be co...

Page 157: ...er 1 Connect ultrasonic scaler tip to the safety tester Note Additional measuring points AP X must be taken into consideration in the presence of accessories e g accessories such as PIEZO ultrasound s...

Page 158: ...ment with protective conductor PE because all relevant parts have already been connected to the protective conductor PE at the factory and are included in the test Measuring the protective conductor r...

Page 159: ...mp Accessories Note Additional measuring points SL X need to be taken into consideration in the presence of accessories e g accessories such as connection to external devices camera module of the pati...

Page 160: ...ckrest progress backrest with the upholstery removed Comfort backrest fastening screw Dentist element T Fixing screw on the underside of the dentist ele ment Dentist element S Fixing screw on the unde...

Page 161: ...ety check Test instructions 7 2 Instructions for the safety check Arm with cover removed Scanning the treatment lamp with the test tip KaVoLUX 540 LED U operating light Fastening screw of the handle s...

Page 162: ...Appendix Additional protective conductor measuring sites Page 167 Equipment leakage current Alternative measuring method Limit 10 mA maximum value ACP Protection class 1 WARNING Electrical power Deat...

Page 163: ...parts must be connected in succession The measured results must be evaluated using the threshold values Application parts which are not included in the measure ment remain open Note An additional mea...

Page 164: ...ing of the displays Functional test of the holder switch of the dentist and assistant element Functional test of the 3F MF handpiece seating of the cannula Functional test of the operating light Funct...

Page 165: ...ame date and signature of test engineer There is a copy of a test report template at the end of the chapter on Safety Checks KaVo recommends the use of this template Note Following testing repair or a...

Page 166: ...sion E80 Vision 7 Safety check Test instructions 7 3 Test protocol for the safety check 166 178 7 3 Test protocol for the safety check Unit leakage current replacement measurement Leakage current of a...

Page 167: ...t be observed Example ERGOcam 5 8 1 Additional scanning sites SL X in the protective conductor measurement ERGOcam One module Screw in bottom part of housing Note The modules are not earthed with a sa...

Page 168: ...ssembly kit 2 3 Base plate for the ceiling adapter Surroundings of the protective con ductor connector Surroundings of the protective con nector terminal 8 2 Additional measuring sites AP X for EUL EP...

Page 169: ...o 1 007 2529 The re close the bayonet closure with the screwdriver No spray in the instru ments No spray preselected Preselect spray Open the spray regula tion in the instrument is closed Open the spr...

Page 170: ...ed to the wireless foot control The treatment unit emits a tone The wireless foot con trol is turned off Check the on off switch on the foot control and turn it on if necessary The wireless foot con t...

Page 171: ...ction Cause Remedy A signal is emitted every 10 seconds and a status message is shown The oxygenal container is empty Refill the Oxygenal container Ten beeps are issued The Oxygenal container is too f...

Page 172: ...structions of the amalgam separator Emergency shut off of the bowl valve only when external suction is installed Call a service technician MOSFET short circuit Turn the device off Commission service t...

Page 173: ...esiden tial buildings Emission of harmonics according to IEC 61000 3 2 Class A This product is suitable for use in all facilities including residential ones and facilities that are dir ectly connected...

Page 174: ...oltage according to IEC 61000 4 11 5 UT 95 interruption for 1 2 period 40 UT 60 interruption for 5 periods 70 UT 30 interruption for 25 periods 5 UT 95 interruption for 5 s 250 periods 5 UT 95 interru...

Page 175: ...case The propagation of electromagnetic waves is subject to absorption and reflection by buildings objects and people a The ISM frequency bands for industrial scientific and medical applications betwe...

Page 176: ...product as recommended below corresponding to the maximum output of the communication device Rated power P of the transmitter in W Safe distance depending on the transmission frequency in m 150 kHz t...

Page 177: ......

Page 178: ...1 012 5446 Fk 20191030 9 en...

Reviews: