23
1.10 Cleaning the stove
Initially, for a few days during operation with pellets, check the burn pot to determine how often it needs cleaning. Before any cleaning,
always turn off the main switch and make sure the fireplace is cold.
• Cleaning the burn pot
Removing the burn pot after loosening the locking screw with the
special wrench. Carefully clean all the air holes in the burn pot
with a pointed tool.Make sure the burn pot support is clean (if the
burn pot is not correctly positioned and air escapes, the stove will
not light or operate properly; smoke could also enter the pellet
hopper).
Position the burn pot correctly, pushing it to the left by means
of the locking screw located on the right side of the burn pot
container (make sure to tighten the screw).
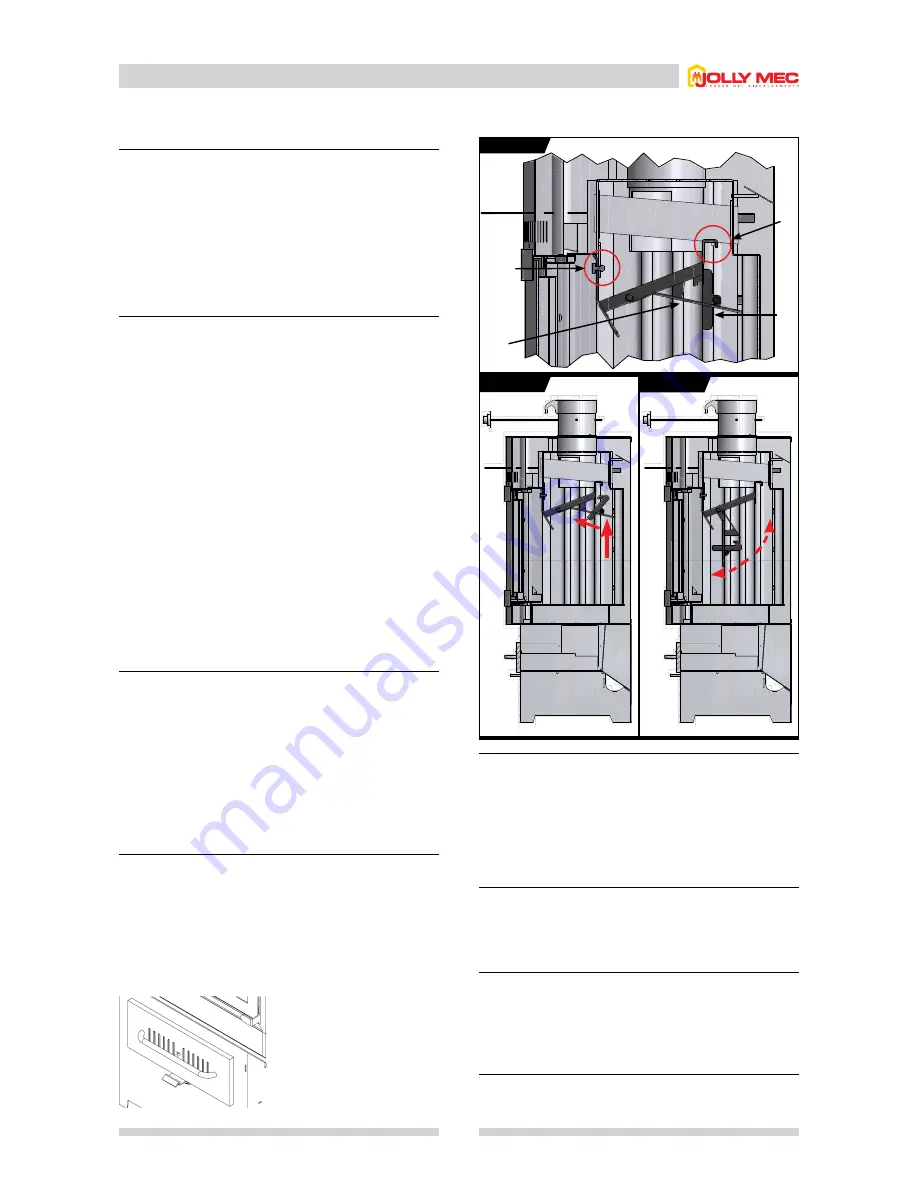
• Installation and Cleaning of the Smoke Deflector
The smoke deflector is delivered disassembled inside the fire-
place, so you must first proceed to install it correctly following
picture
F
ig
.
1.
The device has to be hung at the round supports located at the
rear of the fireplace (A) and secured by means of a pin inserted
on the front (B).
The system is designed such as to make an easier cleaning to
be done according to several factors, such as: the actual use (at
least once per week or about every 60 hours of operation), the
type of fuel used, the draw of the smoke pipe as well as weather
conditions, so that the passage of the fumes is saved from any
clogging caused by backflow of the same fumes in the room.
When the fireplace is running, the tilting piece of the deflector
must be closed (pos.1 upwards); so the locking lever has to be
hooked into the slot provided for this purpose (pos. 2).
During the cleaning of the deflector, this tilting part has to be
slightly raised in order to unhook the lever out of its location
(
F
ig
.
2).
Once the lifter is unhooked, let tumble the tilting part several
types to let drop the ash dust (
F
ig
.
3), and then reposition it (as
per
F
ig
.
1), while ensuring that the locking lever is well hooked
in its slot.
• Cleaning the glass
When using the fireplace in pellet mode, clean the glass every
day with a damp sponge or a paper towel. If the glass becomes
dirty with black smoke, clean the burn pot or increase the
combustion air. When operating in wood mode, use specific
products. Do not use aggressive cleaning products that could
damage the paintwork.
If the fireplace requires more frequent cleaning, check the flue
draught and make sure the smoke baffle is clean (the minimum
draught must be 12 Pascal; do not use the stove if the draught
is less than the specified value).
• Cleaning the ash pan
Empty periodically when necessary.
The ash drawer has a locking device to prevent the sudden
openings in case of violent firing, but allowing however the vent.
Lift up the tray to remove it, while, to put it, simply push it into
its seat.
• Cleaning the fireplace body
Remove the wood guard, cast iron grates and burn pot. Using
the flue brush and brush supplied, clean the corrugated sheet,
making sure the soot falls into the ash pan. Empty the ash pan
and carefully clean the box.
If necessary, use a vacuum cleaner to remove soot and ash.
Clean the pellet burn pot with a wire brush and a pointed tool.
Refit all parts correctly.
• Cleaning the flue
Routine flue cleaning depends on the draught, fireplace use,
weather conditions and the type of wood or pellets used.
It is mandatory to clean the flue every year, by a specialised
technician once a year, in autumn before lighting the fireplace.
• Cleaning the pellet hopper
Every 500-1000 kg of pellets burned, empty the hopper and
remove any sawdust deposited on the bottom. Carefully clean
the bottom of the hopper.
In case of long idle periods, empty the hopper and the in feed
screw.
• Cleaning the fans
Once a year remove the combustion fan and remove all dust
and dirt from the blades.
NOTE: During normal
functioning, check that the
ash drawer is closed (against
the structure of the fireplace
and not against the security
plate).
F
ig
. 2
F
ig
. 3
A
2
B
1
F
ig
. 1
Summary of Contents for FOGHEA
Page 46: ...46 Notes...
Page 47: ...47 Notes...


