background image


USER’S MANUAL


110 

NETWORK VIEWER INSTALLATION


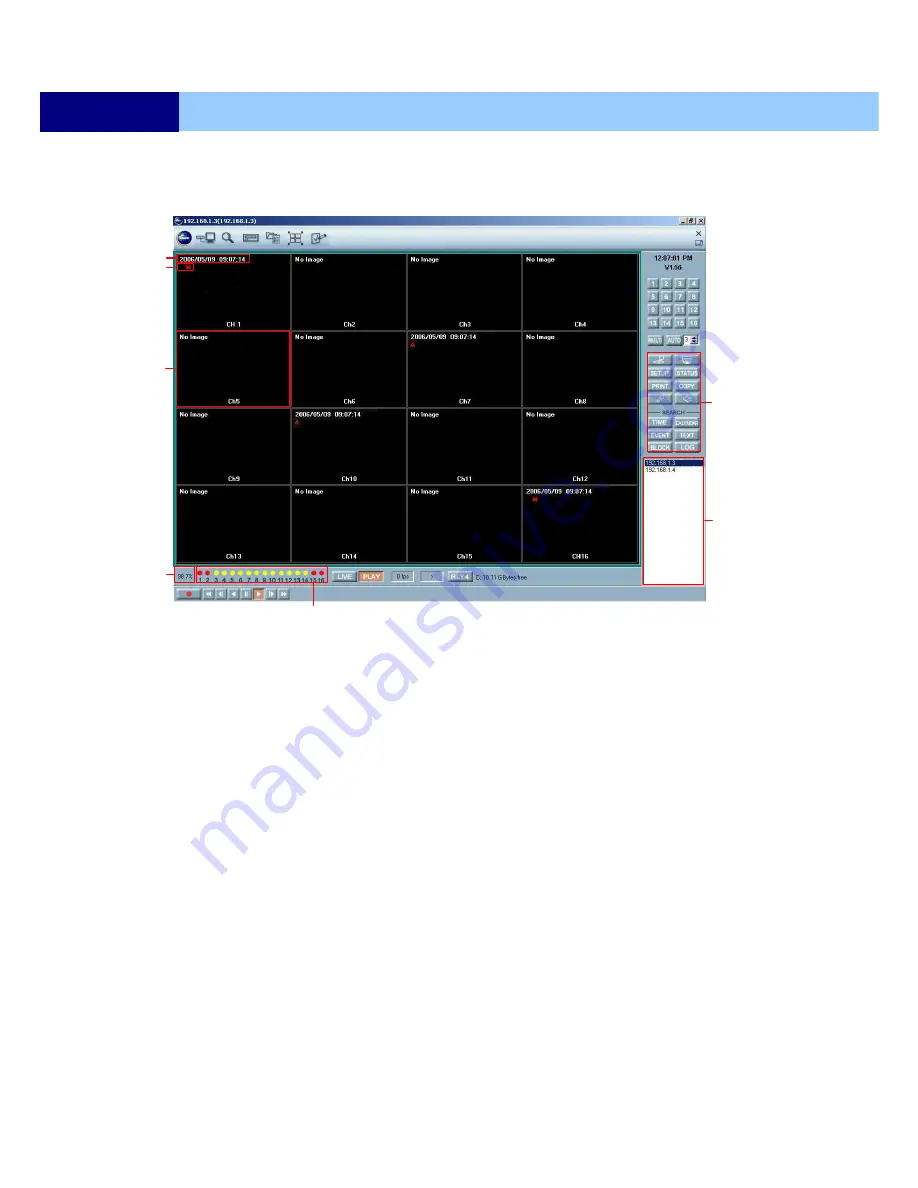
10.5 DVR VIEWER – PLAYBACK MODE   

Any DVRs that are connected online can be accessed to do data search remotely from the DVR and 
then transmit to the DVR viewer for remote playback.     


a.  DVR’s playback time 

Displays the DVR’s playback date and time. Channels without recording show NO IMAGE.     
 

b.  Event message 

Displays the channel’s event messages at the time of the recording.     

 
c. 

Channel window 
The DVR channel window can be double-clicked for a full screen mode. The  channel  window 
can  also  be  zoomed  by  dragging  the  left  mouse  button  over  the  channel  window.  The 
size  of  the  box  created  by  dragging  will  be  the  outline  of  the  channel  window  to  be 
zoomed  in.   
 

d.  DVR functions 

Some of the DVR functions may not be available depending on what user account the DVR
Viewer  has  been  signed  on  with,  and  also  with  what  user  level  password  the  DVR  has   
been connected to.     
 

e.  DVRs online 

The live view of different DVRs can be selected, as well as the playback mode, by clicking 
on the desired DVR name.     
 

f. 

Remaining HDD space 
Displays remaining hard disk drive space on the DVR. 

 
g.  Channel status 

Displays the status of the live channels.         

Summary of Contents for DMR_1681DR

Page 1: ...manual may cause harmful interference to radio communications Operation of this equipment in a residential area is likely to cause harmful interference in which case the user will be required to corre...

Page 2: ...ulation Before connecting the power cord please select the correct voltage for local use You may switch between DC 12V 10A Always use the DVR in a well ventilated location to prevent overheating Risk...

Page 3: ...49 6 4 EVENT 61 6 5 SYSTEM 65 6 6 LINK 74 6 7 SEARCH 81 6 8 COPY 81 6 9 EXIT 82 Chapter 7 External Terminal Information 83 Chapter 8 Specifications 87 Chapter 9 HDD INSTALLATION PROCESS 90 9 1 Instal...

Page 4: ...ding Select of the recording quality grade for each channel Individual camera frame rate can be set by user Manual schedule and event recording Pre Post alarm recording Select of the recording image s...

Page 5: ...y CD RW DVD RW option General Software downloading facility via network and USB flash memory Auto detection of PAL NTSC Built in hardware Watchdog Automatic time adjustment through Network VGA output...

Page 6: ...ower Cord 1 DVR 2 Network Viewer Program CD 3 User s Manual 4 Remote Controller 5 Power Cord 6 Batteries CONTENTS Z FF Z REW MENU STATUS ESC PIP MULTI ALARM RESET HOME D ZOOM 9 7 8 CAMERA NUMBER INPUT...

Page 7: ...ck If press again playback will pause 13 REC Button to begin and stop recording 14 CD RW Removable HDD rack Option Built in Removable HDD or CD RW or DVD RW 15 USB port USB 2 0 port to use a USB flash...

Page 8: ...ERNET Port for 10 100Mbps Ethernet XDSL 11 USB1 USB2 USB 2 0 ports to use USB flash memory Mouse or the external devices 12 RS 485 Terminal blocks of RS 485 13 T ADJ Input and output terminal blocks f...

Page 9: ...USER S MANUAL 9 INSTALLATION Chapter 4 Installation 4 1 TOTAL CONNECTION LAY OUT...

Page 10: ...MANUAL 10 INSTALLATION 4 2 INDIVIDUAL CONNECTION 4 2 1 Camera Connect a female BNC connector of each camera to a male BNC connector CAMERA IN port Connect the looping BNC output to other inputs as re...

Page 11: ...hone to the AUDIO IN port Audio Output AUDIO OUT Connect the RCA Line output to a monitor with a built in speaker NOTE This DVR can be connected only with a line audio and not support a microphone for...

Page 12: ...2 INSTALLATION 4 2 3 Monitor Connect the female BNC for monitor output Connect the male Y C cable socket for S VIDEO monitor output 4 2 4 Power Select the correct voltage of power 12V 10A Connect the...

Page 13: ...c Note 1 Please turn on the power of USB storage devices after DVR is booted completely 2 Most USB flash memory brands are compatible problem occurs only to some brands Therefore when data is unable t...

Page 14: ...EEN 3SEC ADD AUTO SINGLE OFF AUTO SINGLE CH1 16 3SEC VIDEO LOSS SKIP ON DISPLAY HDD FREE SPACE ON HDD FREE SPACE MODE PERCENT RECORD STATUS ON CLOCK DISPLAY ON DATE TIME MODE YY MM DD TITLE DISPLAY ON...

Page 15: ...AUDIO 2 OFF AUDIO 3 OFF AUDIO 4 OFF REPEAT RECORD REPEAT RECORD ON REPEAT RECORD ALARM 5 PLAY MODE FRAME BACKUP MODE OFF HOLIDAY HOLIDAY RECORD OFF HOLIDAY SETUP MM DD 00 00 EVENT MOTION DETECTION CH...

Page 16: ...USER4 PASSWORD NONE USER AUTHORITY AUTHORITY U1 U2 U3 U4 REC OFF OFF OFF OFF SEARCH PLAY OFF OFF OFF OFF COPY OFF OFF OFF OFF LIVE AUDIO OFF OFF OFF OFF DVR SETUP OFF OFF OFF OFF DVR STATUS OFF OFF O...

Page 17: ...DR 1 10 NONE SEARCH CALENDAR SEARCH SEARCH COPY HDD ID NORMAL CHANNEL ALL TIME SEARCH HDD ID NORMAL CHANNEL ALL EVENT SEARCH HDD ID NORMAL CHANNEL ALL EVENT ALL BLOCK SEARCH HDD ID NORMAL FILE SEARCH...

Page 18: ...he SYSTEM menu P70 5 2 2 SCREEN DISPLAY 5 2 2 1 Multi Display Full Screen display A Multi display The example is displayed by 16CH DVR To change a single camera display to the multi camera press the M...

Page 19: ...e skipped To view the single display set up ADD AUTO SINGLE ON in the AUTO SEQUENCE setup menu P42 and the single display will be included in the auto sequence display Press the AUTO button again to e...

Page 20: ...The screen will be turned into real time display mode SCHEDULE MODE When Schedule mode is selected the recording will be automatically executed according to the recording schedule Please refer to the...

Page 21: ...buttons and press the ENTER button to enter setup Change the value using the buttons or turn the JOG DIAL 5 2 4 1 CALENDAR SEARCH Enter the CALENDAR SEARCH menu The date is displayed by white in case...

Page 22: ...l Please refer to 5 2 10 COPY function in P30 for detail description Enter the SEARCH COPY menu Select the desired HDD ID CHANNEL TIME and press the ENTER button then you can playback Press ESC button...

Page 23: ...E When video loss is detected up to five seconds of pre recording data is stored on the HDD and the details will be listed in the EVENT LIST The beep sounds and the LED of the ALARM RESET button will...

Page 24: ...ess the ENTER button then you can playback Press LV PB or ESC button to go back the previous menu 5 2 4 6 FILE SEARCH This function allows you to PLAYBACK by any previously BACKED UP or COPIED from th...

Page 25: ...to go back the previous menu 5 2 4 8 TEXT SEARCH At the SEARCH menu Move the cursor to TEXT SEARCH using or button Press the ENTER button and the TEXT SEARCH screen appears Select the desired HDD ID u...

Page 26: ...button to play 5 2 4 9 LOG FILE SEARCH The LOG FILE SEARCH is not for PLABACK it is for event information only This is useful to find important information regarding to important events Enter the LOG...

Page 27: ...to set up the A position starting position and A will be displayed on upper right of the screen And then press the FREEZE button to set up the B position ending position and A B will be displayed on u...

Page 28: ...of consecutive frames Press the PLAY PAUSE button again to return to the previous mode 5 2 6 3 Digital Zoom of PTZ camera Select a pre set single camera and then press the PTZ button Turn the SHUTTLE...

Page 29: ...zoom x2 Press the ESC button to exit this screen 5 2 8 SCREEN SELECT LV PB During the playback press the LV PB button to convert the screen into real time display mode Press this button again to retur...

Page 30: ...monitor in sequence 5 2 10 COPY Press the COPY button to copy the recorded images into other media During the copy DVR will not stop recording But the recording frame rate will adjust automatically d...

Page 31: ...Y END TIME or to the left to move the cursor of COPY START TIME and the cursor will be yellow And then turn the Jog dial to move the cursor to the desired time It can operate with just Mouse click You...

Page 32: ...the desired time It can operate with just Mouse click You can see a password input message You need this password when opening the file in network viewer 5 2 10 1 4 STOPPING COPY Press the COPY button...

Page 33: ...e MEDIA FULL OR FAIL PRESS COPY message Press the COPY button and the following screen appears Move the cursor to the CONTINUE COPY and then press the ENTER button 5 2 10 2 COPY STATUS Enter the COPY...

Page 34: ...xt page press the or use the wheel scroll of Mouse Press the STATUS button again to move on next information screen Press the ESC button to exit the menu 5 2 12 PTZ CONTROL With easy operation DVR can...

Page 35: ...2 12 2 PTZ PRESETTING Preset point is a convenient usage of PTZ camera It is a user defined camera position using pan tilt zoom and focus commands This DVR has the Programming capacity for 16 preset...

Page 36: ...size and use the buttons to move the position of PIP screen Press the ESC button to exit this mode 5 2 15 AUDIO SELECT NUMBER 0 You can select audio channels regardless of monitoring screen Audio sel...

Page 37: ...Z Refer to 5 2 4 7 BOOKMARK SEARCH P25 Enter the PTZ mode 14 Z Zoom in of PTZ 15 IRIS Iris close and open of PTZ Frame by Frame field by field playback 16 SEARCH PRESET Display the search menu Enter t...

Page 38: ...below keys on the MENU screen with a mouse 1 Status display Double click of the left button 3 Menu display One click of the right button 3 Exit Double click of the right button 2 Value change Turning...

Page 39: ...MENU button and the QUICK SETUP menu appears as the following picture 6 1 1 QUICK SETUP If QUICK SETUP setting is ON the DVR System will according to this Setup Page setting to record the recording da...

Page 40: ...loss alarm or motion is detected the DVR will store post recorded data during the selected period The post recording time can be set from 0 second to 60 second and the default is 10 NOTE All of the c...

Page 41: ...refer to 6 3 4 AUDIO RECORD P58 6 1 9 REMOTE CONTROL ID Select one of the numbers from 11 14 21 24 31 34 41 44 and then press the same number button on the supplied remote controller before the operat...

Page 42: ...menu Move the cursor to the SCREEN icon using the buttons in the MENU screen Press the ENTER button when the cursor is on the SCREEN icon and the following items appear 6 2 1 AUTO SEQUENCE Enter the S...

Page 43: ...ESC button 6 2 2 DISPLAY This setup will change the monitor display style under live record or playback mode Except SPOT DISPLAY item the other items are for main monitor only Enter the SCREEN DISPLAY...

Page 44: ...layed on the screen PERCENT Remaining capacity of the fixed HDDs will be displayed on the screen in percent GIGABYTE Remaining capacity of the fixed HDDs will be displayed on the screen in gigabyte ON...

Page 45: ...Select the character using the buttons and then press the ENTER button To exit this CHARACTER TABLE screen press the ESC button WHITE The color of the border line will be displayed on the multi channe...

Page 46: ...is menu Enter the SCREEN MULTI SCREEN menu To exit this MULTI SCREEN menu press the ESC button 6 2 4 1 MULTI 4E MULTI 6 MULTI 7 MULTI 9B MULTI 10 MULTI 13 Press the ENTER button after selecting the de...

Page 47: ...displayed automatically on spot monitor SEQUENCE Every single channel will be switching and displaying in sequence 6 2 6 2 SPOT SEQ TIME The duration of spot sequence can be set from 1SEC to 60SEC Th...

Page 48: ...ue of the BRIGHTNESS to adjust the horizontal position of the screen Change the value of the CONTRAST to adjust the vertical position of the screen Change the value of the HUE to adjust the vertical p...

Page 49: ...You can use and combine different predefined programs during the week according with your own needs See RECORD PROGRAM section for more information P50 Enter the SCREEN RECORD SETUP menu choose the d...

Page 50: ...detection or continuous recoding Enter the RECORD RECORD PROGRAM menu Select the desired value for each selected item Please check the detail description next page After all setting are done exit usi...

Page 51: ...meras 5 6 etc 3 IMAGE SIZE Shows the actual resolution of each camera group Every camera group can be configured to a different resolution IMAGE SIZES are NTSC 360x240 720x240 720x480 PAL 360x288 720x...

Page 52: ...DVR will record the channels triggered by any event The rest of the channels of the group will record based on the NORMAL IPS set value on each camera Note The maximum value between the NORMAL IPS and...

Page 53: ...ed the maximum IPS of a group MAX means the greater value of a channel between the NORMAL IPS and the EVENT IPS This is only the indication for user s understanding d For COMPLEX ALL CHANNELS The disp...

Page 54: ...vents ON FEATURES RECORDING MODES NORMAL Continuous 15 ips EVENT SINGLE EVENT CH ONLY 15 ips RESOLUTION 360 X 240 CIF QUALITY N N PRE POST 5 10 EVENT LOG 0 0 0 ALL Events ON FEATURES RECORDING MODES N...

Page 55: ...Continuous 10 ips EVENT SINGLE EVENT CH ONLY 30 ips RESOLUTION 720 X 240 HalfD1 QUALITY H H PRE POST 5 10 EVENT LOG 0 0 0 ALL Events ON FEATURES RECORDING MODES NORMAL Continuous 15 ips EVENT COMPLEX...

Page 56: ...x480 720x480 NORMAL 0 15 30 30 8 4 15 1 2 8 EVENT SINGLE 0 15 30 0 15 30 0 10 20 0 EVENT COMPLEX 0 0 0 30 0 0 15 0 0 8 QUALITY NORMAL H N H B N H B N H B QUALITY EVENT H N H B N H B N H B PRE ALARM RE...

Page 57: ...ION DETECTION 3 CONTINOUS MOTION DET FEATURES RECORDING MODES NORMAL Continuous 30 ips EVENT COMPLEX EVENT CH ONLY 0 ips RESOLUTION 360 X 240 CIF QUALITY B B PRE POST 5 10 EVENT LOG 0 0 0 ALL Events O...

Page 58: ...e you can select which audio channel to monitor by press number 0 And playback as well Enter the RECORD AUDIO RECORD menu Select the audio recording channels from ON OFF The default is OFF Press the A...

Page 59: ...ALARM The value is from 5 to 10 And default is 5 6 3 6 PLAY MODE Enter the RECORD PLAY MODE menu Note REPEAT RECORD ALARM is the rest capacity of the HDD If you set REPEAT RECORD ALARM to 5 alarm will...

Page 60: ...ed or sensor triggered you can keep all of the important event recording with a copy in the backup HDD Enter the RECORD BACKUP MODE menu Choose from EVENT and OFF The default is OFF 6 3 8 HOLIDAY DVR...

Page 61: ...ity The detect sensitivity is calculate with all of the active blocks You can verify the area and sensitivity with live test Enter the EVENT MOTION DETECTION menu 6 4 1 1 CHANNEL Select the desired ch...

Page 62: ...r OFF The default is ON 6 4 4 EVENT MESSAGE Select from ON or OFF The default is OFF 6 4 5 EVENT MESSAGE RESET Set the time to reset the OSD event message from 1SEC to 30SEC The default is 5SEC ON The...

Page 63: ...UTPUT Relay output is from 1 to 4 and it is possible to set the period of the relay output It is possible to set the RELAY OUTPUT of each channel in the different type of event Enter the EVENT RELAY O...

Page 64: ...SED and HDD ERROR POWER The relay is working when power is off USER User can operate the relay manually Press the FUNCTION button to operate RELAY 4 manually NC NO And then press the button NO NC And...

Page 65: ...HDD it will require an initialize to make a DVR file format The DVR used HDD is not expected to read by an ordinary PC or notebook laptop Each DVR can be assigned a mode it will separate HDDs as two...

Page 66: ...The default is REC 6 5 1 2 REC HDD INITIALIZE Enter the SYSTEM HDD REC HDD INITIALIZE menu If you want to initialize move the cursor to YES and then press the ENTER button If not move the cursor to N...

Page 67: ...to initialize move the cursor to YES and then press the ENTER button If not move the cursor to NO and then press the ENTER button Press ESC button to exit 6 5 2 CLOCK Enter the SYSTEM CLOCK menu 6 5...

Page 68: ...n this screen with AUTO button and ALARM RESET button Enter the SYSTEM CLOCK TIME ADJUST menu Select ON or OFF of INTERNET TIME ADJUST The default is OFF If the INTERNET TIME ADJUST set ON set the IP...

Page 69: ...ou are operating more than one DVR in the same place and wish to use the remote controller the remote controller ID setup is required Otherwise do not change the default set value and ALL should be se...

Page 70: ...F password menu won t work MENU DISPLAY CHECK REC PLAYBACK CHECK Note In case that the PASSWORD CHECK is on only ADMIN and MASTER can enter the ADVANCED SETUP MENU CAUTION TO REDUCE THE RISK OF FIRE O...

Page 71: ...ns And then reinsert 8 numbers of the NEW PASSWORD in the eight digits marked _ _ _ _ _ _ _ _ beside RE TYPE using the CAMERA NUMBER INPUT buttons to verify the password Press ESC button to exit Note...

Page 72: ...is setting If you set any item ON the password will be required when the user begin to operate specified function Enter the SYSTEM ADVANCED SETUP USER AUTHORITY menu Select from ON or OFF The default...

Page 73: ...6 5 7 4 2 LOAD MENU FROM FILE Enter the SYSTEM ADVANCED SETUP DVR MENU SETUP LOAD MENU FROM FILE menu 6 5 7 4 3 SAVE MENU TO FILE Enter the SYSTEM ADVANCED SETUP DVR MENU SETUP SAVE MENU TO FILE menu...

Page 74: ...tton Press ESC button to exit 6 6 LINK You can setup all of the internet network function and PTZ camera setup here This DVR support dynamic IP and static IP Remote view from Internet Explorer or dedi...

Page 75: ...Fixed IP 6 6 1 2 IP ADDRESS Select the desired position and set the data value 6 6 1 3 SUBNET MASK Select the desired position and set the data value 6 6 1 4 GATEWAY Select the desired position and se...

Page 76: ...default IP is a available server 6 6 1 8 BACKUP IP SERVER DHCP set ON Input the backup IP server s IP The default IP is a available server 6 6 1 9 NETWORK FRAME Select the desired value to select an...

Page 77: ...ter the LINK RS232C menu Choose the item and set the data value Press ESC button to exit 6 6 3 RS485 RS485 is use for connect to external device such as PTZ camera Please make sure all the device conn...

Page 78: ...5 1 SEND E MAIL Select from ON OFF The default is OFF When SEND E MAIL set to ON DVR will send a e mail when an event happened Note BAUD RATE Data transmission speed per second DATA BIT Data transmis...

Page 79: ...NK NETWORK SMTP SERVER menu Select the character using the buttons and then press the ENTER button To exit this CHARACTER TABLE screen press the ESC button 6 6 5 3 DVR E MAIL ADDR DVR E MAIL address m...

Page 80: ...sing the buttons and then press the ENTER button To exit this CHARACTER TABLE screen press the ESC button 6 6 5 5 PASSWORD Please input your E mail login password Please notice is it case sensitive ma...

Page 81: ...USER S MANUAL 81 MENU SETUP 6 7 SEARCH Enter the SEARCH menu Please refer to Search Playback of Chapter 5 Operation P21 6 8 COPY Enter the COPY menu Please refer to Copy of Chapter 5 Operation P30...

Page 82: ...sired item and press the ENTER button SAVE ONLY Select this item if you want only to save the changed setup SAVE AND EXIT Select this item if you want to save the changed setup and exit this screen EX...

Page 83: ...used to connect the external controller 7 2 RELAY OUT For controlling alarm output by relay No DESCRIPTION 1 TA TX RS485 Transmit data 2 TB TX RS485 Receive data 3 GND NO DESCRIPTION NO DESCRIPTION 1...

Page 84: ...N COMMON GND 5 EXTERNAL ALARM 5 INPUT 6 EXTERNAL ALARM 6 INPUT 7 EXTERNAL ALARM 7 INPUT 8 EXTERNAL ALARM 8 INPUT G ALARM IN COMMON GND 9 EXTERNAL ALARM 9 INPUT 10 EXTERNAL ALARM 10 INPUT 11 EXTERNAL A...

Page 85: ...5ohm 0 7Vp p 2 GREEN Green Video 75ohm 0 7Vp p 3 BLUE Blue Video 75ohm 0 7Vp p 4 12 Reserved 13 HSYNC or CSYNC Horizontal or Composite Sync 14 VSYNC Vertical Sync 15 Reserved No Description No Descrip...

Page 86: ...B For both 10Base T and 100 Base TX No DESCRIPTION 1 N C Not Connected 2 N C Not Connected 3 RX Receive Data 4 N C Not Connected 5 N C Not Connected 6 RX Receive Data 7 TX Transmit Data 8 TX Transmit...

Page 87: ...r to the below table Quality User Define Low Fine Superfine Scheduling Available per hour each channel Mode Manual Event Motion detection Video loss Sensor Schedule Water Marking Support 4 HDD Capacit...

Page 88: ...COPY Digital Backup Event Backup Copy External HDD CD RW DVD RW USB Stick 2 0 11 SEARCHING PLAYBACK Searching Method Time Event File Bookmark Log file Text 12 MULTI REMOTE SURVEILLANCE Monitoring Envi...

Page 89: ...cording conditions and may vary from your actual recording situation In the Recording Time Table multiply by 2 for recording hours with an 240 GB HDD and 3 for recording hours with a 360 GB HDD The co...

Page 90: ...Slave When installing the HDD format it before operation It is suggested once the HDDh as been installed unless necessary do not replace the HDD HDD Jumper Setting Information Before install the Hard...

Page 91: ...program The followi ng is the minimum and recommended PC specification Minimum Recommended OS Windows 2000 Windows XP CPU Pentium III 1 Ghz Pentium IV 2 8 Ghz RAM 128MB 512MB Video Card 16MB 128MB Fre...

Page 92: ...l be installed in its default folder of C Program Files DVR DVR Viewer If the folder needs to be changed click on BROWSE button and then select a different folder The setup program will run through it...

Page 93: ...e it prompts for the administrator s password Select and enter a password of up to 20 alphanumeric characters Click on OK to start the program The DVR Viewer has two display modes When the program is...

Page 94: ...isted in this box b Connection Type Select the connection type to the DVR c DVR Name Enter the DVR name d IP Address and Port Enter the IP address and the port number for the DVR if known e Use IP Ser...

Page 95: ...sword to access the DVR remotely The password level entered will grant the access privileges assigned by the administrator i Description Add comments or notes to the DVR in this box j Add Once all the...

Page 96: ...list available DVRs to be added to the DVR list Click on DVR SEARCH to open the DVR Search window Click on SEARCH and available DVRs will be listed Highlight a desired DVR to add to the DVR List and t...

Page 97: ...ill be shown in the main channel display window The content of the hard drive can be further searched and played back using any one of the search features or using the playback buttons to playback in...

Page 98: ...be slowed paused and fast forwarded using the playback buttons The playback list can be viewed and selected again from the TIME search button once the playback starts 5 ARRANGE WINDOW Arrange window b...

Page 99: ...the Viewer Option window Check or uncheck various On Screen Display options as needed By default Channel Title Event and Frame Rate are checked Modify the IP address for the Dynamic IP Servers as nee...

Page 100: ...nd clicking on CHANGE once the changes are made 7 CHANNEL DISPLAY WINDOW Live or playback video from the DVR is transmitted and displayed up to 16 channels Each channel displays information regarding...

Page 101: ...ode 7 channel view mode 6 channel view mode and quad view mode 13 AUTOMATIC SEQUENCE DWELL TIME Defines the dwell time for the automatic sequencing of view modes Select from 1 to 9 seconds The default...

Page 102: ...f by clicking on AF C Set preset points Move the PTZ camera to the desired location and then click on any of the 16 buttons to set a preset position D Move to preset points Click on any of the 16 butt...

Page 103: ...of fixed hard disk drive Remaining free space of fixed hard disk drive Total space of backup hard disk drive Remaining free space of backup hard disk drive 18 2 Record Record status displays the foll...

Page 104: ...r size Select the paper size Available paper sizes are A3 A4 A5 B4 B5 Legal and Letter c Print Send the picture to the printer d Printer Select a printer to send the picture e Save as The picture can...

Page 105: ...djusted the COPY END value will be automatically adjusted d Copy start Enter the starting time of the data to be downloaded e Copy end Enter the end time of the data to be downloaded f Password Encryp...

Page 106: ...earch for a time for remote playback using a calendar based search window Please see 10 5 2 CALENDAR SEARCH under 10 5 DVR VIEWER PLAYBACK MODE 25 EVENT SEARCH Search for events for remote playback Pl...

Page 107: ...display window will be outlined in red b Rewind This button can be toggled for rewind speed of 2x 4x 8x 16x 32x 64x and 128x c Reverse slow This button can be toggled for a slow reverse playback spee...

Page 108: ...layback will resume from where it was left off 33 FRAMES PER SECOND Displays the frame rate of incoming live stream or playback stream 34 LIVE PLAYBACK BUTTON STATUS During live or playback this windo...

Page 109: ...of the box created by dragging will be the outline of the channel window to be zoomed in d DVR functions Some of the DVR functions may not be available depending on what user account the DVR Viewer ha...

Page 110: ...l screen mode The channel window can also be zoomed by dragging the left mouse button over the channel window The size of the box created by dragging will be the outline of the channel window to be zo...

Page 111: ...start and the end of the recorded data will be displayed Select the hard disk drive for the remote playback If unknown leave the selection to Normal Select the channel for playback Select the year mon...

Page 112: ...click on PLAY to begin the remote playback 10 5 3 EVENT Click on EVENT to display the Event Search window The first 500 events are listed chronologically from the most recent to the oldest Select an...

Page 113: ...for playback Select the event categories Select the year month day and time for the end of the event list for playback The list can be advanced to the next 500 lists by clicking on NEXT Highlight the...

Page 114: ...Click on TEXT to display Text Search window Select the hard disk drive for the remote playback If unknown leave the selection to Normal Select the channel for the text string search Enter the text str...

Page 115: ...earch time Click on SEARCH to list data that match the text string If the text string search was left blank then it will display all items Click on NEXT for the next 500 listing Highlight a text strin...

Page 116: ...0 data is displayed in chronological order from the most recent to the oldest Select the hard disk drive for the remote playback If unknown leave the selection to Normal Select the year month day and...

Page 117: ...TUP The DVR Viewer can change the settings on the DVR remotely The features and settings are identical to that of the DVR menu For more information please see V DVR MENU on page Click on SETUP and the...

Page 118: ...FROM DVR Load current DVR settings 11 UPDATE TO DVR Upload changed settings to DVR 12 CLOSE Close DVR Setup menu 10 6 1 QUICK SETUP a Quick Setup on off b Image Size 360 x 240 720 x 240 720 x 480 c Re...

Page 119: ...well time c Video Loss Skip check uncheck d Add Auto Single check uncheck 10 6 2 2 Display a HDD Free Space on off b HDD Free Space Mode percent gigabyte c Record Status on off d Clock Display on off...

Page 120: ...eric characters for channel titles b Clear Clear the bitmap drawing c Move Move the bitmap drawing in the grids d Font Select the font for bitmap conversion e Download Download the bitmap to the DVR f...

Page 121: ...s to be displayed in 4E 6 7 9B 10 and 13 channel view modes 10 6 2 5 Covert a Channels 1 through 16 on off b Select live play network LV PB LV NW PB NW all c Title Display on off 10 6 2 6 Spot a Spot...

Page 122: ...the keyboard a Record Program 0 to 9 b Record Type single complex event channel only all channels c Image Size select the recording image size d Normal Record select the recording rate for manual reco...

Page 123: ...nt a Event Check on off b Event Screen Mode screen hold event full event multi event full return event multi return c Event Message on off d Event Message Reset 1 to 30 seconds e Event Buzzer on off 1...

Page 124: ...n detection area Use the buttons at the bottom of the screen to set or clear motion detection all area of the screen 10 6 4 3 Sensor Input Select the circuit type for the sensor input 10 6 4 4 Relay O...

Page 125: ...h 34 and 41 through 44 d Key Echo on off 10 6 5 2 HDD Select the recording mode for the HDD 10 6 5 3 CLOCK a Date Time the date and time is displayed here cannot be modified b Internet Time Server on...

Page 126: ...ork a DHCP on off b IP Address enter the IP address c Subnet Mask enter the subnet mask d Gateway enter the gateway e DNS enter the DNS address f Port define port number g Dynamic IP Server enter the...

Page 127: ...op bit 10 6 6 4 PTZ a Model select the PTZ camera model b Speed select the communication speed c ID select the PTZ camera address 10 6 6 5 E mail a Send e mail on off b SMTP Server enter the SMTP serv...

Page 128: ...e process begins the connection must not be severed or interrupted Click on FIRMWARE DOWNLOAD and the DVR firmware open window will open Download the logo image to be viewed when booting at the first...

Page 129: ...l begin loading onto the DVR Once the download is complete the DVR will begin flashing the new firmware Once the upgrade is finished and successful the DVR viewer will display DVR Upgraded Successfull...

Page 130: ...anada GMT 04 00 Caracas La Paz GMT 04 00 Santiago GMT 03 30 Newfoundland GMT 03 00 Brasilia GMT 03 00 Buenos Aries Georgetown GMT 03 00 Greenland GMT 02 00 Mid Atlantic GMT 01 00 Azores GMT 01 00 Cape...

Page 131: ...nepura GMT 06 30 Rangoon GMT 07 00 Bangkok Hanoi Jakarta GMT 07 00 Krasnoyarsk GMT 08 00 Beijing Chongqing Hong Kong Urumqi GMT 08 00 Irkutsk Ulaan Bataar GMT 08 00 Kuala Lumpur Singapore GMT 08 00 Pe...

Reviews: