49
ASSEMBLY AND INSTALLATION
inVENTer
®
iV14R/iV14V ventilation system
•
Installation and operating instructions
TIP
The weather protection grille V-230x240 can also be afixed to the exterior wall as a separate
component. To do so, seal the weather protection grille on the exterior wall side with sealing
tape and screw the grille directly to the exterior wall. Make sure that the slat openings are facing
outwards and down.
►
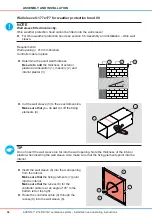
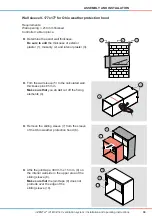
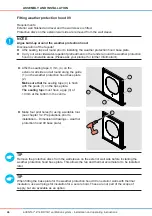
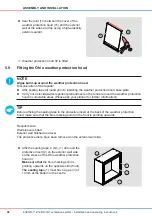
Seal the joint (8) between the wall sleeve and
protective insert using high-elasticity, solvent-
free sealant.
►
Seal the joint between the metal duct and
protective insert using high-elasticity, solvent-
free sealant.
8
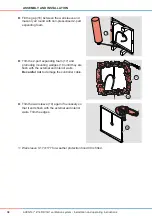
►
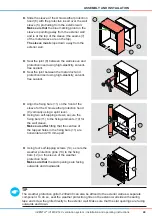
Using four self-tapping screws (14), secure the
weather protection grille (13) to the ixing
bars (12) on the sleeve of the weather
protection hood.
Make sure that
the slat openings are facing
outwards and downwards.
12
13
14
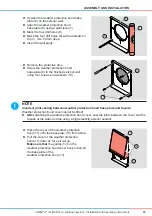
►
Slide the sleeve of the Ohio weather protection
hood (6) with the protective insert over the wall
sleeve (5) protruding from the exterior wall.
Make sure that
the blue marking point on the
sleeve is pointing away from the exterior wall
and is at the top of the sleeve (the seams (7)
of the metal sleeve are on the top).
The sleeve must
slope down away from the
exterior wall.
5
6
7
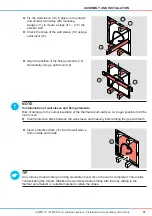
►
Align the ixing bars (11) on the front of the
sleeve for the Ohio weather protection hood
(9) vertically using a spirit level.
►
Using two self-tapping screws, secure the
ixing bars (11) to the ixing elements (10) for
the wall sleeve.
Make sure after
itting that the centres of
the tapped holes in the ixing bars (11) are
horizontal and 210 mm apart.
9
210
10
11

