4 - 75
<
Step 3
>
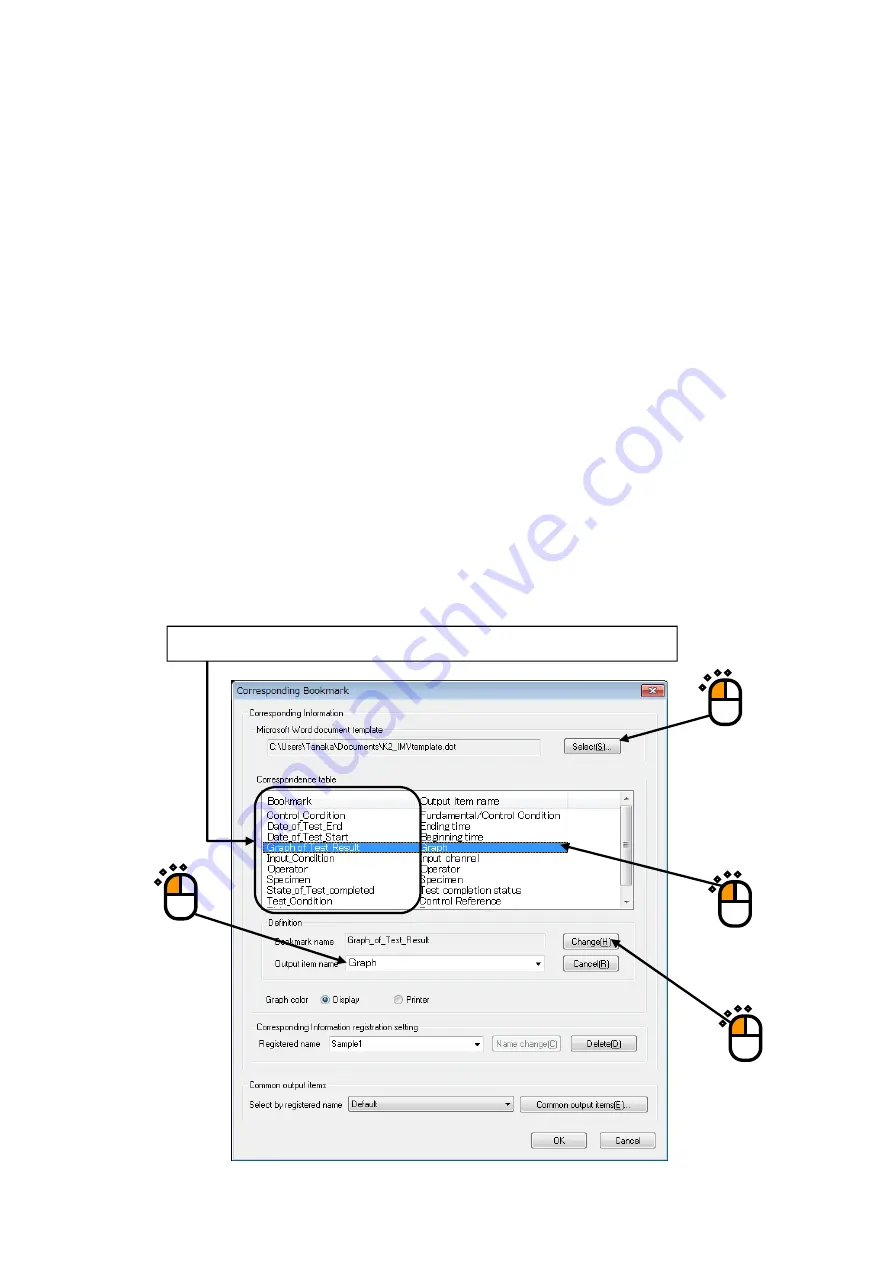
Press [Select] to specify a Template file of Microsoft® Word to be used (
①
).
(The Template file to be used is needed to be made beforehand.)
When the Template file is selected, Bookmarks set in the Template file are listed in
‘Correspondence Table’.
Next, the Output Item is to be made correspondence with Bookmarks.
Select a Bookmark name to be set among the list of ‘Correspondence Table’ (
②
). And specify an
Output Item from the list of ‘Output Item name’ (
③
). Press the [Change] button in Correspondence
Definition(
④
).
Available Output Items vary in each applications as SINE/RANDOM.
<Graph Data>
The graphs displayed at generating reports are treated as the objective for ‘Graph’ among Output
Items. When other graph data (‘Operation’, ‘Response’, etc.) is specified as output item, the graph
data is outputted to the bookmark automatically even if the data is not displayed as a graph.
The setting of color and lines of the graph are selected from the items specified by “Option”
→
“Graph color setting”.
①
②
④
③
When the Template file is selected, the Bookmarks set to the Template are listed.
Summary of Contents for K2-CE
Page 4: ......
Page 34: ...2 6 Step 2 The initial screen of installation appears Press the button of Next...
Page 38: ...2 10 Step 2 The initial screen of installation appears Press the button of Next...
Page 49: ...2 21 Step 2 The initial screen of installation appears Press the button of Next...
Page 55: ...2 27 Step 3 The screen displaying the message of Uninstall or change a program appears...
Page 58: ...2 30 Step 3 The screen displaying the message of Uninstall or change a program appears...
Page 81: ......
Page 82: ......
Page 92: ...4 3 4 2 2 Exit from Application 1 K2 Launcher Press the button Close on the screen...
Page 107: ...4 18 Step 3 A graph of the page displayed currently appears in the display...
Page 110: ...4 21 Step 3 Additional graph appears on the currently displayed page...
Page 121: ...4 32 Step3 Press the Mark button to mark the cursor data displayed in the list...
Page 141: ...4 52 Step 2 Press Yes when a dialog of message for assuring appears...
Page 149: ...4 60 Step 5 Press the OK button...
Page 170: ...4 81 Step 9 Press OK after completing of the necessary settings...
Page 172: ...4 83 Report of testing result generated by Report Generator...
Page 196: ...6 12 Step 3 Select desired data file Some files can be selected at a time...
Page 201: ...6 17 Step 3 Select desired data file Some files can be selected at a time...
Page 212: ...7 6 7 2 2 Standards Mode Procedures Step 1 Press the button of Standards...
Page 217: ...7 11 7 2 3 Test files mode Procedures Step 1 Press the button of Test files...


