background image


11


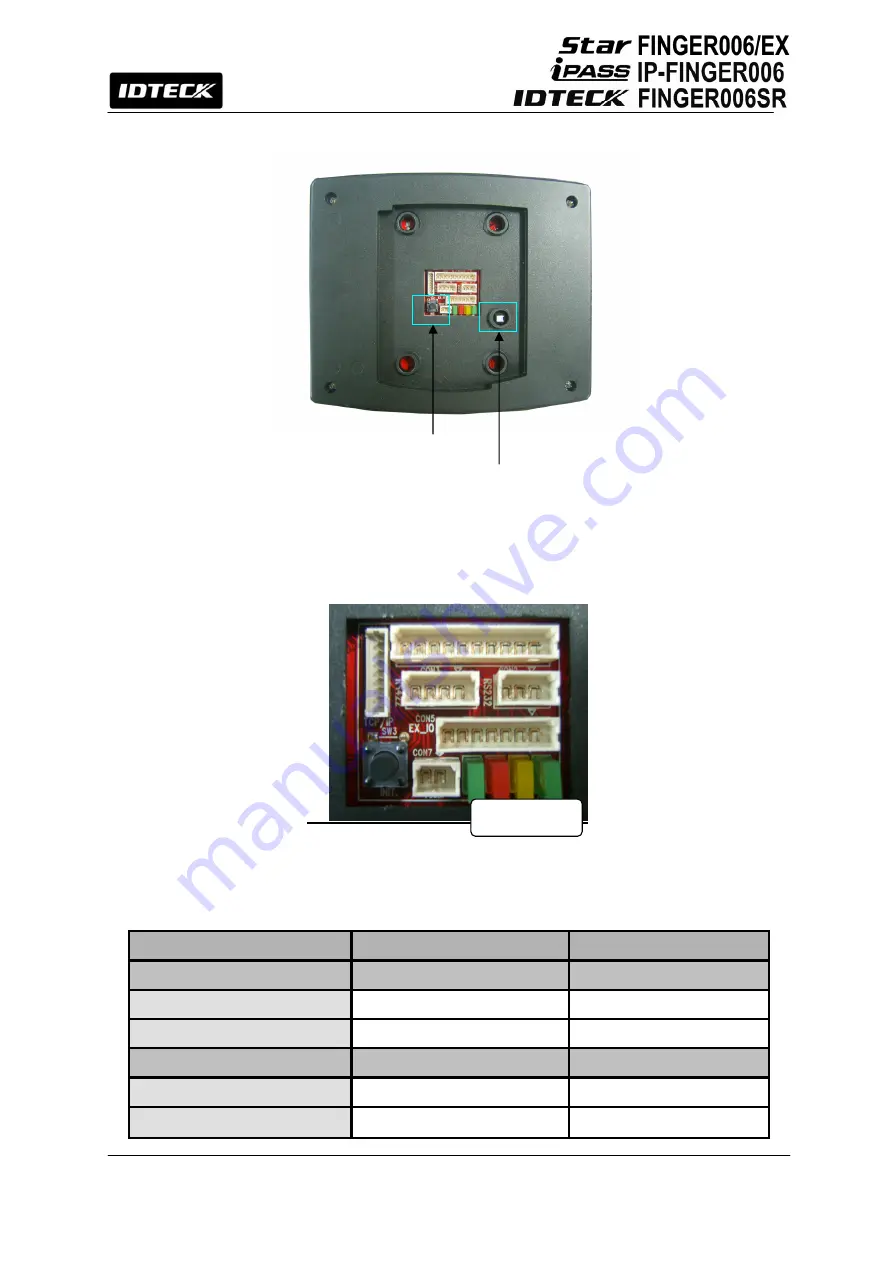
Rear View


Communication Display LED 

          # 3, 4(yellow, green) LED will twinkle during RS232, RS422 and TCP/IP communication. 
          If the LAN is connected normally during TCP/IP communication, green LED will turn on. 

But in the collision status, #2 LED (red) will turn on.       


Figure: The Communication Display LED in the Rear View 


6.2.2. Color Coded & Wiring Table 

I/O PORT NAME 

SIGNAL NAME 

COLOR CODED 

POWER 

(CON7) 


Main Power(+12V) 

DC +12V 

Red 

Power Ground 

GND 

Black 

OUTPUT 

(CON4) 


Door Relay(COM) 

COM(1) 

Gray with Red Stripe 

Door Relay(NC) 

NC(1) 

Blue with White Stripe 

Temper Switch 

Initialization Switch 

1    2    3    4 

Summary of Contents for Star FINGER006

Page 1: ...User s Manual Fingerprint Identification Proximity PIN Reader...

Page 2: ...e 14 7 2 Check Point during Installation 15 7 2 1 Termination Resistor 15 7 2 2 How to Connect Termination Resistors 15 7 2 3 Grounding System for Communication Cable 16 8 Installation of the Product...

Page 3: ...ION 29 12 1 8 CARD ID CLEAR 30 12 1 9 EVENT CLEAR 30 12 2 SETUP MENU F2 31 12 2 1 LCD DISPLAY 32 12 2 2 BUZZER STATUS 32 12 2 3 OUTPUT MODE 32 12 2 4 LED_BUZZER_CONTROL 32 12 2 5 RF PIN INPUT 33 12 2...

Page 4: ...FP STATUS 44 12 4 13 HIGH SECURITY 44 12 4 14 FP QUALITY 45 12 4 15 FP LEVEL 45 12 4 16 FINGERPRINT MODULE VERSION 45 12 4 17 FINGERPRINT COUNT 45 12 4 18 FINGERPRINT MODULE TEST 46 12 4 19 FINGERPRI...

Page 5: ...uit parts possibly resulting in fire or electric shock Never spill liquid of any kind on the product 7 Never disassemble this product by yourself take the unit to a qualified service center whenever s...

Page 6: ...ination of Proximity PIN and Biometric may be used and different verification levels can be customer programmed for each user or user group 3 Features 125KHz Proximity PIN and Fingerprint Recognition...

Page 7: ...Flash Memory Fingerprint User 1 000 2 000 4 000 Fingerprint Users Fingerprint Template Size 800 Bytes for 2 Fingerprint Templates Read Range Passive Type IDK50 IMC125 Up to 2 inch 5cm IDC80 IDC170 Up...

Page 8: ...umidity Non Condensing Color Material Dark Pearl Gray Polycarbonate Dimension W x H x T 161 5mm x 134mm x 48 5mm 6 36 x 5 28 x 1 9 Weight 547g 1 21lbs Certification MIC Fingerprint Module Specificatio...

Page 9: ...failure Keypad Registration The built in keypad and the LCD screen let you perform manual programming without a PC connected Dual Finger Mode Dual Finger Mode is a function that lets a user register...

Page 10: ...ly 6 2 Product Explanation 6 2 1 Panel Description Front View LCD Display LCD displays FINGER006 s status 3 LED Indicators showing system status The red LED turns on with power supply The green LED tu...

Page 11: ...will turn on But in the collision status 2 LED red will turn on Figure The Communication Display LED in the Rear View 6 2 2 Color Coded Wiring Table I O PORT NAME SIGNAL NAME COLOR CODED POWER CON7 M...

Page 12: ...White TTL Output2 TTL2 D1 Brown with White Stripe OK Signal Out OK Out Not Use Green with Red Stripe Error Signal Out Error Out Not Use Blue with Red Stripe Tamper Switch Out Tamper Switch Out Not Use...

Page 13: ...d with common hand tools and readily available communications wires This section provides information about wiring wire runs and other information to make the installation quick and easy 7 1 Check Poi...

Page 14: ...shielded 300m Belden 9514 22 AWG 8 conductor shielded Door Lock Alarm Device Lock Alarm Controller Belden 9409 18AWG 2 conductor unshielded 300m RS232 Cable Belden 9829 24 AWG 2 twisted pair shielded...

Page 15: ...ter the leading edge of a bit Since the data bit is captured in the middle of the bit which is approximately 52us after the leading edge of a bit The reflection stabilizing time 18 6us is much before...

Page 16: ...re when the voltage level of both ends of shield wire is not equal and this current flow will create noise and interfere to communications For the good grounding we recommend to connecting ONLY one en...

Page 17: ...Wall Mount as indicated then run the cable from the main unit through the center hole and snap in place the main unit to Wall Mount Make sure that the main unit is secure locked in place with Wall Mo...

Page 18: ...switch in the back of the FINGER006 unit If you want hardware initialization press key 1 otherwise press key 0 1 Press the key 1 if you wish to initialize the FINGER006 2 Initialization is progressing...

Page 19: ...the controller to OK Signal In wire Green Connect Tamper input wire of the controller to Tamper Switch Out wire Yellow with White stripe External Reader Connection Wiegand Input Connect Data 0 wire of...

Page 20: ...FINGER006 to RS422 TX port of the converter Plug in the RS232 9pin connector of the converter to the COM1 or COM2 Port of the PC Install and run the FINGER006 Application Software Figure RS422 Communi...

Page 21: ...S232 9pin connector of the converter to the COM1 or COM2 port of the PC Install and run FINGER006 Application Software Figure RS422 Communication between FINGER006s and the Host PC 9 3 TCP IP Converte...

Page 22: ...the Setup Menu For a setup or FINGER006 setting adjustment you have to enter the SETUP MENU first To do so press the 0 key 8 times for Master ID Default 00000000 and the user can get into the SETUP ME...

Page 23: ...events and User can t change Maximum Number of Cardholder IDs because FINGER006 doesn t have the controller inside 10 5 Registering Cardholder IDs To add new cardholder IDs to the FINGER006 enter the...

Page 24: ...EEN LED on Exit Button To make a request for exiting from inside an Exit Button Or External Reader can be used The Door Relay1 will open for 3 seconds Defaults with the on Alarms Unregistered Password...

Page 25: ...to other SETUP MENUs by pressing F1 key for SETUP MENU F1 F2 key for SETUP MENU F2 F3 key for SETUP MENU F3 and F4 key for SETUP MENU F4 There are several SUB MENUs for each main SETUP MENU and you ca...

Page 26: ...26 12 1 SETUP MENU F1...

Page 27: ...lication software It is also important to make sure each device on a loop has a unique address To change the communication address of the FINGER006 press ENT enter the desired 3 Digit address in the 0...

Page 28: ...s can access the door by presenting their card or entering their ID number and then verifying their identity by both a fingerprint and a password You can decide which combination of RF card fingerprin...

Page 29: ...wish to use master fingerprint in which case you will be asked to place your fingerprint on the scanner twice in the next step When the Master ID card registration is successfully completed the LCD d...

Page 30: ...ENT and then press 1 to confirm If you wish to cancel and exit press 0 instead 8 CARD ID CLEAR 8 CARD ID CLEAR 1 YES 0 NO Event clear allows you to delete all the event data from the FINGER006 CAUTIO...

Page 31: ...31 12 2 SETUP MENU F2...

Page 32: ...when Buzzer Output is defined in In Output Define 4 LED_BUZZER_CON GL03 YL03 BZ01 This function controls the LED and Buzzer of the reader GL Green LED controls the card reading status YL Yellow LED co...

Page 33: ...d by default Caution If you choose Disable you cannot gain access via password input when using RF PW mode You can change the Output Mode when you press function keys 4BIT Burst 4bit burst will be out...

Page 34: ...mart cards To do so you must change the Data BYTE setting to 2BYTE To change the setting press ENT and press 4 or 6 to select 4BYTE or 2BYTE and press ENT to confirm Range of Card Number FINGER006SR O...

Page 35: ...he FINGER006 or enter the card number ID via the keypad and press ENT NOTE A Card Number ID can be 4 to 8Digits long For the FINGER006SR it can be 4 to 10Digits long For more information about the Car...

Page 36: ...layed on the LCD Description of Fields z PW Password Enter the 4Digit password Password verification can be enabled in 12 1 4 Reader1 Mode This field is compulsory even if you do not use password veri...

Page 37: ...rd on the list Press 4 or 6 to view the information of the previous or next card The FIRST ID or LAST ID message will appear if you are viewing the first or last ID If there is no card data the LCD wi...

Page 38: ...38 12 4 SETUP MENU F4...

Page 39: ...39...

Page 40: ...to test the memory of the FINGER006 To begin the test press ENT If the test is successful the LCD will display the TEST PASSED message Press any key to finish the test If the test is unsuccessful the...

Page 41: ...y to exit OUTPUT 1 OFF PRESS ANY KEY 4 LCD TEST LCD Test allows you to test the LCD of the FINGER006 To begin the test press ENT Once the test begins the LCD will display a series of different screens...

Page 42: ...ck the status of Input Ports and DIP switches Communication Address Setting Switches To begin the test press ESC 1 DIP Switch 1 ON 2 OFF It shows how the DIP switch on the back of the FINGER006 is set...

Page 43: ...d try again after powering the FINGER006 off and back on TEST PASSED PRESS ANY KEY 9 IDENTIFICATION Identification Mode is a feature that allows users to use just fingerprint verification without havi...

Page 44: ...or wet the FINGER006 will adjust the fingerprint images according to the environment to improve the authentication rate To change the setting press ENT and press 4 or 6 to select NORMAL DRY or WET an...

Page 45: ...ingerprints are registered in your FINGER006 and how many can be registered in total Depending on the specification of the fingerprint module in use the total fingerprint capacity can be 1000 2000 or...

Page 46: ...BURST 7 Output Type NOMAL MODE 8 LCD Display STATUS 19 DEVICE INFO FIM2030 HD Device Info shows you the model name of the fingerprint module on your FINGER006 18 FP TEST FP Test allows you to test the...

Page 47: ...ant to Part 15 of the FCC Rules These limits are designed to this equipment generates uses and can radiate radio frequency energy and if not installed and used in accordance with the instructions may...

Page 48: ...AR PURPOSE IDTECK does not and cannot know who is present what property is located where this product will be used it would be extremely difficult to determine the actual damages that may result from...

Page 49: ...49 16 Template...

Page 50: ...t along with the RAM Code and send it to IDTECK RMA Center Product without RMA Code is not accepted If you have any questions or problems regarding the RMA services please contact us using the followi...

Page 51: ...HE60 The specifications contained in this manual are subject to change without notice at any time 5F Ace Techno Tower B D 684 1 Deungchon Dong Gangseo Gu Seoul 157 030 Korea Tel 82 2 2659 0055 Fax 82...

Reviews: