background image


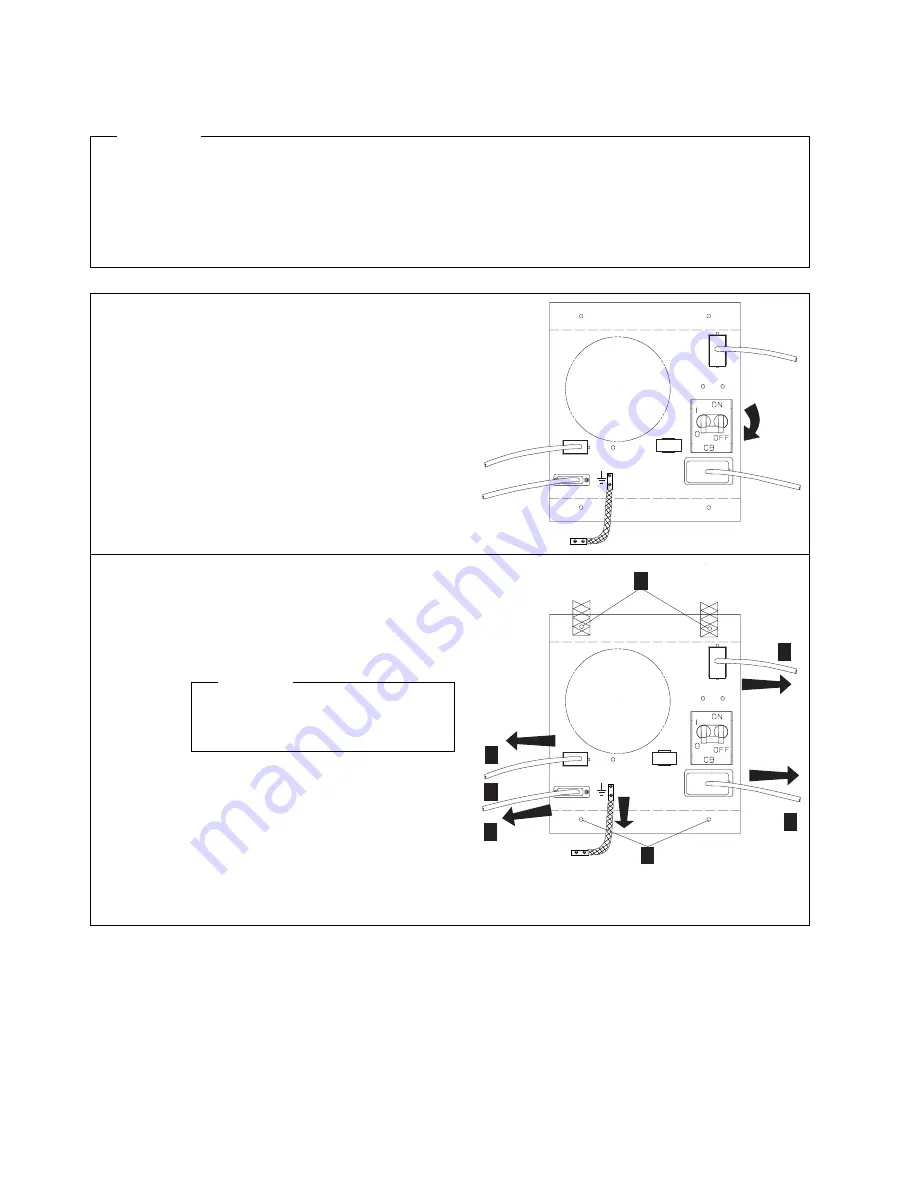
Exchange an ACDC

  Important 

The ACDC exchange procedure is documented with the illustrations of ACDC type B, but the
procedure is identical for ACDC types A and B.

The differences between ACDC types A and B are shown in “Identify the ACDC Power Type” on
page  6-19.

1

Ÿ

Locate the ACDC that you have to
exchange using “2220 Front View in 37 U
Rack” on page 6-15.

Ÿ

At the rear of the machine, on the ACDC
that you want to exchange, switch the
main CB OFF.

J3

J4

J2

J5

MOV

2

Ÿ

Remove the cables in the following order:

1. AC cable from AC plug 

.A/

2. DC cable from the J2 connector 

.B/

(remove the cable retention bracket on
the J2 connector) 

  Warning 

Energy transfer hazard may be
present on the connector pins.

3. Signal cable from the J4 connector 

.C/

4. Control panel cable from the J3

connector 

.D/

Ÿ

Disconnect the earth strap 

.E/

 from the

ACDC.

Ÿ

Remove the four screws 

.F/

 that secure

the ACDC, and connect the earth straps.

J3

MOV

J4

J2

J5

D

C

B

A

F

F

E

6-22

2220 Models 300, 500, and 501: Service Guide 


Summary of Contents for 2220 Nways 300

Page 1: ...2220 Nways BroadBand Switch Models 300 500 and 501 IBM Service Guide SY33 2121 01...

Page 2: ......

Page 3: ...2220 Nways BroadBand Switch Models 300 500 and 501 IBM Service Guide SY33 2121 01...

Page 4: ...ack of this publication If the form has been removed address your comments to IBM France Centre d Etudes et Recherches Service 0798 BP 79 06610 La Gaude France FAX 33 4 93 24 77 97 IBM Internal Use LG...

Page 5: ...f this Manual xlix Who Should Read this Manual xlix How this Manual is Organized xlix Chapter 1 START Finding a Service Procedure 1 1 Service Operation via Nways Switch Administration Station 1 2 Chap...

Page 6: ...g System Components in the 2220 6 9 Format of Location Identifier 6 9 Module Connector Positions 6 10 2220 Model 300 500 501 in 37 U Rack Example 6 11 2220 Model 300 500 501 in 29 U Rack Example 6 12...

Page 7: ...ower Consumption C 1 2220 Power Limits C 1 2220 Base Machine and Modules Power Consumption C 1 Appendix D Parts Catalog D 1 How to Use This Parts Catalog D 2 Part Listing Glossary D 3 2220 Visual Inde...

Page 8: ...Related Publications X 1 World Wide Web X 1 Glossary X 3 Index X 13 vi 2220 Models 300 500 and 501 Service Guide...

Page 9: ...on Battery xliii 0 25 Power Label PN 57G7919 and PN 57G7976 xliv 0 26 Board Labels PN 57G7920 xliv 0 27 Other Labels xlv 0 28 Labels Used for Europe Taiwan and Brazil PN 57G7959 xlv 0 29 Labels Used f...

Page 10: ...6 6 Side Cover Removing for 29 U rack 6 8 6 7 2220 Component Location in 37 U Rack 6 11 6 8 2220 Component Location in 29 U Rack 6 12 6 9 2220 Identification in 37 U Rack 6 13 6 10 2220 Identificatio...

Page 11: ...ble Diagnostics 4 1 6 1 FRU Exchange 6 4 6 2 Examples of Location for the 2220 Models 300 500 and 501 6 14 C 1 Maximum total consumption allowed C 1 C 2 Base Machine and Module Power Consumption C 1 C...

Page 12: ...x 2220 Models 300 500 and 501 Service Guide...

Page 13: ...y rights may be used instead of the IBM product program or service Evaluation and verification of operation in conjunction with other products except those expressly designated by IBM is the user s re...

Page 14: ...the equipment is operated in a commercial environment This equipment generates uses and can radiate radio frequency energy and if not installed and used in accordance with the instruction manual may c...

Page 15: ...In a domestic environment this product may cause radio interference in which case the user will be required to take adequate measures Safety Notices for United Kingdom 1 The IBM 2220 Nways BroadBand...

Page 16: ...in its facilities equipment operations or procedures that could affect the operation of the equipment If this happens the telephone company will provide advance notice in order for you to make the ne...

Page 17: ...the appropriate Terminal Equipment Technical Requirements document s The Department does not guarantee the equipement will operate to the user s satisfaction Before installing this equipment users sh...

Page 18: ...standard connecting arrangement code for this equipment is Connector type 15 position or 8 position miniature Connector model CA81A or CA48C Cable length 30 m 98 ft maximum Load number Not applicable...

Page 19: ...afety Procedures Service Inspection Safety Procedures English xviii Sicherheits berpr fungen Deutsch xxv xxiv Safety and Disposal Instructions for Batteries When disposing of the batteries follow proc...

Page 20: ...ower voltage 6 Power ON indicators 7 Emergency power OFF of the board 8 Cooling Steps 1 through 8 must be performed Power OFF as follows Main CBs switched OFF on the 2220 All the equipment installed i...

Page 21: ...Grounding System Electrical continuity is assured between their frame ground and premises grounding system through their power cords For the 2220 300 and the 2220 500 an additional ground wire A is al...

Page 22: ...Between 2220 500and 2220 501 Notes a B Wire PN 80G3715 b Screws PN 43G3084 c Star washers PN 1622348 3 ac dc Power Cable Ground Wire Check the mainline ac dc power cable for damaged or burned pins an...

Page 23: ...ternal Grounding in the 2220 Check that Electrical continuity is assured within each rack between the rack ground and the installed power supplies via ground straps 1 Figure 0 4 2220 Ground Straps For...

Page 24: ...assured between the LCB housing and the premises grounding system There are two ways to insure a proper grounding of the LCB according to where it is installed 1 Grounding is insured by the four scre...

Page 25: ...en the metal housings of plugs connectors receptacles and so on and any grounded point in the building This can be any grounded metal structure such as the stanchions of a raised floor if they are ele...

Page 26: ...n the control panel Once the 2220 is powered ON using the following table check the status of each element Element Status Control Panel The green LED s POWER SUPPLY 1 and 2 on the 2220control panel ar...

Page 27: ...ung F r die Behebung von Sicherheitsm ngeln ist der Besitzer des Ger ts verantwortlich Folgende Bereiche und Funktionen des 2220 werden im folgenden gepr ft 1 u ere Abdeckungen 2 Sicherheitsaufkleber...

Page 28: ...iv angegeben ist F r die Pr fung der Aufkleber am ACDC Eingang Gleichstrom Wechselstrom und oder DC48 Eingang 48Volt Gleichstrom und an der Batterie sofern vorhanden m ssen Sie diese Funktionseinheite...

Page 29: ...egebenenfalls auch oben am Rahmen des 2220 Modell 300 500 installiert sein A Schutzleiter an Erdungssystem des Geb udes Zahnscheiben Schrauben M6 A Detail Kabelanschu Figure 0 10 Schutzleiter A am 222...

Page 30: ...iter B zwischen 2220 500 und 2220 501 Notes a Kabel B Teilenummer 80G3715 b Schrauben Teilenummer 43G3084 c Zahnscheiben Teilenummer 1622348 3 Schutzleiter des Netzkabels Hauptnetzkabel aller Ger te a...

Page 31: ...und dem Schutzleiterkontakt gew hrleistet ist der elektrische Durchgang zwischen dem Geh useschutzleiteranschlu und dem Verteilerkasten sofern vorhanden gew hrleistet ist Dieser Schritt mu vor dem Ans...

Page 32: ...mit dem Erdungssystem des Geb udes verbindet wenn der Verteilerkasten in einem Geh use installiert ist dessen Rahmen nicht mit dem Erdungssystem des Geb udes verbunden ist Unteransicht an Erdungssyst...

Page 33: ...n einem lackierten Metallteil sicherstellen da die Pr fspitze die Farbe durchbohrt 2 Auch Metallgeh use der anzuschlie enden Kabel berpr fen 4 Sicherungsautomat und berstromschutzschalter Jeder Energi...

Page 34: ...220 zwei Energieversorgungsbl cke installiert sind Die gr ne LED APC blinkt w hrend des Selbsttests beim Einschalten und LEUCHTET dann dauerhaft Die gelben LEDs VENTILATOR und ALARM LEUCHTEN NICHT ACD...

Page 35: ...General and Product Safety xxxiii...

Page 36: ...xxxiv 2220 Models 300 500 and 501 Service Guide...

Page 37: ...General and Product Safety xxxv...

Page 38: ...xxxvi 2220 Models 300 500 and 501 Service Guide...

Page 39: ...General and Product Safety xxxvii...

Page 40: ...xxxviii 2220 Models 300 500 and 501 Service Guide...

Page 41: ...General and Product Safety xxxix...

Page 42: ...ated by letters A particular wording corresponds to each letter see Safety Label Identifications on page xliv A Figure 0 19 Safety Labels on Internal Front Cover C B Figure 0 20 Safety Labels on Inter...

Page 43: ...D Figure 0 21 Safety Labels on Internal Front Board Cover R Figure 0 22 Safety Labels on Rear of the 2220 Rack General and Product Safety xli...

Page 44: ...S Figure 0 23 Safety Label on LCB G J J3 J4 J2 J5 Safety Labels on DC48 Power Old Model J N J3 J4 J2 J5 Safety Labels on DC48 Power New Model xlii 2220 Models 300 500 and 501 Service Guide...

Page 45: ...H K H K G J3 J4 J5 P Safety Labels on ACDC Power Old Model M1 M2 J3 J4 J2 J5 MOV Safety Labels on ACDC Power New Model E L Figure 0 24 Safety Labels on Battery General and Product Safety xliii...

Page 46: ...nd PN 57G7976 Note Depending on the machine configuration you may have one or two power supplies installed Based on that one or two power cords may be present Only a part of this label is shown This l...

Page 47: ...ICHERHEITS KLEINSPANNUNG ANSCHLIESSEN ALIMENTATION TRES BASSE TENSION DE SECURITE SEULEMENT 200 8 50 240 V 6 3A 60 Hz LABEL P Figure 0 27 Other Labels SEALED LEAD ACID BATTERY BATTERY MUST BE RECYCLED...

Page 48: ...V 43A MAXIMUM NRTL C LEVEL 5 MagneTek S p A MADE IN ITALY R LABEL N Figure 0 30 Power Rating Label for DC48 LABEL M1 and M2 LR 56325 1 0 OK OK HP2600 Vdc CODE 3547 99 100 INPUT 200 240 V 50 60Hz 9 1 A...

Page 49: ...necting power supplies and making network connections LABEL R Figure 0 32 Label for 2220 Rack PN 80G3929 HIGH LEAKAGE CURRENT Permanent ground connection is mandatory before network connections LABEL...

Page 50: ...xlviii 2220 Models 300 500 and 501 Service Guide...

Page 51: ...CE is also expected to refer to the manual when required to perform the same tasks as the PT CE How this Manual is Organized This manual is organized as follows Safety information is at the beginning...

Page 52: ...Part number index Appendix X Gives Bibliography Glossary Index l 2220 Models 300 500 and 501 Service Guide...

Page 53: ...ys Switch administration service guide Run diagnostics on the 2220 or Service Operation via Nways Switch Administration Station on page 1 2 2220 Service operation via the Nways Switch administration s...

Page 54: ...y the CMIP Status on page 3 8 Display the Alarm Desk How to Display the Alarm Desk on page 3 11 Run diagnostics on the 2220 Chapter 4 2220 Diagnostics on page 4 1 Run diagnostics on the Nways Switch a...

Page 55: ...tch Configuration Tool Centralized Configuration Database Customer Remote Console via Modem or Ethernet LAN Nways Switch Adminstration Station To IBM Network Support Center Via Modem Broadband Network...

Page 56: ...2220 Models This manual covers the following 2220 models 2220 Model 300 low end unit 2220 Model 500 base unit 2220 Model 501 expansion to 2220 Model 500 2 2 2220 Models 300 500 and 501 Service Guide...

Page 57: ...Each LED is ON when the associated power supply is ON APC This green LED is ON when the alarm and power control APC module inside the 2220is running error free It is blinking during the power on self...

Page 58: ...2 4 2220 Models 300 500 and 501 Service Guide...

Page 59: ...resource and the right button displays the associated menu Figure 3 1 Nways Switch Desktop Display 3 For detail refer to the Nways Switch Administration Station Windows Overview on page 3 5 How to Lo...

Page 60: ...Logon Remote NAS window is displayed 3 Enter the requested information then click on Logon 4 The following windows are displayed Click on OK on each of them 3 2 2220 Models 300 500 and 501 Service Gu...

Page 61: ...rol window of the remote NAS is displayed 5 In the Nways Switch Resource Control window click on View then on View Expanded Tree View 6 Wait until all icons are displayed Chapter 3 Nways Switch Admini...

Page 62: ...Figure 3 2 Example of Expanded Tree 7 Perform the desired action on the window 3 4 2220 Models 300 500 and 501 Service Guide...

Page 63: ...1 Double click on the Nways Switch Services icon 2 In the Nways Switch Services window double click on the Nways Switch Resource Control Local icon 3 Click on OK in the Product Information window 4 I...

Page 64: ...g the right key on the mouse click on the icon of the resource that you want to select then using the left button on the mouse click again on the resource to display a popup window with all options av...

Page 65: ...Figure 3 4 Example of Options Available for a Selected Resource Figure 3 5 Example of Options Available for a Switch Chapter 3 Nways Switch Administration Station Functions 3 7...

Page 66: ...window is displayed 1 Double click on the Nways Switch Services icon 2 In the Nways Switch Services window double click on the Nways Switch Resource Control Local icon 3 In the Nways Switch Resource...

Page 67: ...Node Resources window using the right key on the mouse click on the icon of the resource that you want to select A popup window with all options available for the resource is displayed Chapter 3 Nways...

Page 68: ...6 Click on the Open the on the Status option The Display CMIP Status window is displayed with the current status highlighted 3 10 2220 Models 300 500 and 501 Service Guide...

Page 69: ...yed 1 Double click on the Nways Switch Services icon 2 In the Nways Switch Services window double click on the Nways Switch Alarm Desk icon The Alarm Desk window is displayed 3 By clicking on the Sear...

Page 70: ...Figure 3 7 Search Options in the Alarm Desk Window 3 12 2220 Models 300 500 and 501 Service Guide...

Page 71: ...is displayed 1 In the Nways Switch Desktop window double click on the Nways Switch Configuration icon 2 Double click on the Nways Switch Configuration Tool icon 3 A Nways Switch Configuration Tools w...

Page 72: ...icon According to the icon selected you have different window displayed For example if you click on the Rack A the following window is displayed 6 If you double click on the LIC511 the following windo...

Page 73: ...he LCB 1 Expansion icon the following window is displayed 8 Double click on the 29 line icon The following window is displayed showing the line configuration Chapter 3 Nways Switch Administration Stat...

Page 74: ...9 From the rack configuration window you also can select an adapter 3 16 2220 Models 300 500 and 501 Service Guide...

Page 75: ...10 Double click on a adapter icon the following window is displayed showing the adapter configuration Chapter 3 Nways Switch Administration Station Functions 3 17...

Page 76: ...window is displayed 1 Click on the Nways Switch Services icon 2 In the Nways Switch Services window click on the Nways Switch Resource Control Local icon 3 In the Nways Switch Resource Control window...

Page 77: ...Chapter 3 Nways Switch Administration Station Functions 3 19...

Page 78: ...Switch Installation icon Figure 3 8 Nways Switch Desktop Window 2 Double click on the Nways Switch Installation Program icon Figure 3 9 Nways Swith Installation Window 3 Select option 5 and press Ente...

Page 79: ...Figure 3 11 Example of TCP IP address Chapter 3 Nways Switch Administration Station Functions 3 21...

Page 80: ...leted the following window is displayed 1 Double click on the Nways Switch Services icon 2 In the Nways Switch Services window double click on the Nways Switch Control Program Inventory icon 3 A Nways...

Page 81: ...Figure 3 12 Example of Nways Switch Control Program Software Inventory Chapter 3 Nways Switch Administration Station Functions 3 23...

Page 82: ...tion is powered ON and initialized the Nways Switch Desktop window is displayed 1 Click on the Nways Switch Services icon 2 In the Nways Switch Services window click on the Nways Switch Resource Contr...

Page 83: ...with the following message 6 Click on Yes 7 A new window is displayed Click on OK Remove the cable If you re install a new cable using the same procedure do not forget to unlock the line Chapter 3 Nw...

Page 84: ...s Switch administration station is powered ON and initialized the Nways Switch Desktop window is displayed 1 Click on the Nways Switch Services icon 2 In the Nways Switch Resource Control window using...

Page 85: ...age 4 2 Go to How to Run the Switch to Line Interface Test on page 4 10 Line or Trunk Line Interface Test See Line Interface Test on page 4 4 Go to How to Run the Line Interface Test on page 4 12 Line...

Page 86: ...1 Area Tested by Switch to Line Interface Test Note If the lines are attached through line connection boxes LCBs and active remote connectors ARCs tests are also performed on the LCBs and top ARCs see...

Page 87: ...smit Line Receive LS Figure 4 3 Area tested by Switch to Line Interface Test with a Wrap Plug Local Node Switch Adapter LIC LCB ARC LS Figure 4 4 Area tested by Switch to Line Interface Test with a Wr...

Page 88: ...cted Local Node Switch Adapter LIC LS Figure 4 5 Area Test by the Line Interface Test Local Node Switch Adapter LIC LCB ARC LS Figure 4 6 Area Tested by the Line Interface Test on LIC511 Attention The...

Page 89: ...LIC Wrap Plug Line Transmit Line Receive LS Figure 4 7 Area Tested by the Line Wrap Plug Test Local Node Switch Adapter LIC LCB ARC Wrap Plug Line Transmit Line Receive LS Figure 4 8 Area Tested by t...

Page 90: ...e and stops its traffic Howewer it it is not disruptive on other lines of the LIC if any 2220 Trunk Loopback Test This test sends on a trunk predefined sequences of data These data are looped back and...

Page 91: ...r LIC Switch Adapter LIC Remote Node LIC Adapter Switch Loop for Trunk Loopback Remote Node LIC Adapter Switch Loop for Line Loopback LS LS Figure 4 11 Loop Trunk and Loop Line on Remote 2220 Attentio...

Page 92: ...e mouse click on the rack resource icon that you want to test Then using the right or top button on the mouse click again on the resource 2 A popup window is displayed Click on the Start test option 3...

Page 93: ...showing The resource selected The status of the test proceeding failed or complete The Loop count The diagnostic stops at the end of the cycle count or in case of error 8 Wait for the status Complete...

Page 94: ...the adapter resource icon that you want to test Then using the right or top button on the mouse click again on the resource 2 A popup window is displayed Click on the Start test option 3 A Test selec...

Page 95: ...Yes when that has been done 8 Click on Yes 9 The Test Event Desk window is displayed showing The resource selected The test selected The status of the test Proceeding failed or complete The Loop coun...

Page 96: ...sing the left or bottom button on the mouse click on the line resource icon that you want to test Then using the right or top button on the mouse click again on the resource 2 A popup window is displa...

Page 97: ...e right or top button on the mouse click again on the resource 7 A popup window is displayed Click on the Start test option 8 A Test selection window is displayed with the diagnostics available accord...

Page 98: ...d or complete The Loop count The diagnostic stops at the end of the cycle count or in case of error 11 12 Wait for the status Complete If there is any error call the Network Support Center to inform t...

Page 99: ...Depending of the link tested the content of the windows displayed may be different on your screen 1 Identify the Front end node Node name IP address IPR address Get the PSN number for the front end no...

Page 100: ...age is displayed then the Logon Remote NAS window is displayed d Enter the request information then click on Logon e The following windows are displayed Click on OK on each of them 4 16 2220 Models 30...

Page 101: ...nd Expand Tree View b In the Nways Switch Resource Control window using the left or bottom button on the mouse click on the line resource icon that you want to put in loop for test Then using the righ...

Page 102: ...rce Control window using the right or top button on the mouse click again on the resource g A popup window is displayed click on the Start Test option h A Test Selection window is displayed with the d...

Page 103: ...t for the status complete if there is any error call the Network Support Center to inform them and follow their instruction Otherwise continue with Step 4 4 Start the test on the local NAS a In the Nw...

Page 104: ...ndow is displayed e Click on OK f In the Nways Switch Resource Control window using the right or top button on the mouse click again on the resource g A popup window is displayed Click on the Start Te...

Page 105: ...election window is displayed with the diagnostics available according to the line selected i Select the Line Loopback Test then click on Start The following warning is displayed Chapter 4 2220 Diagnos...

Page 106: ...d follow their instructions 6 Otherwise on the remote NAS unlock the line and close the remote FEUI session using the following procedure a In the remote Nways Switch Resource Control window using the...

Page 107: ...ocal NAS unlock the line using the following procedure a In the local Nways Switch Resource Control window using the left or bottom button on the mouse click on the line resource icon that you want to...

Page 108: ...4 24 2220 Models 300 500 and 501 Service Guide...

Page 109: ...battery through a long period of 24 hours 1 In the Nways Switch Resource Control window using the right or top button on the mouse click on the power resource icon where is located the battery that yo...

Page 110: ...its color from green to yellow The power resource icon stays yellow until test termination about 24 hours Note During this test the ACDC power is operational except the battery At the end of the test...

Page 111: ...Chapter 5 2220 Problem Determination Copyright IBM Corp 1998 1999 5 1...

Page 112: ...ON The APC LED is blinking during power on self test POST then it comes permanently ON ALARM LED OFF The ALARM LED should be OFF otherwise you have a solid error in the 2220 Is the status of the contr...

Page 113: ...rly connected to the J3 and J4 connectors respectively Is everything correct Yes No 006 Are all CPs ON Yes No 007 Go to Step 032 on page 5 7 008 Correct the problem and restart the verification proced...

Page 114: ...GOOD LED is ON Suspect LEDs on the control panel A connection problem between the DC48 and the control panel Refer to Appendix A Schematics on page A 1 Power ON STANDBY switch DC48 power The DC HDW G...

Page 115: ...orm them and follow their instructions 014 Restart the verification procedure Go to Step 001 on page 5 2 015 Is the APC LED blinking Yes No 016 Suspect an APC problem 017 On the control panel of the m...

Page 116: ...supply Are all CPs ON Yes No 026 Set On the CP s tripped Restart the verification procedure Go to Step 001 on page 5 2 027 A solid 2220 error has been detected Remove the external covers if not alredy...

Page 117: ...DC HDW GOOD LED ON Yes No 033 Switch OFF the main CB of the power supply Set ON the CP tripped Switch ON the main CB of the power supply Is the DC HDW GOOD LED ON Yes No 034 You have a power supply pr...

Page 118: ...5 8 2220 Models 300 500 and 501 Service Guide...

Page 119: ...or type A and type B units The differences between type A and type B units are shown in the following sections Identify the ACDC Power Type on page 6 19 Identify the DC48 Power Type on page 6 20 Ident...

Page 120: ...1 and 2 CP5 CP4 CP3 CP2 CP1 CP6 ACDC PI1 DCD1 Battery CB TPA and LIC Positions 1 and 2 TPA and LIC Positions 3 and 4 TPA and LIC Positions 5 and 6 TPA and LIC Positions 7 Clock 1 CP 1 and SW 1 TPA and...

Page 121: ...ange Yes No 006 Check that the location that is power controlled by the CP tripped is empty Is the location empty Yes No 007 Go to Step 010 008 Go to Step 020 on page 6 4 009 Go to Step 015 on page 6...

Page 122: ...cedure on page 6 75 020 In the following table find the FRU you want to exchange and go to the procedure indicated Table 6 1 Page 1 of 2 FRU Exchange Select FRU FRU Name Go to ACDC AC to DC power inpu...

Page 123: ...LCPB line connection power base Exchange an LCPB on page 6 60 LCPE line connection power expansion Exchange an LCPE on page 6 62 LICxxx LIC type xxx Exchange a LIC on page 6 64 LSAx low speed TPA Exc...

Page 124: ...Rack To open the front and rear doors see Figure 6 4 detail B to remove the side covers see detail A Rear 1 1 2 2 1 1 1 2 2 2 3 Detail A Detail B Figure 6 4 Front Rear Door And Side Cover Latches for...

Page 125: ...o open the front and rear doors use an Allen wrench see Figure 6 5 To remove the side covers loose the four screws inside the 29 U rack see Figure 6 6 on page 6 8 Allen Wrench Figure 6 5 Front and Rea...

Page 126: ...3 2 1 1 Figure 6 6 Side Cover Removing for 29 U rack 6 8 2220 Models 300 500 and 501 Service Guide...

Page 127: ...cal locations Examples 2220 500 front logic subrack A F 06 2220 501 rear logic subrack B R 06 Horizontal location HH For modules 1 to 12 label already existing For power supplies and fans number 1 or...

Page 128: ...A ATMX APC CLK CLKRD SW06 SW16 SWRD VSE1 VSE2 LIC511 LIC512 LIC513 LIC523 LIC514 LIC516 LIC517 LIC515 LIC522 LIC544 LIC546 LIC545 LIC551 LIC552 LIC554 LIC555 LIC556 LIC530 LIC563 LIC567 LIC562 6 10 22...

Page 129: ...ation Service Drawer Ctrl Panel Fan Box 2 Fan Box 1 Logic Power Input 2 Power Input 1 Nways Switch Administration Station Service Drawer Fan Box 1 Fan Box 2 Logic Power Input 1 Power Input 2 Front Vie...

Page 130: ...ministration Station Node Administration Station Modem Modem Service drawer Service drawer A L O G I C L O G I C Power input 2 Power input 1 Fan box 2 Fan box 1 Fan box 1 Fan box 2 Power input 1 Power...

Page 131: ...his model are missing The rack identification is B A F 25 A F 22 A F 19 01 A F 19 02 A F 07 A F 01 01 A F 01 02 A R 07 A R 01 02 A R 01 01 Front View Rear View 1 1 7 7 22 22 25 25 29 29 37 37 A A F 29...

Page 132: ...ear View Figure 6 10 2220 Identification in 29 U Rack Table 6 2 Examples of Location for the 2220 Models 300 500 and 501 Component Location RR S UU HH JJJ Power input 1 A F 01 02 Fan box 2 A F 19 01 T...

Page 133: ...AS Display Service Drawer Control Panel FAN 1 CPA Clock Module Optional Power Input 1 FAN 2 TPAS up to 8 Power Input 2 Figure 6 11 2220 Front View Location with NAS Type 7585 Installed in 37 U Rack Ch...

Page 134: ...BE LCBB Modem LICs up to 8 Office Clock Tailgate Optional Power Input 1 APC Tailgate DCD 2 DCD 1 APC Switches ARCs 5 6 4 3 2 1 Figure 6 12 2220 Rear View Location in 37 U Rack with NAS Type 7585 Insta...

Page 135: ...29 U Rack Power Input 2 Power Input 1 FAN 1 Service Drawer TPAs Up to 8 NAS FAN 2 CPA Clock Module Optional Figure 6 13 2220 Front View Location in 29 U Rack with NAS Type 6275 Installed Chapter 6 222...

Page 136: ...J10 J11 J3 Power Input 1 Power Input 2 Office Clock Tailgate Optional APC Tailgate DCD 2 DCD 1 APC Switches LICs Up to 8 Modem Figure 6 14 2220 Rear View Location in 29 U Rack with NAS type 6275 Insta...

Page 137: ...Identify the ACDC Power Type ON OFF ACDC Power Type A Front ACDC Power Type B Front J3 J4 J2 J5 J3 J4 J2 J5 MOV ACDC Power Type A Rear ACDC Power Type B Rear Chapter 6 2220 FRU Exchange 6 19...

Page 138: ...Identify the DC48 Power Type ON OFF DC48 Power Type A Front DC48 Power Type B Front J3 J4 J2 J5 J3 J4 J2 J5 DC48 Power Type A Rear DC48 Power Type B Rear 6 20 2220 Models 300 500 and 501 Service Guide...

Page 139: ...Identify the APC Type APC 1 2 3 4 5 6 APC 1 2 3 4 5 7 6 APC Type A APC Type B Figure 6 15 APC Type Identification Chapter 6 2220 FRU Exchange 6 21...

Page 140: ...the ACDC that you want to exchange switch the main CB OFF J3 J4 J2 J5 MOV 2 Remove the cables in the following order 1 AC cable from AC plug A 2 DC cable from the J2 connector B remove the cable reten...

Page 141: ...Pull out the ACDC G H J 4 Unpack the new ACDC Note Be sure that the new ACDC that you want to install has its CB in the OFF position If you are installing the new ACDC on IBM 2220 model 300 do not in...

Page 142: ...therwise continue the procedure to install the battery On the new battery glue one of the labels provided according to your country requirement LABEL L LABEL L OR Y Last Charge Date 7 Install the batt...

Page 143: ...ll the bracket J and secure it with the two screws previously removed H Secure the ACDC to the bracket with the two screws previously removed G G H J 11 If you are replacing an ACDC power type A with...

Page 144: ...1 The green LEDs AC GOOD and DC HDW GOOD are ON 2 The yellow LED BATTERY EXCHANGE REQUIRED can be ON or OFF Check that the corresponding green LED on the control panel is ON If not check the ACDC inst...

Page 145: ...re the APC cables Note To unscrew the screws of connectors in position 3 and 5 if Model 501 is connected on an APC module type B first disconnect the two coax cables from the T connector in position 4...

Page 146: ...installed on your APC module first install the cables in position 3 and 5 before connecting the coax cable onto the T connector in position 4 Check that the green LED APC on the control panel is ON a...

Page 147: ...e ARC Unplug the ARC cable from the ARC G 2 Loosen the two knobs A that secure the ARC into the LCB Remove the ARC from the LCB A 3 Exchange the ARC Insert the new ARC into the LCB and secure the ARC...

Page 148: ...neral and Product Safety on page xvii to select safety statements in your language Locate the ACDC on which you want to exchange the battery using 2220 Front View in 37 U Rack on page 6 15 At the rear...

Page 149: ...hs order a new battery otherwise continue the procedure to install the battery On the new battery glue one of the label provided according to your country requirement LABEL L LABEL L OR Y Last Charge...

Page 150: ...Secure the battery with the three screws previously removed B Connect the cable to the battery B 7 Reinstall and secure the grid using the four screws K K 6 32 2220 Models 300 500 and 501 Service Guid...

Page 151: ...rsists call the Network Support Center Otherwise continue with the next step Perform the power test refer to How to Test an ACDC Power and Battery on page 4 25 This test must reset the yellow LED BATT...

Page 152: ...edure contact the network operator and inform him her of your action and wait for his her agreement 1 Locate the areas of the machine using 2220 Rear View in 37 U Rack on page 6 16 At the rear of the...

Page 153: ...cables firmely while removing the cables from the connectors to avoid any effort which can damage the connectors Loosen the screws that secure the cables progressively and alternatively on top and bot...

Page 154: ...les at their original position Position the latches then slide the module into its location Secure the module by locking the latches then tighten the screws on the latches 8 At the rear of the machine...

Page 155: ...ch redrive module Maintain the cables firmely while installing the cables from the connectors to avoid any effort which can damage the connectors Carefully connect the cables Tighten the connector scr...

Page 156: ...he end of the POST Check that The ALARM LED is OFF The FAN BOX 1 and 2 LEDs are OFF The POWER SUPPLY 1 and 2 LEDs are ON if you have two power supplies installed If there is a problem check the board...

Page 157: ...2 Fan Box 2 Fan Box 1 Control Panel Power Input 2 Power Input 1 Figure 6 16 2220 Front View In the following table select your clock mode Clock Mode Action Simplex Go to Step 002 Duplex Go to Step 003...

Page 158: ...ick on the Deactivate option and wait for deactivation complete message then continue with Step 10 If the deactivation complete message does not appears continue with Step 10 10 Go to Exchange a Clock...

Page 159: ...hen continue with Step 8 If the message does not appear in less than one minute there is another problem with the Clock call the Network Support Center to inform them and follow their instructions 8 L...

Page 160: ...al clock device to the appropriate status device dependent 16 Check on the front of the Clock module that you have exchanged the status of the display The display should be in or state in less than 15...

Page 161: ...al Oscillator Office Clock 2 Loosen the screws on the latches Unlock the latches as shown then remove the module from its location 3 Insert the new clock module in the machine Position the latches the...

Page 162: ...Support Center Otherwise continue with the next bullet Return to the point in the prerequisite procedure where you came from Note The Appendix B Maintenance Aids on page B 1 can help you to describe y...

Page 163: ...k redrive module installed you are in simplex clock mode Two clock redrive modules installed you are in duplex clock mode 12 1 2 3 4 5 6 7 8 9 10 11 CLK RD 1 or 2 CLK RD 1 or 2 Fan Box 2 Fan Box 1 Con...

Page 164: ...option and wait for deactivation complete message then continue with the Step 6 If the deactivation complete message does not appears in less than one minute continue with the Step 6 6 Go to Exchange...

Page 165: ...nform the network operator ask him to check on Netview that the synchronization is complete synchronization can take up to 15 minutes 12 Go to Ending the Exchange Procedure on page 6 75 Chapter 6 2220...

Page 166: ...e Deactivate option and wait for the deactivation complete message then continue with the Step 6 If the deactivation complete message does not appear in les than one minute continue with the Step 6 6...

Page 167: ...with the Step 11 on page 6 49 No You have a problem Call the Network Support Center to inform them and follow their instruction 11 Go to Ending the Exchange Procedure on page 6 75 Chapter 6 2220 FRU E...

Page 168: ...he new clock redrive module in the machine Position the latches then slide the module into its location Secure the module by locking the latches then tighten the screws on the latches Check that the g...

Page 169: ...n the DC48 that you want to exchange switch the main CB OFF J5 J4 J2 J3 2 At the rear of the machine remove the cables in the following order 1 DC cable from DC plug A 2 DC cable from the J2 connector...

Page 170: ...t the rear of the machine secure the DC48 and connect the earth straps using the four screws previously removed F Connect the earth strap to the DC48 E Connect the cables previously removed in the fol...

Page 171: ...fective DCDx Switch the main CB OFF on the associated ACDC or DC48 power supply J3 J4 J2 J5 MOV J5 J4 J2 J3 ACDC DC48 3 Remove the DCDx cable from the associated power supply Connector J2 J2 4 Remove...

Page 172: ...he DCDx cable using the lower cable retainer previously removed Tighten the screws B to secure the lower cable retainer B Rear View Cable Retainer 10 Reinstall the cover and secure it using the screws...

Page 173: ...ered OFF after two minutes 1 Locate the fan box using 2220 Front View in 37 U Rack on page 6 15 Loosen the two nuts A that secure the fan box and remove the fan box Exchange the fan box Insert the new...

Page 174: ...onnection box expansion LCBE 2 Loosen the screws A that secure the ARCs to the LCEE Remove the ARCs and note their position in the LCEE A 3 Loosen the screws that secure the cable between the LCBE and...

Page 175: ...ved F Install the LCPE previously removed E Secure it using the four screws D Install the cover F E D 7 Plug the cable to the line connection expansion base and secure it C 8 Reinstall all ARCs in the...

Page 176: ...e connection box base LCBB 2 Loosen the screws A that secure the ARCs in LCEB and LCEE if present Remove the ARCs and note their positions in LCEB and LCEE A 3 If there is a line connection box expans...

Page 177: ...Secure it using the four screws D Install the cover F E D 7 Plug in the cable coming from the LIC and secure it with screws B If present plug in the cable coming from the line connection box expansio...

Page 178: ...Locate the line connection box base LCBB 2 Loosen the screws A that secure the ARCs in LCEB and LCEE if present Remove the ARCs and note their positions in LCEB and LCEE A 3 If there is a line connect...

Page 179: ...h the LCPB Stick the new IBM logo on the new cover F E D 6 Plug in the cable coming from the LIC and secure it B If present plug in the cable coming from the line connection box expansion and secure i...

Page 180: ...them both at the same time 1 Locate the line connection box expansion LCBE 2 Loosen the screws A that secure the ARCs to the LCEE Remove the ARCs and note their position in the LCEE A 3 Loosen the scr...

Page 181: ...Install the new cover provided with the LCPE Stick the new IBM logo on the new cover F E D 6 Install the new cable between the LCPE and LCPB and secure it using the screws C 7 Reinstall all ARCs in th...

Page 182: ...r View in 37 U Rack on page 6 16 Using the label on the front of the LIC check that the LIC installed on the machine and the LIC that you want to exchange are the same type Loosen the screws if presen...

Page 183: ...dule into its location Secure the module by locking the latches then tighten the screws on the latches Check that the green LED of the LIC blinks If not check the LIC installation If the problem persi...

Page 184: ...ntrol panel card Install and secure the control panel card using the screws previously removed On the control panel card plug in the cable previously removed Check that The green POWER SUPPLY 1 and 2...

Page 185: ...tatus of the green and yellow LEDs on the module that you want to exchange 3 Use the following table to select your action LEDs Status Action The both LEDs are ON If you have only one switch or one Sw...

Page 186: ...he left or bottom mouse button 4 The CMIP Status window is displayed Is Providing Services status highlighted Yes Click on Close Continue with the Step 5 No Click on Close Continue with the Step 7 5 A...

Page 187: ...Step 2 Otherwise go to Step 3 2 Removing cables Important Cable connectors can be damaged when removing cables on switch or switch redrive module Maintain the cables firmely while removing the cables...

Page 188: ...f you have removed any cables Important Cable connectors can be damaged when installing cables on switch or switch redrive module Maintain the cables firmly while installing the cables from the connec...

Page 189: ...e the icon of the Switch module that have you exchanged or the associated Switch icon of the Switch redrive module that you have exchanged 2 On the Switch icon click on the left or bottom mouse button...

Page 190: ...are the same type Loosen the screws on the latches Unlock the latches as shown then remove the module from its location 2 Exchange the TPA module Insert the new TPA module into the machine Position t...

Page 191: ...nd the VSA that you want to exchange are the same type Loosen the screws on the latches Unlock the latches as shown then remove the module from its location 2 Exchange the VSA module Insert the new VS...

Page 192: ...VSE installed on the machine and the VSE that you want to exchange are the same type Loosen the screws on the latches Unlock the latches as shown then remove the module from its location 2 Exchange th...

Page 193: ...tch OFF the display of the NAS If you display is installed in the rack and similar to the following figure Figure 6 19 continue with the Step 3 Otherwise go to Step 7 3 Remove the front cover plate by...

Page 194: ...6 76 2220 Models 300 500 and 501 Service Guide...

Page 195: ...tant Two levels of schematics are available according to the level of your machine To select the appropriate schematics check the APC type APC 1 2 3 4 5 6 APC 1 2 3 4 5 7 6 APC Type A APC Type B Copyr...

Page 196: ...ogic J1 J1 J1 I O SW J1 J1 J2 J2 1 2 J3 J3 3 PI1 PI2 Subrack Power AC DC or DC48 AC DC or DC48 J4 J4 6 DCD1 APC Tailgate Clock Jumper Jumper Control Panel DCD2 Fan Box 2 Box Connector Box Connector Cl...

Page 197: ...APC SW B A B J1 1 J2 J2 J5 PI1 PI2 J5 TB1 DCD 1 DCD 2 TB1 Logic Subrack Power Subrack J1 1 1 48V CP5 CP1 CP4 CP2 CP3 CP3 CP2 CP4 CP1 CP5 CP6 CP6 INTER LOCK INTER LOCK Drawer Connector Drawer Connecto...

Page 198: ...OWER OFF BATTERY TEST AC GOOD DC HDW GOOD BAT EXH REQD BATTERY RUNNING INTERF DISABLE ACDC PRESENT RESET APC GOOD COOLING A STATUS COOLING B STATUS GND FAILURE POWER OFF BATTERY TEST AC GOOD DC HDW GO...

Page 199: ...0 21 22 23 24 25 FAN 2 TACH FAN 2 CTL 48V SENSE FAN1 TACH 48 RET SENSE DCD2 RETURN DCD1 RETURN 48 RET SENSE 48V1 SENSE 48V1 SENSE 48V2 SENSE 48V2 SENSE FAN1 TACH FAN2 TACH FAN2 TACH FAN1 CTL FAN1 CTL...

Page 200: ...J1 J1 I O SW 1 2 1 2 J2 J2 1 3 2 5 6 J3 J3 4 PI1 PI2 Power Subrack AC DC or DC48 AC DC or DC48 J4 J4 7 DCD1 APC Tailgate Clock Jumper Jumper Control Panel DCD2 Fan Box 2 Drawer Connector Drawer Conne...

Page 201: ...J1 J1 J2 J2 J5 PI1 PI2 J5 TB1 DCD 1 DCD 2 TB1 Logic Subrack Power Subrack J1 J1 J2 J2 48V CP5 CP1 CP4 CP2 CP3 CP3 CP2 CP4 CP1 CP5 CP6 CP6 INTER LOCK Drawer Connector Drawer Connector INTER LOCK ACDC...

Page 202: ...4 25 POWER OFF BATTERY TEST AC GOOD DC HDW GOOD BAT EXH REQD BATTERY RUNNING INTERF DISABLE ACDC PRESENT RESET APC GOOD COOLING A STATUS COOLING B STATUS GND FAILURE POWER OFF BATTERY TEST AC GOOD DC...

Page 203: ...23 24 25 FAN 2 TACH FAN 2 CTL 48V SENSE FAN1 TACH 48 RET SENSE DCD1 48V DCD1 RETURN DCD2 48V DCD1 48V DCD2 RETURN DCD1 RETURN DCD2 48V DCD2 RETURN 48 RET SENSE 48V1 SENSE 48V1 SENSE 48V2 SENSE 48V2 S...

Page 204: ...20 2 N 2 OFFICE CLK IN 120 2 N 1 OFFICE CLK IN 120 1 N 2 OFFICE CLK IN 120 1 N 1 OFFICE CLK IN 120 1 P 2 OFFICE CLK IN 120 1 P 1 OFFICE CLK IN 120 2 P 2 OFFICE CLK IN 120 2 P 1 OFFICE CLK IN 75 2 P 2...

Page 205: ...Appendix A Schematics A 11...

Page 206: ...A 12 2220 Models 300 500 and 501 Service Guide...

Page 207: ...Use the following figure to identify the LED segments Lighted Select the status column according to the Clock or Clock redrive status then locate the LED segments lighted with letters Figure B 1 Clock...

Page 208: ...LIC514 LIC516 Wrap Plug 1 57G8097 ARC X 21 Wrap Plug 1 80G3744 LIC513 LIC515 LIC523 LIC545 or LIC562 Wrap Plug 1 57G8093 LIC517 Wrap Plug 1 80G2221 LIC522 Wrap Plug 1 57G8096 LIC530 Wrap Plug 1 57G809...

Page 209: ...Power Consumption Table C 2 shows the base machine and modules power consumption Table C 2 Page 1 of 2 Base Machine and Module Power Consumption Types Feature Code Consumption Watt Base machine 2220...

Page 210: ...6 5517 5522 5525 5523 5530 5544 5545 5546 5551 5552 5553 5554 5555 5556 5562 5567 9 17 23 18 19 18 20 26 0 43 41 40 36 53 40 26 26 26 20 24 Line Connection Box with 10m RVX cable 15 x V 24 ARCs 100m R...

Page 211: ...gs and illustrations of all replaceable assemblies subassemblies and detail parts for the 2220 and IBM Rack This information is used by stock and maintenance personnel to identify requisition and issu...

Page 212: ...r index shown with the part refer to the accompanying listing to obtain the part number description and quantity PERFORM STEPS PERFORM STEPS WHEN ASSEMBLY NAME IS KNOWN WHEN PART NUMBER IS KNOWN A A E...

Page 213: ...bject to frequent changes If two or more assemblies contain a majority of identical parts they are combined in the same listing Parts common to assemblies are illustrated and listed by one index numbe...

Page 214: ...M 1 FAN ASM See ASM 2 Contrrol Panel ASM See ASM 2 Board ASM See ASM 4 DC Power Supply ASM See ASM 3 AC DC Power Supply ASM See ASM 3 Power Attachment Cord see ASM 9 Internal Cables See ASM 7 D 4 2220...

Page 215: ...37 U Rack Visual Index Extender See ASM 8 Rack ASM See ASM 8 Gate See ASM 8 LCBB LCBE See ASM 6 Cover See ASM 8 Power Attachment Cord see ASM 9 Appendix D Parts Catalog D 5...

Page 216: ...ck Visual Index Rear See ASM 12 Top Front and Rear Covers See ASM 10 Details See ASM 11 LCBB LCBE See ASM 6 Side Covers See ASM 9 Power Attachment Cord see ASM 9 D 6 2220 Models 300 500 and 501 Servic...

Page 217: ...Catalog Section Appendix D Parts Catalog D 7...

Page 218: ...Assembly 1 2220 Enclosure Assembly Models 300 500 and 501 1 2 D 8 2220 Models 300 500 and 501 Service Guide...

Page 219: ...Asm Part Index Number Units Description 1 NONE REF Enclosure Assembly Models 300 500 and 501 1 80G3810 1 Enclosure Logic 2 57G7755 1 Enclosure Power Appendix D Parts Catalog D 9...

Page 220: ...Assembly 2 2220 Control Panel and FAN Box Assembly 2 1 3 4 5 D 10 2220 Models 300 500 and 501 Service Guide...

Page 221: ...1 NONE 1 OP Panel Card 2 57G7771 1 Panel 3 57G7950 1 Overlay English 3 57G7951 1 Overlay French 3 57G7952 1 Overlay German 3 57G7953 1 Overlay Italian 3 57G7954 1 Overlay Spanish 3 57G7955 1 Overlay J...

Page 222: ...Assembly 3 2220 AC DC and DC Power Supply Assembly 1 3 2 4 5 D 12 2220 Models 300 500 and 501 Service Guide...

Page 223: ...nd DC Power Supply Assembly 1 80G3978 1 AC DC Power Supply Labels 2 80G4478 1 Battery Back up Labels 3 80G4441 1 DC 48V Power Supply 3 57G7934 1 Power Cord DC 48V 4 57G7631 1 Front Bracket 5 4796653 6...

Page 224: ...Assembly 4 2220 Board Assembly 2 3 1 8 7 5 6 4 Front View Rear View D 14 2220 Models 300 500 and 501 Service Guide...

Page 225: ...mbly 1 NONE 1 Board Assembly 2 57G7629 1 Cover Plate 3 57G7782 14 Special Screw M4 4 5767855 1 Cover Plate 5 80G3877 2 Cable Routing Bar 6 43G3084 16 Scew Hex MD M6 X 8 7 57G7873 1 Cover Plate 8 47966...

Page 226: ...Assembly 5 2220 Modules 1 2 D 16 2220 Models 300 500 and 501 Service Guide...

Page 227: ...Asm Part Index Number Units Description 5 NONE REF Modules 1 80G4866 1 Power Module Upper Position A 2 80G4867 1 Power Module Lower Position B Appendix D Parts Catalog D 17...

Page 228: ...Assembly 6 LCBB and LCBE Assembly 7 6 5 6 1 2 3 4 LCBB LCBE 14 13 12 13 8 9 10 11 D 18 2220 Models 300 500 and 501 Service Guide...

Page 229: ...3 1621170 4 Screw Pan HD M3 X 6 LG 4 63F2498 1 Panel 5 63F2501 1 Isolation Foil 6 65X8654 8 Rivet 7 61F4592 1 Cover 8 NONE REF Enclosure LCBE 9 NONE REF Power SMU LCPE 10 1621170 4 Screw Pan HD M3 X 6...

Page 230: ...Assembly 7 Internal Cables Assembly Rear View 1 2 3 4 D 20 2220 Models 300 500 and 501 Service Guide...

Page 231: ...ndex Number Units Description 7 NONE REF Internal Cables Assembly 1 80G3890 1 Panel Control Cable 2 57G7640 1 Fan Box Cable 3 57G7767 1 OP Panel Cable 4 57G7639 1 DC Control Cable Appendix D Parts Cat...

Page 232: ...Assembly 8 37 U RACK Assembly FRONT 1 2 4 3 5 5 6 7 8 9 10 11 12 13 14 15 16 17 D 22 2220 Models 300 500 and 501 Service Guide...

Page 233: ...rews 11 43G3111 2 Slides 30 kg Delivered by 2 11 43G3112 2 Slides 130 kg Delivered by 2 12 43G3094 2 EMC Kickplate with mounting elements Front and Rear EMC Kickplate are same 13 43G3071 1 EMC Plain D...

Page 234: ...Assembly 9 29 U RACK Assembly Side Covers 1 2 3 5 6 4 D 24 2220 Models 300 500 and 501 Service Guide...

Page 235: ...ption 9 NONE REF 29 U RACK Assembly 1 26L0276 1 Left Covert 2 26L0276 1 Right Cover 3 11F6274 4 Bumper Delivered by 4 4 72F1154 4 Plate Delivered by 4 5 72F1023 4 Caster Delivered by 4 6 1621229 16 Sc...

Page 236: ...10 29 U RACK Assembly Top Rear and Front Covers Front View Detail B for Rear Cover Detail A for Front Cover 9 8 2 See Detail B See Detail A 3 1 10 6 11 5 4 7 6 D 26 2220 Models 300 500 and 501 Servic...

Page 237: ...sembly 1 26L0270 1 Frame Assembly 2 26L0277 1 Top Cover 3 1621210 4 Screw 4 26L0275 1 Rear Cover 5 6496006 2 Shaft 6 26L0274 1 Front Cover 7 6496006 2 Shaft 8 42L2870 1 Cover 9 1621309 6 Screw 10 42L2...

Page 238: ...Assembly 11 29 U RACK Assembly Details 2 2 6 5 5 11 10 12 8 7 9 4 6 7 1 3 3 See Detail B See Detail A Detail A Detail B Front View D 28 2220 Models 300 500 and 501 Service Guide...

Page 239: ...ame Rack Assembly 2 6495763 4 Bracket Delivered by 4 3 1621210 8 Screw 4 26L0272 2 Vertical Bar 5 1621230 20 Screw 6 1622348 10 Lock Washer 7 6496007 2 Bracket 8 1621210 4 Screw 9 6406241 2 Latch 10 6...

Page 240: ...Assembly 12 29 U RACK Assembly Rear Side 2 1 Rear View D 30 2220 Models 300 500 and 501 Service Guide...

Page 241: ...Asm Part Index Number Units Description 12 NONE REF 29 U RACK Assembly 1 26L0278 1 Cable Retainer 2 6398807 2 Wing Nut Appendix D Parts Catalog D 31...

Page 242: ...achment Cord Assembly 250 V 15 A 250 V 16 A 250 V 15 A 250 V 16 A 250 V 16 A 250 V 15 A 250 V 15 A 250 V 16 A 250 V 16 A 250 V 16 A 250 V 18 A 22 25 29 10 18 32 34 46 49 54 5 D 32 2220 Models 300 500...

Page 243: ...1554 REF Power Attachment Cord 4 30 m 22 14F1557 REF Power Attachment Cord 4 30 m 25 14F1560 REF Power Attachment Cord 4 30 m 29 14F1553 REF Power Attachment Cord 4 30 m 32 14F1561 REF Power Attachmen...

Page 244: ...D 34 2220 Models 300 500 and 501 Service Guide...

Page 245: ...6 D 15 43G3086 8 10 D 23 43G3087 8 2 D 23 43G3094 8 12 D 23 43G3096 8 8 D 23 43G3101 8 16 D 23 43G3105 8 14 D 23 43G3107 8 15 D 23 43G3111 8 11 D 23 43G3112 8 11 D 23 43G3117 8 9 D 23 43G3118 8 7 D 2...

Page 246: ...E 2 2220 Models 300 500 and 501 Service Guide...

Page 247: ...6275 SY33 2129 P N 42L2846 2220 Nways BroadBand Switch Models 300 500 and 501 Safety Information GA33 0401 P N 80G4908 Nways 2220 Switch Manager Publications IBM Nways 2220 Switch Manager for AIX Inst...

Page 248: ...X 2 2220 Models 300 500 and 501 Service Guide...

Page 249: ...pter can be associated with a voice server extension VSE ADPCM Adaptive differential pulse code modulation AIS Alarm indicator signal AIX Advanced Interactive Executive alarm and power control APC In...

Page 250: ...a leased line It transports information with a constant bit rate at the source and destination The traffic can be PCM voice video fax multimedia or real time synchronous data such as BSC CLIP Calling...

Page 251: ...ields and push buttons Also called dialog DLCI Data link connection identifier DNPT Destination numbering plan table DSP Digital service processor DSU Data service unit DTE Data terminal equipment DTM...

Page 252: ...IE Information element ILMI Interim local management interface IMU Inverse multiplexing unit Integrated Digital Network Exchange IDNX A processor integrating voice data and image applications It also...

Page 253: ...CES protocol A logical port sets up and maintains its predefined connections logical trunk Also called NBBS trunk A logical resource generated by the Nways Switch Control Program to provide transport...

Page 254: ...in a network management station to manage Nways Switches routers and bridges in a 2220 network see 2220 Nways Switch Manager Nways Switch Synonym for 2220 Nways BroadBand Switch Nways Switch administ...

Page 255: ...k PSTN Public switched telephone network PTF Program temporary fix PTM Packet transfer mode PTNX Private telecommunications network exchange pulse code modulation PCM A standard adopted for the digita...

Page 256: ...C System reference code SSN Send sequence number station A microcomputer that is connected to a host or a network and at which a user can run applications STM 1 Synchronous transport module type 1 STS...

Page 257: ...NI A standardized interface between a user and a communication network UTC Universal time coordinated UUS User user signaling VBR Variable bit rate VC Virtual channel VCC Virtual channel connection VC...

Page 258: ...unts for the other interfaces of the group until a free one is found X 25 network interface A logical resource generated by the Nways Switch Control Program to provide access services to a physical X...

Page 259: ...isplay the control program inventory and level 3 22 how to display 3 8 3 11 3 13 Alarm Desk 3 11 CMIP status 3 8 configuration 3 13 test event desk 3 18 how to find a TCP IP address 3 20 how to perfor...

Page 260: ......

Page 261: ...your comments concerning this book We will greatly appreciate them and will consider them for later releases of the present book If you prefer sending comments by FAX or electronically use FAX 33 4 9...

Page 262: ...We d Like to Hear from You SY33 2121 01 IBM Fold and Tape Please do not staple Fold and Tape PLACE POSTAGE STAMP HERE IBM France Centre d Etudes et Recherches Service 0798 BP 79 06610 La Gaude France...

Page 263: ......

Page 264: ...IBM Part Number 02L4247 Printed in Denmark by IBM Danmark A S 2L4247 SY33 2121 1...

Reviews: