


Firmware Upgrades
217
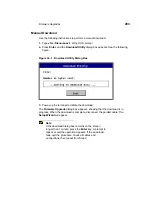
3. Using the SNMP/Network Administrator dialog box, verify that the community
and set community names for the terminal match the community and set
community names in the SNMP manager.
Note
You can set the Set Community name for a terminal if
you have DHCP enabled by setting DHCP Option 164
to the set community name your SNMP manager uses.
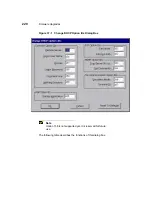
4. Using your SNMP manager:
a. Go to 1.2.3.8.1.2 (wbt3UpDnLoadTable).
b. Go to 1.2.3.8.1.2.1.2 (wbt3UpDnLoadID), user defined string.
Note
The above is used in traps to identify the download
operation.
c. Go to 1.2.3.8.1.2.1.3 (wbt3UpDnLoadOp), and set its value to
1 (Download).
d. Go to 1.2.3.8.1.2.1.4 (wbt3UpDnLoadSrcFile), and set its value to the
absolute path of the directory where the image file and params.ini are
located.
e. Go to 1.2.3.8.1.2.1.6 (wbt3UpDnLoadFileType), and set its value to 0
(Binary).
f. Go to 1.2.3.8.1.2.1.7 (wbt3UpDnLoadProtocol), and set its value to 0 or 1
(FTP or TFTP).
g. Go to 1.2.3.8.1.2.1.8 (wbt3UpDnLoadFServer), and set its value to the IP
address or DNS name of the FTP or TFTP server.
h. Go to 1.2.3.8.1.4 (wbt3SubmitLoadJob), and set its value to
1 (Ready).
Step 4h will initiate an SNMP upgrade to your terminal. If the download is
configured properly, the new image will download and the terminal will reboot
automatically.
Refer to Chapter 31, FTP Pull Firmware Upgrades, to view the dialog boxes that
display during the process.
Summary of Contents for Compaq t1010
Page 1: ...T1000 T1010 Series Windows based Terminal Administrators Guide Software Version 3 5 ...
Page 25: ...Terminal Installation 1 Model T1000 Terminal Installation 2 Model T1010 Terminal Installation ...
Page 27: ...4 Terminal Installation Figure 1 1 T1000 Terminal Back Panel Connectors ...
Page 33: ...10 Terminal Installation Figure 2 1 T1010 Terminal Back Panel Connectors ...
Page 44: ...22 Advanced User Interface Figure 3 5 Desktop and Keyboard Settings Dialog Box ...
Page 103: ...Connection Configuration 85 Figure 11 3 Dial Up Configuration Wizard 3 ...
Page 159: ...148 External Devices Figure 21 1 Devices Properties Sheet ...
Page 167: ...156 External Devices Figure 23 1 Uninstall Dialog Box ...
Page 189: ...External Devices 179 Figure 28 5 Printer Properties Dialog Box Layout Tab ...
Page 192: ...External Devices 183 Figure 29 2 Printers Properties Sheet ...