


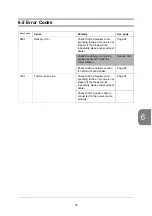

79
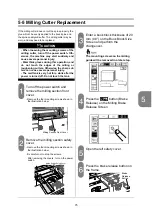
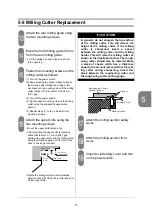
5-6 Roughening Cutter Replacement
Remove the two roughening cut-
ters.
(1) Press the brake release button on the
machine.
(2) Keep pressing the brake release button on
the machine and rotate the milling cutter
clockwise until the roughening cutter you want
to remove comes to the right side of the open-
ing (shown below).
(3) Turn off the power switch.
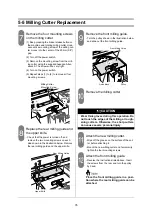
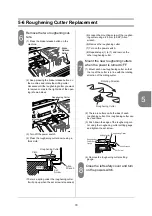
(4) Press the roughening cutter down using a
thick cloth.
(There is a spring under the roughening cutter.
It will pop up when the set screw is loosened.)
(5) Loosen the mounting screw of the roughen-
ing cutter using a 2.5 mm (0.098”) Allen
wrench.
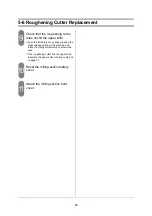
(6) Remove the roughening cutter.
(7) Turn on the power switch.
(8) Repeat steps (1) to (7) and remove the
other roughening cutter.
Mount the new roughening cutters
when the power is turned OFF.
(1) Mount each new roughening cutter so that
the top of the cutter is in line with the rotating
direction of the milling cutter.
(2) There are cutters on both sides of each
roughening cutter. One roughening cutter can
be used twice.
(3) Push down the edge of the roughening cut-
ter using the roughening cutter setting gauge
and tighten the set screw.
(4) Remove the roughening cutter setting
gauge.
Close the left safety cover and turn
on the power switch.
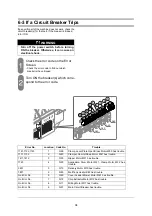
Brake
Release
Button
Roughening Cutter
Clockwise
Roughening Cutter
Set
Screw
Spring
Allen
Wrench
Cloth
Rotating Direction
Roughening Cutter
Roughening Cutter
Milling Cutter
Roughening
Cutter Setting
Gauge
Set Screw
Spring
Allen Wrench
Summary of Contents for BQ-270
Page 60: ...54...
Page 102: ...96...
Page 120: ...114 9 4 Option Extractor VS 270 1 pc Weekly Timer 1 pc...