


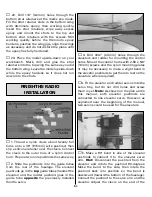


empty fuel tank, have an assistant lift the model
at the balance point you marked on the bottom
of the top wing.
Hint:
Instead lifting the model
with his finger tips, have your assistant use the
eraser end of a pencil held in each hand to lift
the model (be certain the erasers are positioned
on the line
near the ends
of the center panel
under the ribs inside). This will improve the
accuracy of the C.G. procedure.
❏
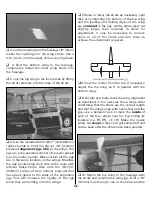
3. While your assistant is holding the model
at the balance point, view the model from the
side. (If viewing the model from the front as you
would be if doing this procedure by yourself,
detecting whether or not the fuselage is level
would be difficult. Viewing the model from the
side provides a much better perspective.) If the
fuselage is not level as shown in the photo, the
C.G. must be corrected. If the tail is low, the
model is “tail heavy” and the battery pack
and/or receiver must be shifted forward or
weight must be added to the nose to balance. If
the nose is low, the model is “nose heavy” and
the battery pack and/or receiver must be shifted
aft or weight must be added to the tail to
balance. If adding additional weight, nose
weight may be easily added by using a “spinner
weight” (GPMQ4645 for the 1 oz. [28g] weight,
or GPMQ4646 for the 2 oz. [57g] weight). If
spinner weight is not practical or is not enough,
use Great Planes (GPMQ4485) “stick-on” lead. A
good place to add stick-on nose weight is to the
firewall or fuselage sides (don’t attach weight to
the cowl–it is not intended to support weight).
Begin by placing incrementally increasing
amounts of weight on the top of the fuse over
the firewall until the model balances. Once you
have determined the amount of weight
required, it can be permanently attached. If
required, tail weight may be added by cutting
open the bottom of the fuse and gluing it
permanently inside.
Note:
Do not rely upon the adhesive on the
back of the lead weight to permanently hold it
in place. Over time, fuel and exhaust residue
may soften the adhesive and cause the weight
to fall off. Use #2 sheet metal screws, RTV
silicone or epoxy to permanently hold the
weight in place.
❏
4.
IMPORTANT:
If you found it necessary to
add any weight, recheck the C.G. after the
weight has been installed.
❏
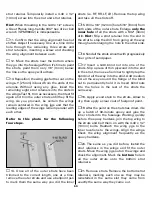
1. With the wings level, have an assistant help
you lift the model by the engine propeller shaft
and the bottom of the fuse under the TE of the
fin. Do this several times.
❏
2. If one wing always drops when you lift the
model, it means that side is heavy. Balance the
airplane by adding weight to the other wing tip.
An airplane that has been laterally
balanced will track better in loops and
other maneuvers.
No matter if you fly at an AMA sanctioned R/C
club site or if you fly somewhere on your own,
you should always have your name, address,
telephone number and AMA number on or
inside your model. It is
required
at all AMA R/C
club flying sites and AMA sanctioned flying
events. Fill out the identification tag on the
decal sheet and place it on or inside your model.
Follow the battery charging instructions that
came with your radio control system to charge
the batteries. You should always charge your
CHARGE THE BATTERIES
IDENTIFY YOUR MODEL
PREFLIGHT
BALANCE THE MODEL
LATERALLY
57
Summary of Contents for Dynaflite S.E.5a
Page 9: ...9 Die Drawing...
Page 10: ...10 Die Drawing...


