


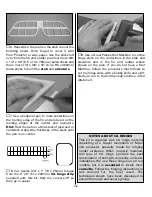


30" [2.4 x 4.8 x 760mm] balsa stick. Glue the cap
strips to the rails next to the hatch.
❏ ❏ ❏ ❏
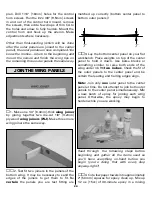
5. Mount the aileron servo to two 3/8"
x 3/4" x 3/4" [9.5 x 19 x 19mm] basswood
servo
mount blocks
by drilling 1/16" [1.6mm] holes
into the blocks. Run the servo screws (that came
with the servo) in and out of the holes in the
blocks a few times to form some “threads.”
Remove the screws, add a few drops of thin CA
to the holes and allow to
fully
harden. Mount
the servo to the blocks with the screws.
❏ ❏ ❏ ❏
6. Make a one-arm servo arm by
cutting off three of the arms. Install the arm on
the servo.
❏ ❏ ❏ ❏
7. Use a ballpoint pen to mark the
forward edge of the aft servo hatch rail onto the
inside of the hatch. Remove the hatch cover
from the wing. Use 30-minute epoxy to securely
glue the servo mount blocks to the hatch with
the servo arm centered in the slot. Be certain
the aft servo block is not over the line depicting
the aft servo hatch rail.
❏ ❏ ❏ ❏
8. While the epoxy is hardening and
the hatch is out of the wing panel, add a few drops
of thin CA to the screw holes in the hatch rails.
❏ ❏ ❏ ❏
9. After the epoxy hardens, mount the
hatch with the servo to the wing. Glue the die-
cut 1/8" [3.2mm] plywood
top
and
bottom
control horn mounts (TCH, BCH)
into position.
You may return to the beginning of this section
and mount the servos in the remaining three
outer panels now, or continue with the first
panel and proceed to the wing tip.
❏ ❏ ❏ ❏
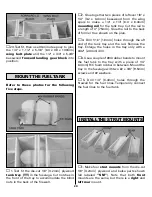
1. Working over the plan, glue both
parts of the die-cut 1/8" [3.2mm] balsa
wing
tips (WT)
together.
BUILD THE WING TIPS
21
Summary of Contents for Dynaflite S.E.5a
Page 9: ...9 Die Drawing...
Page 10: ...10 Die Drawing...


