USER MANUAL
Hill-Rom® P500 Therapy Surface
Product No. P005723 and P005787
158251 REV 3
Page 1: ...USER MANUAL Hill Rom P500 Therapy Surface Product No P005723 and P005787 158251 REV 3...
Page 2: ......
Page 3: ...ed trademark of NanoHorizons Inc Advanced Microclimate Advanta and RemindMe are trademarks of Hill Rom Services Inc Advance CareAssist Hill Rom nano Ag and Resident are registered trademarks of Hill R...
Page 4: ...ii Hill Rom P500 Therapy Surface User Manual 158251 REV 3...
Page 5: ...isinfect 7 Clean and Disinfect the P500 and Advanced Microclimate Technology AMT Coverlet 7 Machine Wash the AMT Coverlet 8 Maintenance 10 Service Calls 10 Unit Removal and Storage 10 Discard the Unit...
Page 6: ...31 Fracture Frame 32 Siderails 32 Reverse Trendelenburg 33 Troubleshooting 33 An Error Shows on the Display the Light Bar is Solid Orange or Flashing Orange 33 The Unit Does Not Go into Turn Assist M...
Page 7: ...NOTE sets apart special data or important instruction clarification WARNING RELATIVE CONTRAINDICATION or CAUTION A WARNING identifies situations or actions that may have an effect on user safety To ig...
Page 8: ...necessary when this product is used by or near children or invalids 2 Use this product only for its intended use as described in this manual Do not use attachments not recommended by the manufacturer...
Page 9: ...ld cause serious injury to the occupant WARNING Use oxygen administering equipment of the nasal mask or ventilator type only Do not use this product with oxygen tents To do so could cause injury or eq...
Page 10: ...ard Use and position of bed accessories and other devices on the bed such as the control unit may affect stability Do not exceed the bed s safe working load For the weight of the control unit and surf...
Page 11: ...ution so the control unit does not fall off the cart or surface Failure to do so may cause injury or equipment damage The control unit is most stable when it is lying with its backside down The contro...
Page 12: ...actices could cause death or serious injury WARNING Failure to unplug the bed and control unit from their power sources before you clean or disinfect the bed frame and surface could cause injury or eq...
Page 13: ...o remove difficult spots or stains we recommend that you use standard household cleansers and a soft bristle brush To loosen heavy dried on soil you may first need to saturate the spot Disinfect When...
Page 14: ...or disinfectant and rinse with warm water 8 Let the surface and or coverlet completely air dry 9 If the surface was removed install it on the bed Go to Install the P500 on page 25 Machine Wash the AMT...
Page 15: ...he coverlet Air dry or select a low or non heat dry cycle such as air fluff High temperatures could destroy the coating that makes the coverlet waterproof yet breathable 3 Use the lowest temperature s...
Page 16: ...er label is on the control unit next to the hose connector When you give the serial number the Hill Rom representative can identify your unit and give you the information you need more quickly Unit Re...
Page 17: ...an outer surface that is green with or without yellow stripes is the grounding wire Check with a qualified electrician or serviceman if the grounding instructions are not completely understood or if i...
Page 18: ...Manual 158251 REV 3 If it is necessary to use an extension cord use only a three wire extension cord that has a three blade grounded plug and a three slot receptacle that accepts the plug on the prod...
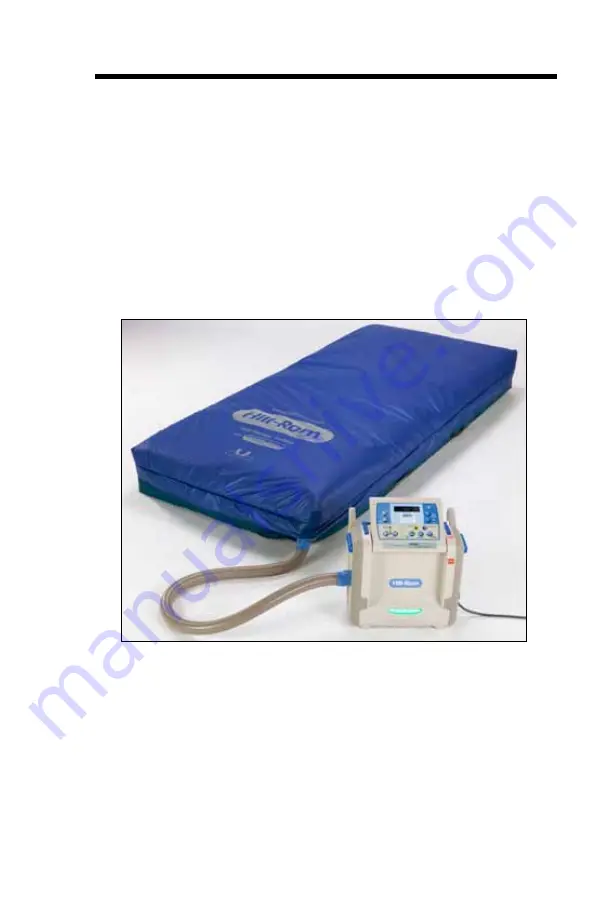
Page 19: ...ous injury The P500 surface is a finished size of 35 5 90 cm wide by 84 213 cm long with a thickness of 8 20 cm The surface is designed for use on pan deck frames that accommodate this surface size it...
Page 20: ...rs the occupant s weight see Set Up the System for Occupant Placement on page 27 Power Switch The power switch turns the control unit on and off The switch is next to power cord connector on the left...
Page 21: ...es on and the light bar is green Light Bar WARNING The occupant should not be on the surface if the light bar is flashing orange because of a system error Injury could occur When the control unit is c...
Page 22: ...nd shows the results of your selections entered weight alarm times etc Controls Lockout The lockout control on the control panel locks out all of the controls on the control panel The lockout control...
Page 23: ...hat are turned on and off through the control panel These alarms do not connect to the bed frame alarms or to a facility network When the surface is in an alarm state these will occur An audible alarm...
Page 24: ...ts appropriately Failure to do so could cause serious injury or death Turn the alarm on or off press the control When the alarm is on the control s indicator stays on Head Alarm When the Head Alarm is...
Page 25: ...surface will go into an alarm state Off press the control until the indicator goes off Alarm Volume Settings The alarms have three levels of volume low medium and high The default volume level is hig...
Page 26: ...Down arrows to engage the feature 2 Press the section Up or Down arrow until you reach the applicable pressure level When you set the Comfort Adjust levels the settings will stay at those levels in th...
Page 27: ...rol Off if you want to stop the Max Inflate mode before the 30 minutes have passed press the Normal control until its indicator comes on Turn Assist WARNING Before you put the surface into the Turn As...
Page 28: ...omes on When the Turn Assist mode is on the surface turns the occupant to the applicable side beeps one time and then holds the occupant in the turned position During the turn period help support the...
Page 29: ...r punctures and can cause the air system to fail Caregivers should be instructed to prevent bladder punctures caused by needle sticks and incorrect use of x ray cassette holders The sleep surface shou...
Page 30: ...h SmartSilver Ions supplies surface protection as an antimicrobial that kills 99 8 of stain and odor causing bacteria on the surface This product is not intended to protect users or others against bac...
Page 31: ...l unit to the surface To help keep the hose assembly off the floor a hose hanger is on the hose assembly and can be attached to one of the hooks on the bottom of the control unit Install the P500 1 Fo...
Page 32: ...h or around any bed frame areas that would prevent the bed from articulating If the bed frame has footboard controls you install the control unit so that you can view and get access to the footboard c...
Page 33: ...is away from the bed mechanisms All functions of the P500 operate correctly Refer to Control Unit Features and Use on page 14 All functions of the bed frame operate correctly Refer to the bed manufac...
Page 34: ...plus control c Press the plus or minus control to change the weight shown on the display NOTE To quickly change the weight dimension press and hold the plus or minus control NOTE If the system has be...
Page 35: ...refer to the bed manufacturer s user documentation Transport the Occupant on the Unit 1 Press the Power switch to Off 2 Disconnect the control unit from its power source The surface will stay at its...
Page 36: ...Connect the hose assembly to the surface c Connect the unit to an applicable power source and then go to Set Up the System for Occupant Placement on page 27 Loss of Power If the power to the unit is...
Page 37: ...have been evaluated for fit and function with the P500 installed For the latest list of approved bed frames contact Hill Rom Technical Support For use on a bed frame not approved by Hill Rom evaluate...
Page 38: ...ate occupants for entrapment risk according to facility healthcare protocol and monitor occupants appropriately Make sure all siderails are fully latched when in the raised position Failure to do eith...
Page 39: ...the Display the Light Bar is Solid Orange or Flashing Orange If an error shows on the display and the light bar is solid orange call Hill Rom Technical Support for assistance as soon as possible If a...
Page 40: ...product MEDICAL ELECTRICAL EQUIPMENT CONFORMS TO UL Std 60601 1 IEC60601 1 4 and CERTIFIED TO CAN CSA Std C22 2 NO 601 1 Scope P500 Therapy Surface Protective earth ground Recycle the product in accor...
Page 41: ...Max Inflate mode Turn Assist mode Left and Right con trols starts or stops the Turn Assist mode Confirm Rails Up control must be pressed for the Turn Assist mode to start Comfort Adjust control lets y...
Page 42: ...ntrol turns off an alarm s sound for 30 minutes Volume control changes the alarm vol ume There are three levels low medium and high lb kg control changes the weight shown on the display from pounds to...
Page 43: ...ed at maxi mum pressures for a flat deck bed such as the Advanta Bed or Advance Series Bed 8 20 cm Surface weight 45 lb 2 lb 20 kg 1 kg Control unit weight 30 lb 2 lb 14 kg 1 kg Recommended therapeuti...
Page 44: ...nical and Quality Assurance Standards UL 60601 1 CSA C22 2 No 601 1 IEC 60601 1 IEC 60601 1 2 IEC 60601 1 4 ISO 13485 IEC 60601 1 Classification According to Degree of Protec tion against Electric Sho...
Page 45: ...surgical equipment this could be an indication of electromagnetic interference If such behavior occurs the user should try to move the interfering equipment further from this device WARNING The P500 s...
Page 46: ...nce RF Emissions CISPR 11 Group 1 The P500 uses RF energy only for its internal functions Therefore its RF emissions are low and are not likely to cause any interference in nearby electronic equipment...
Page 47: ...t Surge IEC 61000 4 5 1 kV Line s to Line s 2 kV Line s to Earth 1 kV Line s to Line s 2 kV Line s to Earth Mains power quality should be that of a typical commercial or hospital environment Voltage D...
Page 48: ...electromagnetic site sur vey a should be less than the compliance level in each frequency range b Interference may occur in the vicinity of equipment marked with the following sym bol a Field strength...
Page 49: ...smitter W Separation distance according to frequency of transmitter m 150 kHz to 80 MHz d 1 2 P 80 MHz to 800 MHz d 1 2 P 800 MHz to 2 5 GHz d 2 33 P 0 01 0 12 0 12 0 23 0 1 0 38 0 38 0 73 1 1 2 1 2 2...
Page 50: ...nnected to the control unit and the surface Select Yes Select Mattress Deflate Select Configurations The display shows Rental Capital NOTES 1 The and controls move you through the menu items The lb kg...
Page 51: ...ls Up a reminder to make sure the sid erails are up for the Turn Assist mode You must press this control within two minutes before or after you press the Turn Assist control 21 E Out of Bed Alarm an a...
Page 52: ...nd Minus used as selectors for the display 17 L Lb kg changes the weight dimension shown on the display to lb or kg 17 M Lockout locks out all of the controls on the control panel It does not lock out...
Page 53: ......
Page 54: ...el 353 0 1 413 6005 Fax 353 0 1 413 6030 dublin sales hill rom com Italia Hill Rom S p A Tel 39 0 02 950541 Fax 39 0 02 95328578 Hill Rom Japan Tel 81 0 3 5715 3420 Fax 81 0 3 5715 3425 c o Hill Rom J...